Pages

Thursday, June 30, 2016

Review: UberChic Beauty collection 10, plus manicure!

(Press samples and affiliate links** ahead!)

Hello!

Today we're gonna take a look at UberChic Beauty's most recent collection release, collection 10! To start off the party, here's the video review I did for your viewing pleasure:


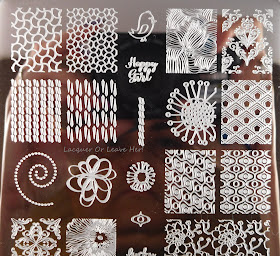
Let's take a closer look at the plates, starting with plate 10-01:


UberChic Beauty Plate 10-01

UberChic Beauty Plate 10-01

UberChic Beauty Plate 10-01

So much to love, where do I start?! My favorites on this plate are the carnations, the doodle flowers, the ribbon bow/flower, the chandelier-tear pattern, the deco pentagons, and that lacy mandala.


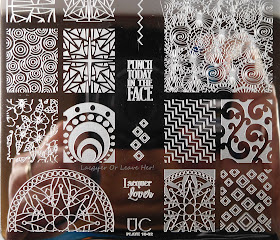
On to UberChic Beauty 10-02:
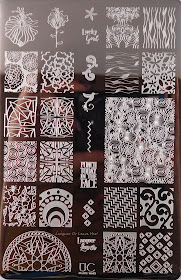

UberChic Beauty Plate 10-02

UberChic Beauty Plate 10-02

UberChic Beauty Plate 10-02


I love all the stained-glass looking designs on this plate--so much potential there. I love that flower in the upper left, even if I don't know what it's called. I love that she gave a scrollwork design that's a negative-space image so you can let your gorgeous polish shine from underneath, and I love the square-diamond pattern.


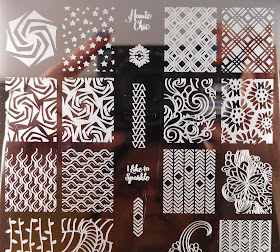
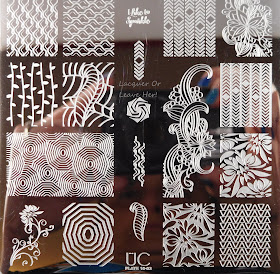
And our grand finale, 10-03:
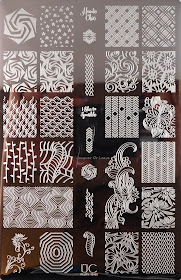

UberChic Beauty Plate 10-03

UberChic Beauty Plate 10-03

UberChic Beauty Plate 10-03

I am so excited about that pinwheel pattern, it's fun and crazy, in a good way! I also love the concentric polygons, and the lines of arrows--very cool for an edgier look.


UberChic Beauty has done all of the things I've come to expect here--coordinating isolated images to match the full-nail designs, images that take the same design and vary the size for more design options, and a mix of mirror-images and negative space vs. regular designs. There are flowers, geometrics, and other sorts of fun--basically any single plate, let alone any collection, gives you something for every mood.


Size matters! Here's a look at the relative size of the images:


And we all know what's really important is whether or not the images stamp well:


Okay, that last one looks janky, but it's not the plate's fault--I spilled polish everywhere. But, I like to show my first attempt in the video and wanted to show the image I stamped--so I apologize for the mess.


So, for my sample manicure, I was inspired by the interlocking circles-and-dots image on plate 10-02--when I was thinking about 4th of July manicures, it grabbed me because it looks like the swag they put on tables and bandstands at the county fair, so I thought I'd try to recreate that in 4th-of-July fair-weekend colors. I started with a skittle of Spellbound Nails Rocket's Red Glare and Twilight's Last Gleaming, and Literary Lacquers Stinky Little Truck. I added a coat of Spellbound Nails Comet, Then I stamped with Messy Mansion's Chalk stamping polish:
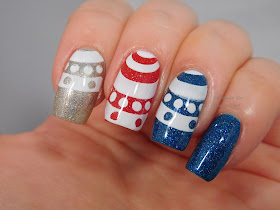

Spellbound Nails Rocket's Red Glare & Twilight's Last Gleaming + Literary Lacquers Stinky Little Truck + UberChic Beauty 10-02
Spellbound Nails Rocket's Red Glare & Twilight's Last Gleaming + Literary Lacquers Stinky Little Truck + UberChic Beauty 10-02

Spellbound Nails Rocket's Red Glare & Twilight's Last Gleaming + Literary Lacquers Stinky Little Truck + UberChic Beauty 10-02
Spellbound Nails Rocket's Red Glare & Twilight's Last Gleaming + Literary Lacquers Stinky Little Truck + UberChic Beauty 10-02

Okay, if I'm honest, this didn't quite capture the festive-banner swag sort of look I was hoping for. However, I do think it has a geometric coolness that creates a different sort of look still filled with patriotic love. What do you think--can you see the hanging swag?


You can find this collection and many other amazing plates in the UberChic Beauty shop, and don't forget to follow them on Instagram and Facebook for inspiration and updates.


Happy stamping!
M.

Wednesday, June 29, 2016

Review: Spellbound Nails Rocket's Red Glare and Twilight's Last Gleaming

(Purchased by me)

Hello nail lovelies!

Today I have two awesome polishes from Spellbound Nails that are perfect for 4th of July! When I saw how perfect they are for the holiday, I had to snap them up.

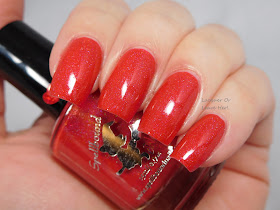
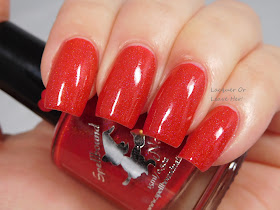
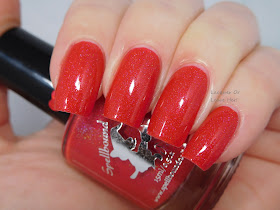
The first is Rocket's Red Glare, a gently candy-apple red linear holographic polish:


Spellbound Nails Rocket's Red Glare

Spellbound Nails Rocket's Red Glare

Spellbound Nails Rocket's Red Glare

Spellbound Nails Rocket's Red Glare

Spellbound Nails Rocket's Red Glare


I have on two coats here, although this is definitely a one-coater, and I also wore it as such. The formula and application on both polishes is sublime. The polishes dry to a semi-wax finish, so if you want a fully shiny look, you'll want topcoat (which I'm wearing here).


This is the perfect Americana red, I think--it's the color of cherry pie at a family barbeque, and the soft sprinkle of holo is a gorgeous subtle splash of sparkle. Beautiful on its own or perfect for any sort of seasonal nail art. Great for Christmas, too!


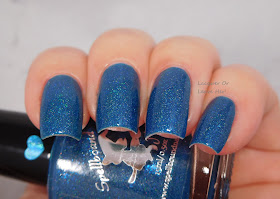
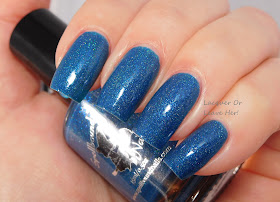
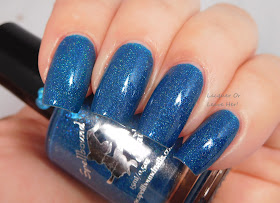
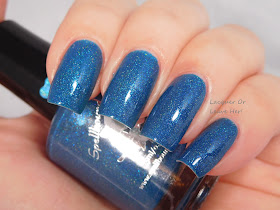
And then there's Twilight's Last Gleaming, a denim blue softly linear holographic polish:


Spellbound Nails Twilight's Last Gleaming

Spellbound Nails Twilight's Last Gleaming

Spellbound Nails Twilight's Last Gleaming

Spellbound Nails Twilight's Last Gleaming

Spellbound Nails Twilight's Last Gleaming

Spellbound Nails Twilight's Last Gleaming

This is also two coats with topcoat; the holo showed up a little more in these pictures, so you can see how gorgeous the flash is. This is such a great shade for 4th of July nail art, but also for denim nails, or any blue nail stuff you want to do. Such a versatile shade, and who can't use a little bit of holo magic to help them through the day?


I couldn't be happier for the polishes, just for every day use, and for my 4th of July art. I love the rich, saturated color (no staining for me with basecoat), and they were lovely to work with. Watch this space for some nail art with them...;-)


You can find both of these beauties in the Spellbound Nails shop; there is also a crelly and two glitter toppers in this collection that are perfect for the holiday, so check those out, too!

Happy polishing,
M.

Tuesday, June 28, 2016

Review: Incoco American Sweetheart collection

(Press samples ahead!)

Hello nail lovelies!

Are you ready to get your 4th of July on?? Incoco sent me a few selections from their American Sweetheart collection to review, and they're fun and perfect if you're on the go and don't have time to do you nail art by hand this holiday.

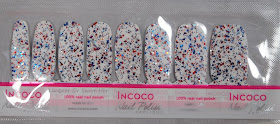
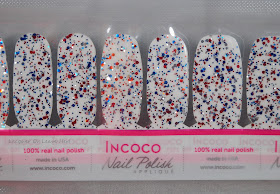
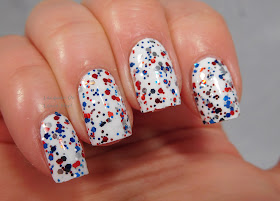
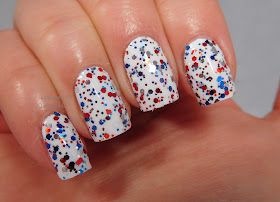
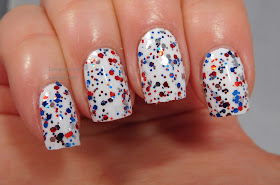
Let's start with Incoco American Spirit, a fun mix of red, blue, and silver glitters on a white base:

Incoco American Spirit

Incoco American Spirit

Incoco American Spirit

Incoco American Spirit

Incoco American Spirit

I've said it before and I'll say it again--I ADORE Incoco's glitter appliques. They go on as easily as the other strips, in one step versus at least three with glitter polish, and they come off with so much less fuss and muss. This is perfect just as is for any July 4th event (or any other event or country that features these colors), and is also a perfect base for nail art. I'll show you a mani with them in the next couple of days.


Next we have Incoco Home Of The Brave, which features the stars and stripes over a silver background:


Incoco Home Of The Brave

Incoco Home Of The Brave

Incoco Home Of The Brave
 
Incoco Home Of The Brave

Incoco Home Of The Brave


This set is an American flag for your nails, fast, easy, and festive. Mix 'n' match to your hearts content for a ton of different designs.


And finally, we have Incoco Showtime, an opalescent-white based set with a spray of fireworks across it:


Incoco Showtime


Incoco Showtime


Incoco Showtime

Incoco Showtime

The colors are a little more varied in this set, with magenta and light blue bursts, and I think you can use these for any occasion that features fireworks--trips to the fair, New Year's Eve, Guy Fawkes day, and of course, 4th of July. You can slap these puppies on without a plan, or you can be strategic about which colors you want to stand out where.


As always, these wraps went on quickly and easily, were temporarily removable when I didn't get it right the first time, and remove just as easily as polish from a bottle. I love the designs they chose for the collection--fun, bright, and patriotic.

You can find these sets on Incoco's website; you can find selected Incoco sets at Walgreen's and now at Walmart.

Happy wrapping!!
M.

Monday, June 27, 2016

Tutorial: Stamping Sandwich

(Plate is press sample)

Hello!

A while back I  reviewed three flakies from Indigo Bananas including Perfect Night (For Mystery & Horror):

Indigo Bananas Perfect Night (For Mystery & Horror)

Indigo Bananas Perfect Night (For Mystery & Horror)


The awesome layered flakies in this polish inspired me to try out a stamping sandwich with it, and I figured since I was doing it, I might as well walk you through the process. I think the key to a successful stamping sammich is the placement of the stamps that are going to be buried under layers of polish relative to the ones that will show more clearly.


For my stamping I chose Born Pretty Store plate BP-L014 and Hit The Bottle Polish Pool Party:

Born Pretty Store plate BP-L014


Step one: Put on a base layer of your polish.

Coat one of polish


Step two: place the stamp that you want to be the least visible. For my mani, I want the standard accent nails (ring and thumb) to be the center of the manicure, so I want those images to be the brightest. I want the images around them to pull the eye toward the accent nails rather than compete for attention, so I want the images to be less visible as they are farther from the ring finger (the thumb is naturally farther away from the other aspects of the design, so I don't have to worry about that. So, I want the two fingers next to the ring finger to be under only one layer of polish, and the image on my index finger to be under two layers of polish. To accomplish that, I stamp the index finger image first (the one I want to be the most buried):


Stamp the image you want to be least visible.


Step 3: Add another coat of polish.


Add that next coat of polish

Step 4: Stamp the images you want to have medium visibility. For my mani, I want the two fingers that are next to my main accent nail to have medium visibility:


Stamp the images you want to have medium visibility


Step 5: Add your next coat of polish.


Apply another coat of polish.

Notice how the index finger image is less bright than the images on the middle and pinkie?


Step 6: Stamp your final images, the ones that won't be covered with more base polish. Then add topcoat, clean up, and you're done!


Final stamping sandwich

Final stamping sandwich

Final stamping sandwich


Notice I also chose size and placement of the images that would frame the accent nail and pull the eye toward it as well.

What do you think? I love how the jelly turns the image more purple when it's under two coats of polish, but does a blurple thing under only one coat of polish. I love the way the flakies play with the image, and reflects the lacy-ness of it. Very happy with how it came out!

What do you think--are stamping sandwiches awesome?

Happy stamping,
M.