(Press samples ahead!)
Hello!
Charlie's Nail Art recently sent me these bold and beautiful red, black, and white striped nail wrap stickers for review:
 |
| Charlie's Nail Art Black Colour Stripe nail decals |
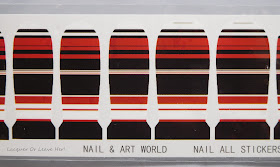 |
| Charlie's Nail Art Black Colour Stripe nail decals |
When I see the word 'sticker', I think of the peel-off and stick on concept, and I've reviewed that type of nail wrap before, so I jumped right in. After about three minutes of trying desperately to figure out how to get the decals to peel off the backing, I finally figured out that they were water decals!
I've worked with water decals before, but only as part of a nail design--this was my first time trying water decals for a full-on wrap. I wasn't quite sure what I was doing, but I learned from my mistakes as I went along, and have a few tips to share with you, because these are a very inexpensive way to get a fun nail look that you might not want to try to create by hand.
Step 1: Measure the decal.
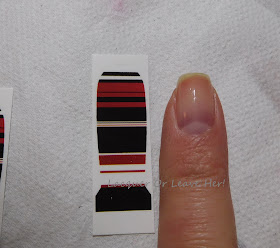 |
| Step 1: Measure the decal |
You'll notice that while there's some variation in size options, mostly the idea here is for the wrap to be bigger than your nail, and then for it to be cut down/cleaned up down to size. So take a look at the size closest to your nail and measure off what you're going to need to trim off. For the purposes of this test, I just trimmed the length, not the sides.
Step 2: Trim.
 |
| Step 2: Trim |
Cut the decal down to the size you need.
Step 3: Submerge under water.
 |
| Step 3: Submerge under water |
You only need to do this for a few seconds, although that might vary with the particular set...
Step 4: Slide off the decal.
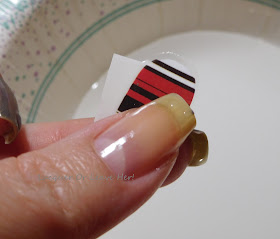 |
| Step 4: Slide off the decal |
...but you'll know you're done when the decal slides off with gentle pressure; just slide your finger over the top of the design and it will slide off the backing when ready.
Step 5. Dab off excess water.
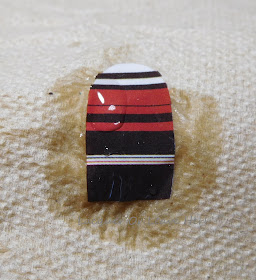 |
| Step 5. Dab off excess water |
You're going to gently press your design where you want it over the curve of your nail; if your design is too wet, it'll slide all over the place when you're positioning it on the nail. But, if it's too dry, it won't cling to the nail. Don't worry, if you dry it too much, you can always dunk it again.
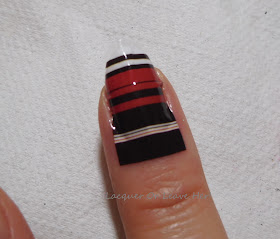
Step 6: Position your design.
 |
| Step 6: Position your design |
If the decal is a little wet, it will cling gently to the curve of your nail. This isn't a strong bond--it will move if you hit it--but it will stay in place enough for you to put on topcoat.
Step 7: Put on topcoat.
 |
| Step 7: Put on topcoat |
With single strokes (don't go over the same place multiple times), cover the decal. The topcoat will 'melt' your decal into place--you can see the tip melting in the picture. This will get out your wrinkles and will curl your tip--you may want to gently direct it under the tip, but be very, very gentle.
Step 8: Run around the outside with acetone on a clean-up brush.
 |
| Step 8: Run around the outside with acetone on a clean-up brush |
Give the topcoat 15-20 seconds to dry, and then go around the edge of the nail with a clean-up brush dipped in acetone. I found that if I tried to do this before I applied the topcoat, I got raggedy edges that were just not cute (see my picture below). But once the topcoat had set a little, I was able to clean up just like a normal polish and get a much cleaner edge.
Step 9: Finish your clean-up.
Once you have the excess separated from the nail, you can probably peel most of the excess right up with tweezers or an orange stick. If that doesn't work, continue on with acetone.
And, you're done! You can add another layer of topcoat if you want/need to smooth things out further, otherwise, you're done.
Here is a picture of my final manicure, and you can see my learning curve: I started with the middle finger, and didn't apply my topcoat before trying to separate the excess from the nail--you can see the edge is really raggedy. I did the ring finger next, and thought I'd help the curling along by running my clean-up brush along the edge, and the acetone just ate up the color--so I didn't do that again, lol. You can see by my pinkie I was doing pretty darn well, and by the time I finished up with my index finger, I was rockin' those decals out!
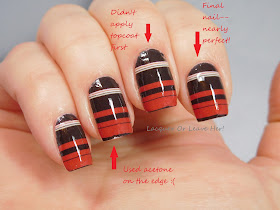 |
| My learning curve: applying water decal nail wraps |
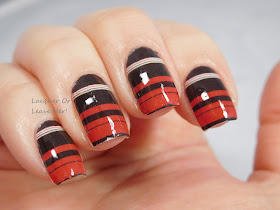 |
| My learning curve: applying water decal nail wraps |
So what do I think of water-decal wraps? They're a little bit more work than the stick-on version, but with a couple of tips it's not too bad at all--and for $1.18 a set, they're a very good option for those of us who have to watch our wallet. I've made a graphic to help you remember the steps if you want to try them out:
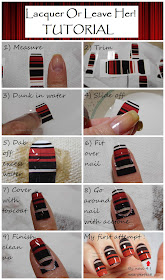 |
| Tutorial: applying water-decal nail wraps |
You can find these and lot of other designs in Charlie's Nail Art shop, and don't forget to use my code for 10% off your order: LOLAM10. You can also follow them on Facebook and Instagram for ideas and updates. :)
Happy wrapping!
M.

The design on the nail wraps are nice. I'm not a fan of these myself but your review and tutorial was very helpful.
ReplyDeleteThough there seems quite some learning curve, these still look pretty fun to use. Your tips will def make someone's life easier. :)
ReplyDeleteCool design too.