Pages

Friday, February 27, 2015

Review and test: My Online Shop JR-35

(Nothing to disclose)

Today I'm showing you a brand I've never tried before, My Online Shop. They've been around for a while, but you know how it is--so many plates, so little time. *sigh*

But I finally got two of these plates, and I'm starting off today with JR-35, because this month's theme in the Nail Challenge Collaborative is 'animals', and this is the most animalest plate I've ever seen. Yes, it's a word. I checked...>.>

Let's start with the video:


And here are the stills:

My Online Shop JR-35

My Online Shop JR-35

My Online Shop JR-35


And to give you a sense for how big the images are, here's the plate next to a standard Konad plate:


My Online Shop JR-35 vs. Konad

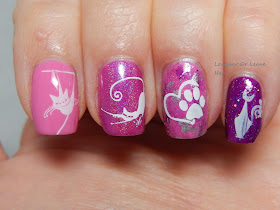
For my first manicure with this plate, you know I had to check out the cute little kitties...they're half the reason I bought the plate! I started with a pink-and-purple skittle featuring Zoya Eden, Colores de Carol Amethyst, and Zoya Thea; I did a little sponging on my ring finger, and then stamped my kitties on top:


Kitty skittle
Kitty skittle

Kitty skittle


Kitty skittle
Kitty skittle


I have to admit I struggled a little getting these kitties to stamp well; unlike the images I tested in the video, these are a little harder to isolate, and I had to scrape/pick up each of these at least 5-10 times before I got a good image--and you can see on my pinky and my middle finger, the images still were not perfect. This doesn't mean that the plate is bad, just that it's not a beginner plate, and you may have to try a few times before you get the image you like.

What do you think--cute enough to be worth a little extra work? :)

Happy stamping,
M.


Wednesday, February 25, 2015

Review: MoYou London duochome stamping polish

(Press sample)

It's no secret I live for duochrome polishes. When I first entered into the world of the polish obsessed, the only truly beautiful duochromes were made in the other hemisphere, and I did a lot of long-distance jewelry. The polish world has changed a lot since then, and the most recent addition to my duochrome madness is MoYou London's duochrome stamping polishes.

I rarely make videos of anything other than nail plates, but was so excited about these, I couldn't help myself:


Okay, so! Let's take a look at these beauties. They come in these nice boxes, so if you like to keep your polishes all organized and looking chic, you'll love this:


The two they sent me are Ginger Rust, which has a gold-to-green shift similar to the lovely Chanel Peridot, and Purple Haze, which has a purple-to-copper shift with a little pink thrown in for good measure:


MoYou London Ginger rust and Purple Haze
MoYou London Ginger Rust and Purple Haze


I'll admit, I was a bit skeptical when I first saw these polishes; I didn't have any doubt that they'd stamp over dark colors but in the past I've seen these sorts of pigments fade to nothing over lighter colors. So I tested them out over both for you.

Both of the polishes had a good consistency for stamping--thick enough to work with easily, but not so thick you feel like you're dealing with sludge. When I first put the polish on the plate, it seemed a bit sheer, but that turned out not to be a problem, as you'll see. But unlike polishes that you paint your nails with, let's face it, formula really isn't a make-or-break thing--what matters is how the polishes stamp. So let's take a look...

First, let's do Ginger Rust (I used MoYou London Geek plates 05 and 06 for these tests):


MoYou London Ginger Rust over white

MoYou London Ginger Rust over white

MoYou London Ginger Rust over black

MoYou London Ginger Rust over black

Ginger Rust had no problem whatsoever showing its shift over white; from gold to copper to green, the full range is there, in full stamping glory. Absolutely gorgeous. I also love that the polish gives two slightly different looks over the two colors, more like rich molten metal over the black, and more like cool delicate chains over white.


Does Purple Haze live up to this standard?


MoYou London Purple Haze over white

MoYou London Purple Haze over white


MoYou London Purple Haze over black

MoYou London Purple Haze over black


Purple Haze also stamps beautifully over both white and black. And there's a more noticeable difference in how it shows up over the two--over white, the shift goes more directly from purple to copper, while over black, the shift is more purple-to-pink. I love the fun possibilities here for exploring how this plays with different base polishes...

...In fact, I was so intrigued that I decided to use this in my sample mani, over a medium-ish color. I chose Zoya Leslie (I'll be reviewing this for you shortly), a lovely lavender shimmer, and I stamped with MoYou London Kitty 14:


MoYou London Purple Haze duochrome stamping polish


MoYou-London-Purple-Haze-duochrome-stamping-polish
MoYou London Purple Haze duochrome stamping polish

Yep, you just can't argue with that--strong shift from purple to copper even when the nails are on the same plane. Of course, I do have fairly curvy nails, and this is one time when that turns out to be a great thing, the duochrome shows off so well!

I highly recommend these polishes. A little goes a long way, and the effect is stunning. If you love duochromes and you love to stamp, these polishes are a must for you. You can find them on MoYou London's site, along with their dazzling array of stamping plates.

Happy stamping!!
M.


Friday, February 20, 2015

Review, test, & manicure: MoYou London Geek Collection 05 & 06

(Press Sample)

It's been a little while since I've done a video review, and I'm back today with a good one: MoYou London's Geek Collection 05 & 06, two of my favorites from the collection.

This versatile collection is just adorable--it takes all things geek chic and puts them at (and on!) your fingertips.

Here's the video review to kick things off:


And here are the still images of the plates:


Geek 05: 

MoYou London Geek Collection 05

MoYou London Geek Collection 05

MoYou London Geek Collection 05

Geek 05 has a wide variety of geekdoms represented: video games, Elvish script, Steampunk, emoticons, and more. There's not just one type of manicure represented here--you can go kitschy, geeky, elegant, masculine, computer chic-y.


Geek 06:


MoYou London Geek Collection 06


MoYou London Geek Collection 06

MoYou London Geek Collection 06


Geek 06 focuses a little more specifically on devices and computer-geek chic. Computer commands, buttons, internet interfacing, online acronyms and shortcuts. In today's world you can't get through your day without seeing multiple of these, so why not celebrate them and their hidden/implied meanings?

The three images at the top of Geek 06 are also on Geek 05, but the sizes differ. Geek 06 is the equivalent of the 'regular'-sized image plates, and 05 is and XL-sized plate; here are the two of them together so you can see the size difference:


And here are both of the plates next to a standard Konad plate so you can get a feel for the size of the images:


MoYou London Geek Collection 05 vs. Konad

MoYou London Geek Collection 06 vs. Konad

So how did the plates stamp? Very well:


("Hey Michelle! That's some pretty stamping polish ya got there. What is that?" Those are two of MoYou London's duochrome stamping polishes, and I'll be reviewing them for you very soon...)


The plates worked flawlessly, I had no problems stamping with them. They're very easy to work with, a total breeze for even a beginning stamper.

So what do you think, want to see a manicure??

Something about the message of putting 'ctrl+alt+del' on a stark black-and-white manicure just really appealed to me (I think I mentioned it in my video, even), and I just had to do it--I've had many days where I wish I could just hit the 'reboot' function, lol:


This is Julep Cleopatra stamped with Konad white. I wanted a satin finish, because I wanted this to look like a keyboard. I love how it came out, and think it's such a fun statement!

There are a ton of cute plates in this collection--another of my favorites is Geek 08, a collage-style plate made up of emoticons. So cute and so fun!!

You can find these plates on MoYou London's website; some of their plates also sell on Amazon. Check out their duochrome stamping polishes while you're there--I'll be reviewing them shortly, but spoiler alert: they're awesome. :)

Happy stamping!
M.


Friday, February 13, 2015

Before & After: Incoco 2015 Valentine's Day Collection

(Press Sample)

Are you ready for Valentine's Day tomorrow? If not, don't worry, I got you covered with a few quick-and-easy Valentine's looks so you can feel your prettiest tomorrow, whether you're celebrating 20 years of marriage, the blossoming of a new love, or spending some me-time curled up with a good book.

I've got two before-and-afters for you today, each done with Incoco's 2015 Valentine's Day collection (I've done one manicure with this collection already; you can see it here).

Three sets from Incoco's Love Story Collection 


For the first manicure, I used Incoco Blowing Kisses on all fingers except my middle; Blowing Kisses has several designs each done in pearly white on a pink-peach background. I chose the designs that featured the word 'love'. On my middle finger, I used Hello Sweetheart, a pink-and silver glitter wrap that works beautifully with the other wraps in the collection:


Incoco Blowing Kisses and Hello Sweetheart

Incoco Blowing Kisses and Hello Sweetheart

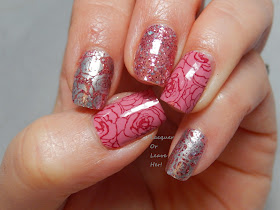
For the second manicure, I used Hello Sweetheart on my index, middle and pinky, and the rose pattern from Love Story on the ring and thumb:


(Apologies for the chipped edge on my middle finger! These things always happen at the worst time.)

In the manicures above, I have no topcoat on any of the nails, but even the glitter wraps are perfectly smooth and shiny. Gorgeous.

I love both of these manicures as is. But as you know, I have to stamp anything that stands still for even a second...

For the 'after' part of the second manicure, I used matching rose images from Bunny Nails BuNa-A, and stamped them on my pinky and index fingers:


Incoco Valentine's skittle
Valentine's skittle

Valentine's skittle
Valentine's Skittle


And I've left my favorite for last...for the 'after' portion of the first manicure, I stamped 'love' from Bundle Monster H16, using Konad White:


All you need is love
All you need is love...

All you need is love
Love is all you need

There you go--four very easy looks that you can put together in no time flat. With or without stamping, these take 5-10 minutes from start to finish.

But I know what you're thinking: Michelle, Valentine's Day is tomorrow! I don't have time to get these shipped to me! Well that's where you're wrong. Because Incoco has just teamed up with Walgreens. Now you can pop in and grab these beauties in a snap.

What do you think--do you have a favorite out of these appliques or these manis?

Happy wrapping,
M.

Before & After: Day-To-Night Look

(Press Sample)

Today I thought I'd do a Before & After designed to show an easy way you can take a work appropriate neutral manicure and pump it right up for a Friday night out on the town.

So, let's start with an nice neutral, like Zoya Rowan:


So you've been rockin' it at work, looking all chic and elegant, and gettin' it done. Now it's Friday and you want to go get your party on, and you don't have much time to get ready. You certainly don't have time to do an entire manicure.


So here's what you will need:

1) A polish that will stamp over your existing manicure. I chose Sally Hansen InstaDri Red-io Active.

2) A stamping design that will look good from any angle, meaning, that doesn't have to be placed precisely. Large full-nail images that down have a pre-determined upside are good for this, especially those from collage images. I will be using Born Pretty 07.


Here's what you do: 

1) Paint your pinkies and thumbs with your chosen color--right over your existing polish.

2) Stamp your design on your ring fingers with the same polish.

3) Cover with fast-drying topcoat to make sure everything is dry and you can get right on out the door.


Here's how my look turned out:


Day-to-night-look
Day-to-night, off you go!

Day-to-night-look
Day-to-night, off you go!

Day-to-night-look
Day-to-night, off you go!

The beauty of this technique is that, with a design like this, you don't have to get it perfect. Any way you stamp it on, it's gonna look awesome. So you're not going to have to try, mess up, remove, try again, and again, and again. This look will take less than five minutes, and you're out the door. Literally.

So go on, hot stuff. Pump up that manicure and have a great time. And if you just can't resist that stamping plate and need one of your own, don't forget to use my discount code:


Happy polishing!
M.

Wednesday, February 11, 2015

Review: Colores de Carol Valentine's Trio from Live Love Polish

(Press Sample)

Today I have another exclusive to share with you from Live Love Polish...and OMG, it's gorgeous, and ready-made for nail art.

Colores de Carol has collaborated with Live Love Polish to put together a a Valentine's Day gift set of three polishes, one of them exclusive to Live Love Polish. It comes in this adorable box:


Colores de Carol Valentine's Trio from Live Love Polish

Colores de Carol Valentine's Trio from Live Love Polish


The awesome packaging is absolutely fitting for the awesomeness inside...Let's start with Colores de Carol Amethyst, a medium-to-strong linear holo in a glowing orchid shade:


Colores de Carol Amethyst

Colores de Carol Amethyst

Colores de Carol Amethyst

Colores de Carol Amethyst

Colores de Carol Amethyst


Colores de Carol Amethyst


This polish. THIS POLISH. I absolutely live for it. It's soft. It's squishy, It's vibrant. It's holo. It's wonderful in every possible way.

I've had lots of jelly holos that take 4 coats to reach opacity, and when I first saw this, I wondered if it would be one of those...absolutely not. This is two coats, full coverage, and those coats applied like butter. I had almost zero clean up because control on this was absolute. I have one coat of Seche Vite, but this polish doesn't need it, in terms of amazing shine.


Next up is Jesse's Girl, made exclusively for Live Love Polish, a glitter topper with predominantly pink, red, and purple glitters, and a smattering of blue and yellow-green to keep you on your toes:


Colores de Carol Jesse's Girl over China Glaze Tart-y For The Party


This is one coat over China Glaze Tart-y For The Party, with one coat of Seche Vite. Application was very good--this mostly brushed on evenly, and I only needed one or two teeny dabs to make sure I got coverage everywhere.


Colores de Carol Jesse's Girl over Zoya Sage


This is two coats over Zoya Sage, with two coats of Seche Vite. The polish dries quickly, so I really didn't have to wait between coats--I started on the second as soon as I was done the first. It's also a very versatile polish; I'll show it below over Amethyst. 


Colores de Carol Jesse's Girl over Zoya Sage


And here's a macro so you can see the glitters up close and personal. This polish is like the glitter version of a spring Monet painting, with some holo flash thrown in. :)


And finally we have the oh-so-perfectly-named Bling, a glimmering concoction of silver holographic glitter that looks like a bottle of liquid diamonds:


Colores-de-Carol-Bling
Colores de Carol Bling


These swatches need a little explanation. This polish covers well enough with two coats that in real life, it looks like full coverage even if you have your fingers right up to your eyes. However, under the lightbox lamp, it looks a little sparser. So what I did here was put three coats on my ring finger so you can see what it looks like IRL, and left the two coats on the other nails. Believe me--you won't need three coats IRL to get the effect you see on the ring finger here. Below, I also show one coat of Bling over Barry M Silver Foil, and over Amethyst, so you can see a range of different looks with this polish. Each have one coat of topcoat.

Application was exceptional. When I look at a polish like this, I drool, and then brace myself for all of the glitter that's going to get onto my cuticles and be a nightmare to clean up. I didn't have that problem at all with this polish. The glitter went where I wanted it to go, and nowhere else. I was careful, of course, but not inordinately so--and often with glitters like this, it doesn't matter how careful you are. But this was a dream to work with.


Colores de Carol Bling

Colores de Carol Bling


Colores de Carol Bling


On my thumb I have one coat of Bling over one coat of Barry M silver foil--I personally prefer Bling on its own, but this is a good option if you want to stretch your mileage.


Colores de Carol Bling


I said at the beginning that this gift set is a nail art waiting to happen--I couldn't resist playing with them a bit and showing them together. First I have one coat of Bling on my ring finger and one coat of Jesse's Girl on my pinky and thumb, over two coats of Amethyst:


Colores de Carol Valentine's Trio Gift Set for Live Love Polish

Colores de Carol Valentine's Trio Gift Set for Live Love Polish


And here's two coats of Bling and Jesse's Girl over Amethyst:
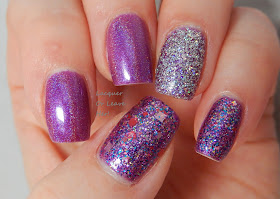


Colores de Carol Valentine's Trio Gift Set for Live Love Polish


Final verdict: This is an amazing set of specialty polishes for the polish addict or the polish beginner alike. This is a perfect gift to give your friend who likes nail polish and nail art, but doesn't quite know where to start--the polishes go beautifully together so you can combine them in so many ways with foolproof results. I still have the above manicure on, and don't want to take it off. It's stunning and light catching and I just want to stroke it and kiss it and hug it and love it.

And yet, any experienced polish collector/nail artist will be over the moon with this set, as well. A top-notch holo, a sparklicious holo glitter, and a versatile glitter topper--how can you go wrong? Even if the 'gift' is for yourself. Especially if the 'gift' s for yourself. :)

If you want to get the special packaging, you should head over there quickly--the sets are already in the 'low stock' category. But, you can also buy each of the polishes separately; just don't count on being able to get all three, because Bling is also low stock.

And don't forget: Live Love Polish has free shipping in the United States if you spend over $20--so guess what, not only do you save money over buying these separately, that means no shipping cost on the set. You can't beat that with a stick.

Happy holographic polishing!!!
M.