Showing posts with label acrylic paints. Show all posts

Wednesday, January 27, 2016

Before & After Twin Post: Native War Paints Extra Crispy Walkers + UberChic Beauty plates

(Plates sent for review)

Hello!

Recently the lovely Amanda, my friend and fellow blogger over at Polish & Plates gifted me a bottle of Native War Paints Extra Crispy Walkers, because  I'd admired it on her blog and told her what a huge fan I am of The Walking Dead (and of the zombie flambe scene that inspired the polish). And now since we each have a bottle of it, she suggested we do a twin post with it, and I jumped at the chance!

You may know that The Walking Dead is now on hiatus, scheduled to return with the mid-season premiere on *Valentine's Day*. And, you now know that I have in my possession an awesome polish that pays tribute to zombies. So, I think we can agree that what's about to happen was completely inevitable...

Zombies. Valentine's Day. Hmm...When I think of the combination of zombies and love, I can't help but think of The Zombie Song:


It's a touching, heart-rending (or, rendering) story about a sweet girl zombie who has fallen in love with a non-zombie guy--talk about your star-crossed lovers...sigh...

I started with my base of Native War Paints Extra Crispy Walkers, a black jelly polish with orange, blue, and green flakies and glitter; it looks like either a charred zombie corpse, or the ash and embers flying up as the zombies are being fried:
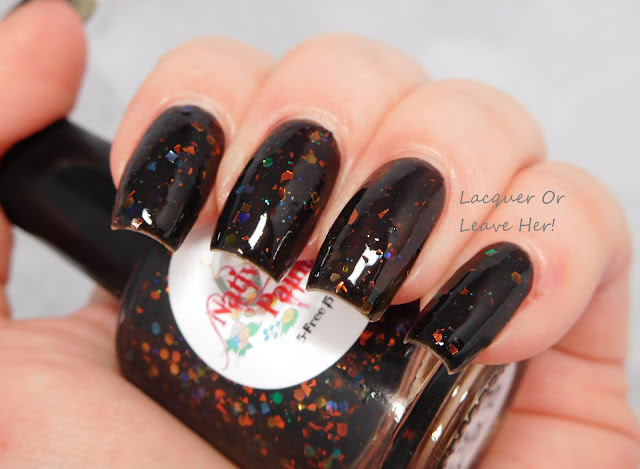

Native War Paints Extra Crispy Walkers


Then I set to decorate it, based on the artwork in the video...


...and the fact that part of the chorus is 'I'd never eat your brain.'


Here's what I came up with:
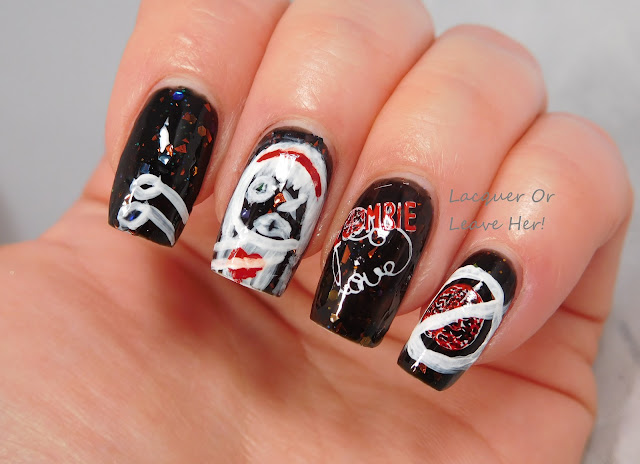

zombie love manicure with native war paints extra crispy walkers and uberchic beauty zombie love and marriage plates
If I were a zombie, I'd never eat your brain

zombie love manicure with native war paints extra crispy walkers and uberchic beauty zombie love and marriage plates
I'd just want your heart, yeah I'd want your heart, just want your heart.


I freehanded the girl (obviously, lol) trying to re-create the stick-figure look, but I wanted her to look a little more gnarly and I added in a red heart on her dress and a red headband; I also freehanded a slashed circle around the brain on my pinkie. I used UberChic Beauty's Love & Marriage 02 plate (review coming very soon!) and UberChic Beauty's Zombie Love plate; I stamped with Konad White and Red.


For the freehand portion, I used white and red acrylic paints, and did a test run of this brush from Born Pretty Store:


Nail art brush from Born Pretty Store

Nail art brush from Born Pretty Store

The handle turns into the cap. 


The brush gave me good control, and finer lines where I needed them, bigger lines where I wanted them for the stick figure look. The brush was excellent quality; I love that it pulls apart and the handle becomes a lid to help protect your brush.


What do you think? Yes, the manicure is kooky and crazy and just a teensy bit sick and twisted. Okay, a lot sick and twisted. But I love it, and I never want to take it off! I'm going to recreate it for the premiere on Valentine's Day, luckily Mr. LOLH loves zombies as much as I do. :)

But that's not all! Don't forget to go check out what Amanda did with this polish, over on Polish & Plates! She does great polish reviews as well as cool nail art--my kind of girl. You can find her on Facebook, too.


You can find the nail art brush here, and don't forget you can use my Born Pretty Store code off you full-price purchase.


Happy stamping!
M.


Sunday, October 26, 2014

NOTD: Freshly Dead

(Nothing to disclose)

Hello!!

I recently saw a 'burnt parchment' technique on my friend's blog (Bob Plays With Polish), and my mind went a little crazy with the idea...and I decided to turn it into a little Halloween experiment.

Basically how the technique works is, you layer several colors of polish, then you take a brush dipped in acetone and swipe down through the layers to show the different colors. If you do it with whites, browns and blacks, you get a burned parchment look the the beautiful one she made. But my mind thought...what about flesh, blood, and bone?

And thus was my 'Freshly Dead' manicure born:


Freshly dead corpses

with lots of yummy maggots...

nom nom nom nom nom


I'm not sure if the corpse has started to split open due to decomposition, or if it was sliced into before death...either way, the maggots don't care and are enjoying their feast!

Because this month's theme in the Nail Challenge Collaborative is 'stripes', I decided to go for the most Halloweenest stripes ever...this is why the rotted parts are up-and-down stripey splits (and yes, sometimes my brain scares me, too).

Here's how I did it:

(1) I started with a base of Color Club Look Don't Tusk, which is an off-white bone color, for my 'bone' layer. I used two coats, but if I were to do this again, I think I'd do three, to make sure I had enough white.

(2) I put on two coats of Barielle Miami Heat, for my 'blood' layer.

(3) I put on two coats of Barielle Pillow Talk for my 'flesh/skin' layer.

(4) I stamped some stitches using Konad Black and MoYou London Gothic 04.

(5) I free-handed some yummy maggots with acrylic paints. Yes, I know maggots don't usually have big eyes like that, but I thought it made them creepier, so I went with it.

(6) I used a layer of Seche Vite between each of the colors, and then on top of the art.

What do you think? Is it deliciously disgusting?

Happy Halloween Hugs,
M.

Wednesday, May 7, 2014

Before & After: Inspired by Magritte, and review of MoYou London Back To The Future 50s 01

(Purchased by me; affiliate links)

Hello!!

I've missed doing my 'Inspired by' manis, particularly the ones inspired by artists, so I put together another one today, using MoYou London Back To The Future 50s plate 01.

You know I had to do a video review of the plate:


And took still shots of it:


MoYou London Back To The 50s 01


MoYou London Back To The 50s 01

And we need to see how big the images are; here is a comparison with a Konad plate:

MoYou London Back To The 50s 01 vs. Konad

I've been wanting to do an 'Inspired by Magritte' manicure for a while now, based on this painting, known as Golconde:


But you know I needed to do it with my own little twist. :) I started with a base of Authority Cosmetics Paradise for my pretty sky:


Authority Cosmetics Paradise

Authority Cosmetics Paradise

Then I busted out MoYou London Lanscape (Mother Nature) 06, and made some nail decals with the houses on the bottom and some acrylic paint. I also stamped some clouds from the same plate, with Konad white.

To finish, I stamped the lovely cocktail ladies from the Back To The 50s plate on my middle finger, filled in the one that was only an outline, and then stamped the one with the pretty full skirt randomly on the rest of my fingers:


I just LOVE that chimney, darling!


I love how this came out, but there are a few things to say about it. First, when you're coloring in your nail decals, hold them up to the light and make sure you don't have any baldish spots. When I just looked at them flat on the table, I couldn't see those little bald spots. I don't mind--I just think it makes the whole thing more surreal-esque, but it's good to know when it comes to things that I don't want to look that way!

Second, this is the first MoYou London plate that I had a hard time with. If you look at my lady's head, you'll see that in three out of four stamps that included her head had a circle out of it. It was always in the same place, and it wasn't due to insufficient polish. I was able to make it work by scraping very carefully, but I don't like that I had to work that hard to get a good image; I got two bad ones for every good one I managed, even once I figured out how to make it work.

Thanks for stopping by! I hope you have a very surreal Wednesday. :)

M.

Friday, April 25, 2014

Before & After: For Kim & Alyssa

Hello!

I mentioned last time that my cousiniece (TM) was in the process of being born, and sure enough, she has officially come to join us, and I decided to make a special mani to welcome her to our lovely planet.

I started with a skittle manicure using Zoya Destiny (a rich tangerine texture polish) on my pinkie and ring fingers, and Zoya Rica (a golden-brown orange shimmer) on my middle and index fingers:

Zoya Destiny and Zoya Rica


Then I stamped using MoYou London Artist collection plate 02, and Sally Hansen Coco-A-Go-Go, and I used my dotting tool to add mustard and red acrylic paint accents:


Hush little baby, don't say a word

Mama's gonna buy you a mockingbird


All of the different textures in the manicure made this a challenge to photograph without getting a massive glare on the baby's face, so I apologize that the hand positions are a little unusual. The top picture captures the colors most accurately.

Welcome, little Alyssa: may you have a very long and very happy life. I will always be here if there is every anything you need.

Love,

Your cousauntie Michelle

Saturday, April 5, 2014

Review: Incoco Garden Daydreams Spring 2014 collection

(Press Sample)

Hello!

I'm back with two very sweet sets of nail appliques from Incoco's Garden Daydreams Spring 2014 collection. The collection features pastels and watercolors and subtle florals; it's feminine but not sickly sweet the way some floral collections go. I wore each of these for a few days, and then added some nail art when I was ready for a change (so you'll see a little tip-wear on the nail art photos).

Here is the lovely Tea Party, a very soft pink background with a spray of pink and peach roses, amid faint polka dots:


Incoco Tea Party

Incoco Tea Party

Incoco Tea Party

These applied with Incoco's characteristic ease. One of the things I liked about these sets was the flexibility to choose the look I wanted for each nail, and how each nail related to one another; for my index, ring, and middle finger, I have several wraps to choose from, and each one is double-ended; this let me have one nail with no flowers, and to place the flower sprays in what I found to be a pleasing array; if each nail wrap had been the same, I wouldn't have been able to do that. Also, another benefit of this particular set is the multiple colors within the flowers, something that's hard for me to do with stamping, and time-consuming with freehand.

Possibly my favorite set from the collection is Garden Path, an off-white background with a very light green-gray textured effect, topped off with a selection of pink, yellow, and blue flowers:


Incoco Garden Path

Incoco Garden Path

Incoco Garden Path

Incoco Garden Path

These speak directly to my heart because they have a very impressionist feel, like little Monets on my nails. And, if you like the look of those little dried flowers that people do nail art with, but you don't want the hassle of messing with them, these give the same effect. :)

For my nail art, I wanted to add a little bit of extra without detracting from the original design; with Tea Party, I added a little distressed mesh look to the pattern with Sally Hansen Mint Sprint, using Pueen 54 (this is from their new collage-style set, and I'll be reviewing it soon):


For garden path, I was so inspired by Monet that the only logical thing in my mind was to throw up a little Japanese bridge running through the flowers...you'll notice that on three of the four nails I put the sprays near my cuticle, because I knew I wanted to do this when the time came. I freehanded this with acrylic paints:


Because I'm happy

Clap along if you feel like happiness is the truth

Because I'm happy

Clap along if you know what happiness means to you


These appliques are playing a bigger and bigger part in my personal nail-art repertoire, in their own right, and as a spring board for my own nail art. :)

Happy Saturday!
M.

Thursday, December 26, 2013

Before & After: Inspired by Gustav Klimt

Hello!!

This month's theme in the Nail Challenge Collaborative is 'Inspired by Art', and you know I love that type of theme. Unfortunately, with the Christmas crazies, I totally forgot about it until now. So, I am going to try to get at least two manicures up on the theme before the end of the month. :)

Today I chose to be inspired by Gustav Klimt's The Kiss:


For my version I started with a base of China Glaze Unpredictable, the Peridot dupe from their Bohemian collection:


China Glaze Unpredictable

Next, I did something I've been wanting to do since I first saw MoYou-London's Artist Collection 04 plate, which itself is inspired by The Kiss; I stamped different parts of the plate using Konad black, and then decorated it with acrylic paint and rhinestones:


Kiss me, beneath the milky twilight

Lead me out on the moonlit floor

Lift your open hand, strike up the band


And make the fireflies dance, silver moon's sparkling

Tomorrow I will be doing a review of this plate, so this is sort of a prequel to that...In the meantime, I am completely over the moon about this mani. I love how it came out, it captures the texture, color, and metallic scheme of the original. When I look down, I feel like I have an actual work of art on my fingers. I'm not even bothered that the Konad polish smeared on her face a little. :)

Stay tuned tomorrow for my review of the plate, with some other suggestions on how to use it. :)

Big hugs!!
M.

Sunday, December 15, 2013

Review: Bauble New York nail wraps (Or, Holly Jolly!)

Hello!

I have a double-feature today--a review plus nail art. :)

I have been falling in love with the convenience of nail wraps, once I realized that they don't limit nail art, but can actually be just one more awesome tool that enhances nail art.

So far I've only tried one type of wraps, so I was very excited when Bauble New York approached me about testing out a set of their new nail wraps. They have a very nice-sized collection of wraps to choose from, with a range of types, including some designs that are very hard to create on your own--take a look at Life Is But A Dream to see what I mean.

Another beauty is Emerald's Addiction To Gold, the set that they sent me. This set features a gold foil base with a tealish green accenting it. I love this look and often create nail art like it by using nail foils, which can be a pain, can be time consuming, and can be tricky to get the look that you want--so the idea of a set that could create the look with no fuss at all was very appealing:


These work just like the other nail wraps I've tried. You choose the strips that are the closest in size to your nail, then one at a time you peel the top and bottom clear layers off to reveal the nail strip. You place the strip on the nail and put it gently into place, picking it back up and adjusting as needed. Once in place, you push down on wrap firmly to make it seal to the nail. Here is what they look like on:


Bauble New York Emerald's Addiction To Gold


 You'll notice that on my ring finger I have a teeny bit of puckering. This is because I wasn't careful to check that I had it placed correctly before I pressed down to seal the wrap to the nail. You'll notice this didn't happen on my other three nails; this was user error, not an issue with the wraps, and I easily avoided it on the other fingers. Just make sure to double-check all your edges before you go press down over the nail to seal it, and you'll be fine. And notice that even in the pictures it doesn't look that bad, and in person it's actually much less noticeable.

The instructions suggest that you use a topcoat with these nails, but I'm not convinced that you need it. These pictures are without topcoat, and I thought they looked nice and shiny without it--I couldn't tell much difference after I added the topcoat (you can see the topcoated nails in the nail art shots below).

If you do use topcoat with them, the instructions warn that you may get peeling on any edges that weren't pressed down firmly, and this happened to me. They tell you that if it happens, just wait for the topcoat to dry, and then press those edges down again. I did just that, and it worked just fine.

I promised you some nail art with this, and tomorrow's theme in the 12 Days of Christmas challenge is holly--and it seemed to me that this would be a perfect base for some awesome holly. I freehanded some holly leaves on my ring finger with acrylic paints, and then added two sizes of rhinestones for my holly berries. You know I had to have rhinestones, 'cause it don't mean a thing if it ain't got that bling:


Have a holly jolly Christmas! 

It's the best time of the year!
Can you even see the puckering now? That's how not visible it actually is, even though the camera picked it up in the close-ups. And can you tell the difference with topcoat? If you can, you have better eyes than I do. :)

These nail wraps will go on sale starting on Dec. 27th--perfect time to stock up for the new year!

This was a wonderful manicure that was perfect for me today...after a very busy week that was complicated by a cold that sapped all of my energy, I finally felt well enough today to clean the house and decorate. These wraps made it super fast for me to have a festive, fun manicure that looked like it took me forever, and left me time to do other things. I even baked some brownies! A holly-licious manicure was the icing on the cake (or...the brownies?).

I hope you are having a wonderful weekend,
M.