During my Halloween plate reviews so far, I mentioned that you can get a super-quick but still awesome Halloween mani by stamping silver webs and black spiders over a Halloween color. Today I'm going to show you two versions of this look, featuring UberChic Beauty Halloween 01 and 02.
UberChic Beauty Halloween 01 & 02 over Sassy Pants Create, stamped with Messy Mansion polishes
UberChic Beauty Halloween 01 & 02 over Sassy Pants Create, stamped with Messy Mansion polishes
For the second version, I started with a base of Wet n Wild Nuclear War. I stamped a smaller web, again using Messy Mansion Sterling. Then I stamped the same spiders with Messy Mansion Carbon:
UberChic Beauty Halloween 01 & 02 over Wet n Wild Nuclear War, stamped with Messy Mansion polishes
Which do you prefer? I like that the smaller web makes the spiders look bigger, and I love the contrast with the orange. But on the first mani I love the pop of green that gives a radioactive look, and I can't stop loving that beautiful blurple.
And, in honor of my spider mani, I share with you a poem I wrote for a spider mani three years ago:
Yes. I am in my happy place. Because Messy Mansion just released four new stamping plates. And I'm totally, completely in love, because their deliciously spooky factor is high!
I've started something new with my videos, please tell me if you like it--I made a shorter one that just shows the plates and the swatches quickly, and then my normal 'full' review which discusses how to use the plates. Here's the full version:
And here's the quick version:
Okay, let's take a look at the still shots of the plates...let's start with MM22XL:
Messy Mansion MM22XL
Messy Mansion MM22XL
Messy Mansion MM22XL
Look at the cute shapes in the word collage! A little ghost and a little tombstone, and whiskers on the word 'cat'! And the Jack Skellington-esque jack-o-lantern collage...and the Frankenstein/Alien skull collage...And spooky owls...so much fun stuff...
Then there's MM80XL:
Messy Mansion MM80XL
Messy Mansion MM80XL
Messy Mansion MM80XL
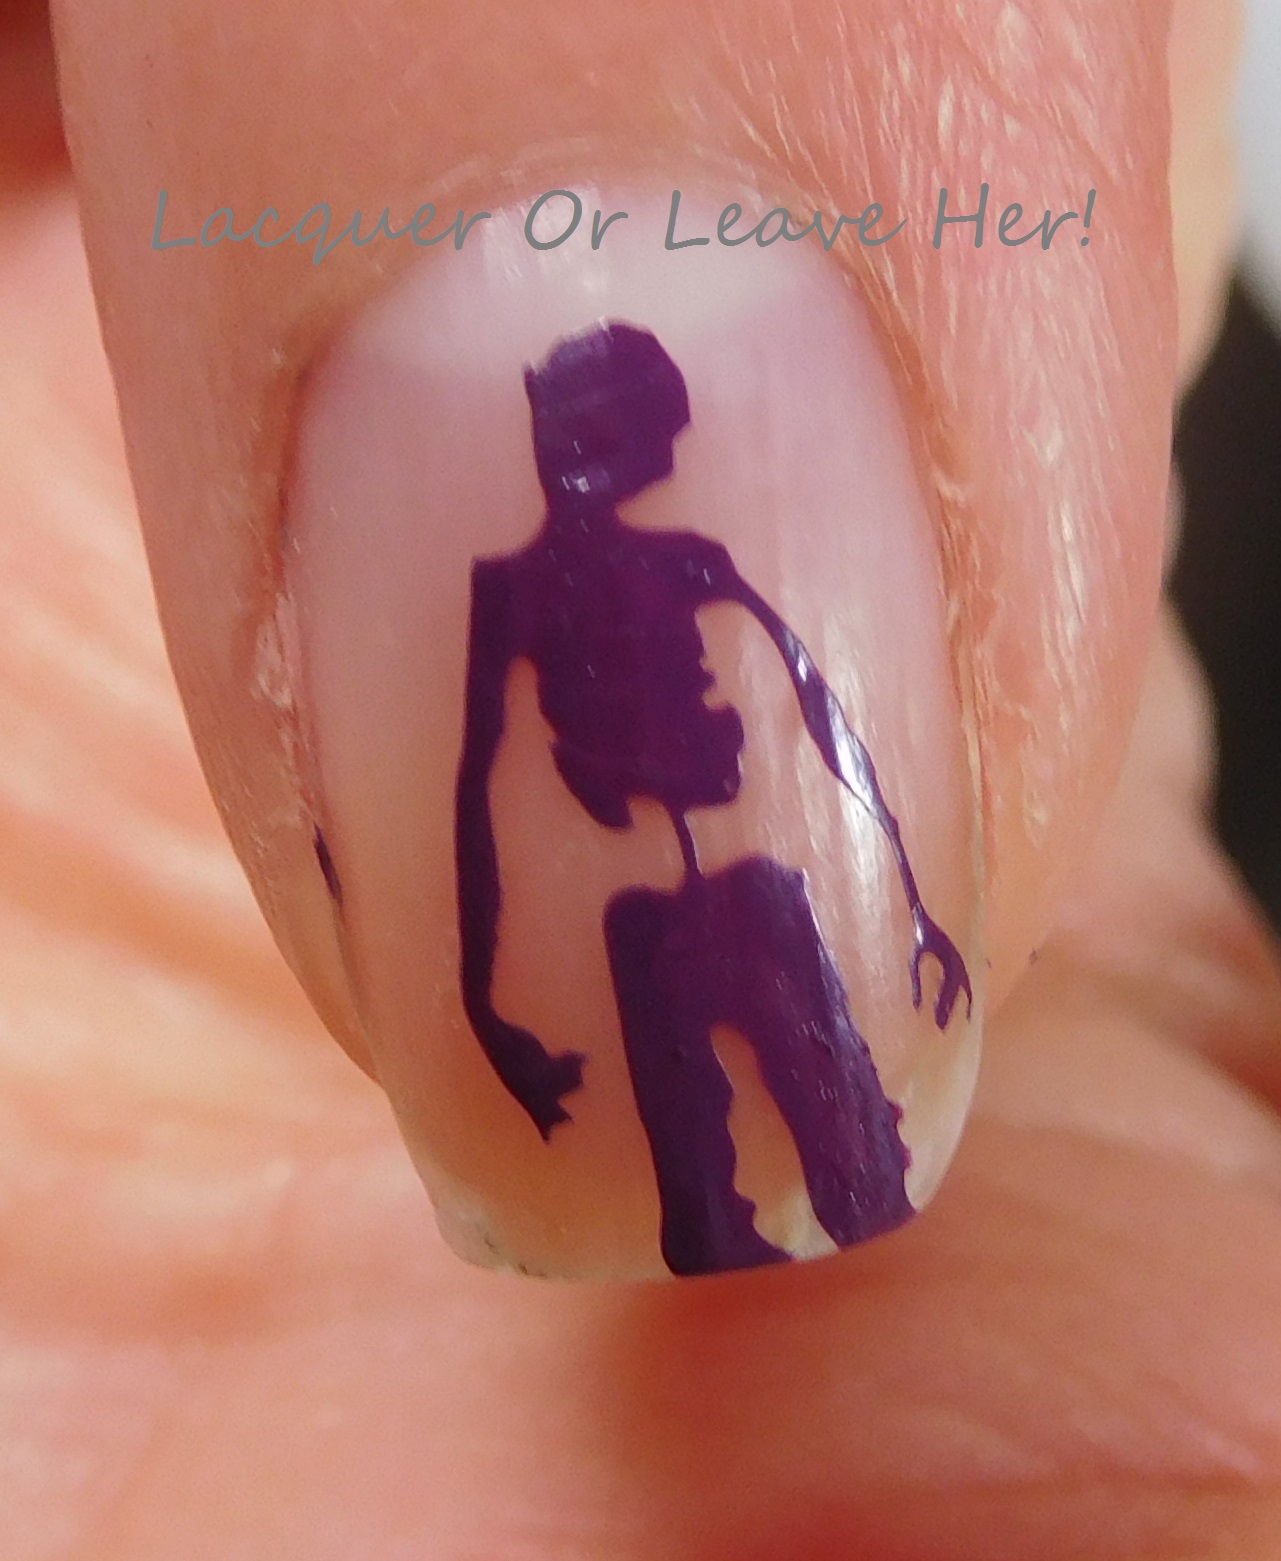
Omg, omg, omg, zombies!! And a body part collage! Yes, we've established before that while I definitely have love in my heart for whimsical Halloween stuff, I LIVE for the spooky Halloween stuff. Bloody body parts--yes please! And a layering zombie image that allows me to use my goopiest green glitter as the base for my zombie face? Sign me up. Yeeeeesssssssss. You can bet you'll be seeing nail art with this very, very soon.
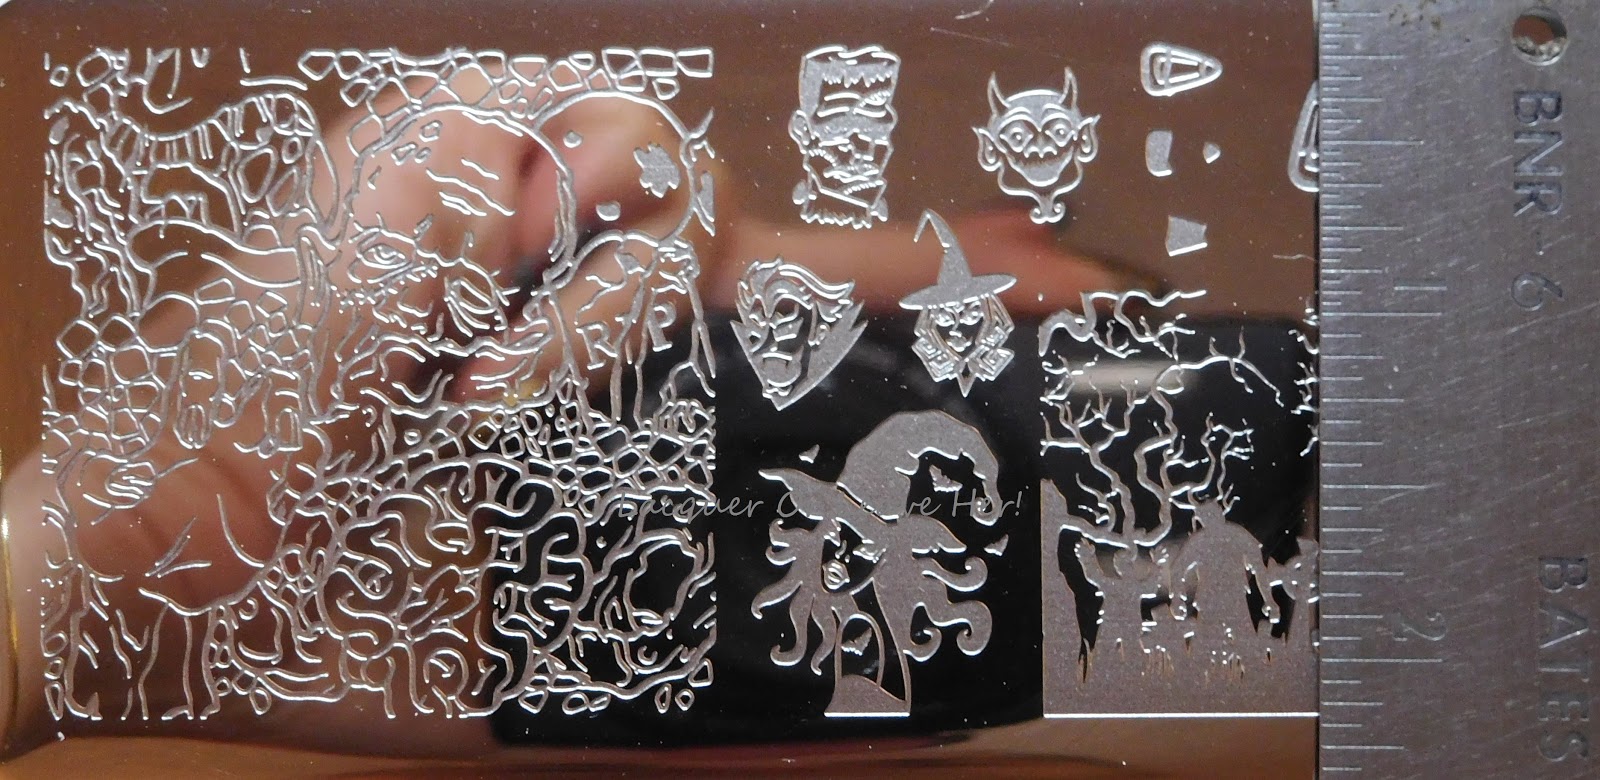
And MM81XL:
Messy Mansion MM81XL
Messy Mansion MM81XL
Messy Mansion MM81XL
Whaaaattt?!?! A zombie collage?! And a zombie scene?! And retro-comic style images? And a sexy, bad-ass witch?!? Yesyesyesyesyes!
One warning on this one. The images in this collage are big, so you'll want to focus on part of them, or use the shrink technique to make them smaller. I show you the technique very quickly in the video.
And finally, MM83XL:
Messy Mansion MM83XL
Messy Mansion MM83XL
Messy Mansion MM83XL
Messy Mansion MM83XL
This one is a more traditional full-nail image plate, and there's not an image on this plate I don't adore. Those spooky trees with the spooky faces. The awesomest Halloween cats every. Menacing ghosts and skull owls, and an anarchy skull collage. That intricate web with the quilted feel--I've never seen anything like that. But my absolute favorite is the selfie-taking skulls. it doesn't get any more Halloween-cool than that.
There are lots of different sizes on these plates, so let's take a closer look:
The full-nail images on MM83XL are 3/4 of an inch wide and 1 inch long.
The collage squares on both MM80XL and MM81XL are 2 inches square.
And the collage square on MM22XL is 1.5 inch square:
So how do they stamp?
The zombie finger is a little bit smudged, but that's my fault, not the fault of the plate. The stamping quality here is crisp, clean, top-notch.
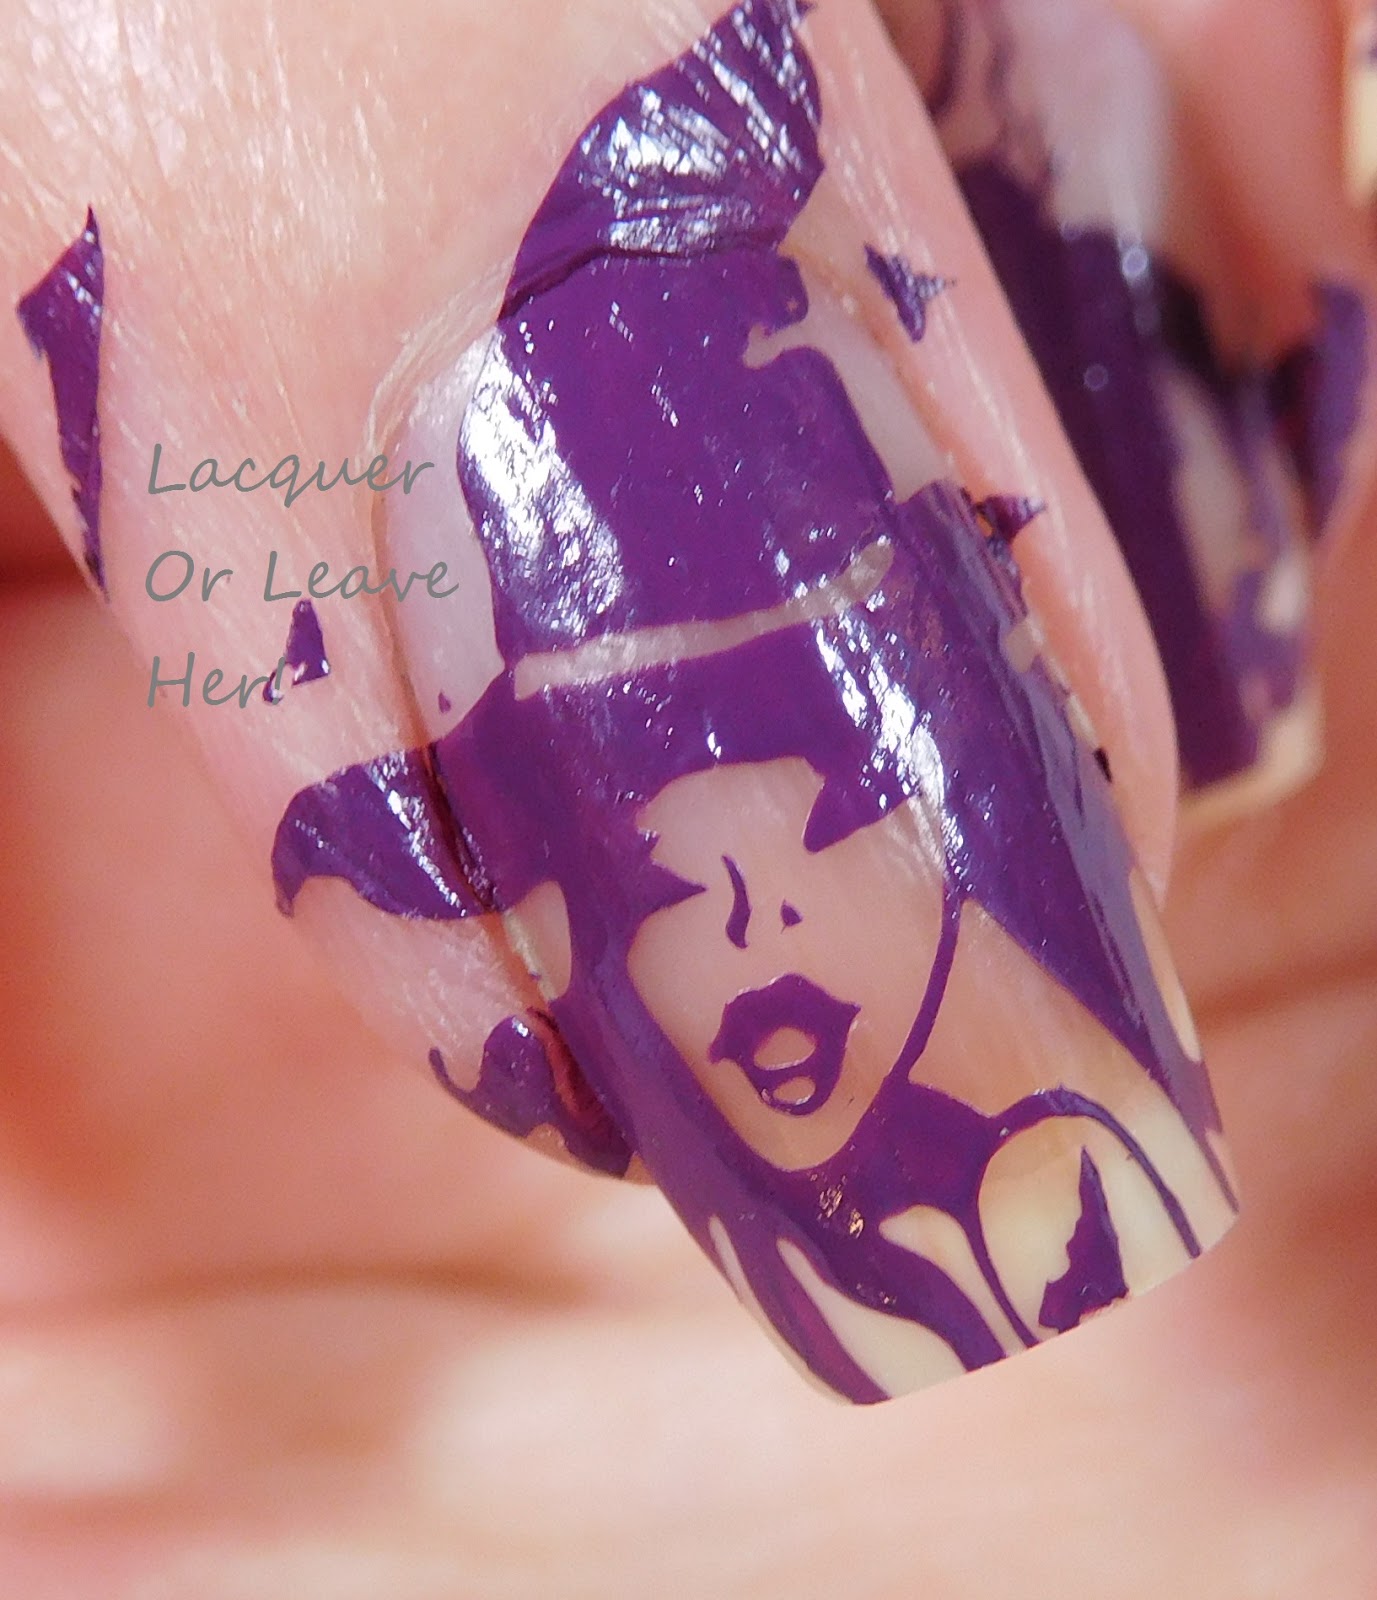
Lately I've been trying to show you a few manis that are cute and fun but super easy to create. For this mani, I started with a base of Wet n Wild Nuclear War, and awesome orange for Halloween. Then I stamped images from MM22XL and MM81XL; I stamped with Messy Mansion Carbon:
Messy Mansion MM22XL and MM81Xl over Wet n Wild Nuclear War
Messy Mansion MM22XL and MM81Xl over Wet n Wild Nuclear War
How bad-ass is that sexy witch?! And how cute is that for a fast, simple bit of stamping? Love it. :)
I have awesome news for you! Clear Jelly Stamper now has a softer, more flexible refill head available! The only minus for me with the original Clear Jelly Stamper (the harder head) was that it wasn't flexible, and it was a little fragile, so I was extremely excited to test this out, to see if it worked as well as the original despite the difference in material.
I did a video review showing this baby in action, which you can check out here:
And here's what I found: 1) Can you see through it as well as the original head?
As you can see, the refill head is just as clear as the original (refill head is next to the stamper, original head is inside the stamper):
I didn't find any difference in my ability to see through the head, or position the stamps.
2) Does it pick up as well as the original head?
I found that this stamper picked up just as well as the other stamper; in fact, because the head is more flexible, I was a little less paranoid about using the perfect 'flick of the wrist'.
3) Does it align as well as the original head?
I already mentioned that you can see through this just as easily as the original. But in addition, I found that the extra give of the soft head allowed me align with even more control than the original--I have curvy nails, and whenever I roll over my nails, I risk warping my image. With this stamper, I was able to press in rather than just roll, and I got better placement.
4) Do you have as much dry time as the original?
The original, harder head was made of material that allowed the polish to stay wet for longer than most stampers. This softer head doesn't have that advantage; the polish dried at about the same rate as other stampers.
5) Can you do techiques like shrink stamps with it?
No. This isn't a marshmallow head, it's just more flexible than the original, like other soft-but-non-marshmallow stamper heads. You can push your nail into it fairly easily, but I wouldn't risk trying to stretch it.
So what do I think? I think this head gets rid of the only concern I had about the original Clear Jelly Stamper, the firmness/fragility of the head. I'll still use the harder head when I want a longer dry time during application, but for the most part, I'll be using this softer refill head.
Clear Jelly Stamper also sent me three layering plates to review, CJS C-02, and CJS-01 and CJS-03; these stamps are designed specifically for use with the clear jelly stamper, because they're designed to be layered and/or mixed and matched:
CJS C-02 Christmas sweater madness!!
CJS-01 Flowers galore!
CJS-03 Snowfall serenade
On the Christmas sweater plate, there are some images designed to layer, but the plate is more about mixing and matching the elements you want to make the perfect Christmas sweater manicure; on the second two, there are lots of layers and pieces you can use to build multi-layered multi-colored flowers and snowflakes.
These are just over 2.25 inches square; this will give you a sense of the relative size of each image:
With spring colors and collections coming out, that flower plate called to me, so I decided to do my sample manicure with it (CJS-01; you can see me test the other two in the video). I started with Zoya Ireland:
Zoya Ireland
I stamped my flowers and leaves using Sally Hansen Lively Lilac, Pronto Purple, Irush Luck, and Poison Ivy; Wet n Wild Who Is Ultra Violet, Barry M Cotton and Almond; I also stamped a subtle background on parts of the nails using Zoya Easton and CJS-02:
Spring flowers with CJS-01 and Zoya Ireland
Spring flowers with CJS-01 and Zoya Ireland
I did have a couple of very minor snafus, one on the ring finger where I didn't overlap the purple on the white 100% perfectly and one on the thumb where I lifted the stamper too soon and got a bobble with my purple outline, and had to stamp again over it (notice the big flower on that thumb has SIX layers!). But considering this is only my second full mani with the clear stamper and I did a crazy number of layers, I'm pretty impressed with what this stamper and these plates can do.
You can find the soft refill had and all these awesome plates in Clear Jelly Stamper's store; she's coming out with new plates for the spring as well!
I totally get that this combo of colors isn't for everyone, but I ADORE it. The olive gray with the bright pinks--edgy but feminine at the same time. Even if I didn't go exact, I think I captured the feel of the shirt, and to be honest--I wish I could make the background of the shirt the same color as Charli!