Showing posts with label Shany. Show all posts

Sunday, November 30, 2014

NOTDs: Inspired by my novels

(Barielle polishes sent for review)

Hello!

Today I'm doing something a little different, and I hope you'll bear with me...This month's theme in the Nail Challenge Collaborative is 'Inspired by a book'. I did two manicures based on Pillars of the Earth and Time Traveler's Wife, and then I had a thought for something a little different...

Some of you know that I'm a writer, and I am in various stages of finishing three novels (you can read more about these and my other writing on my writing blog, The Michelle/Mishka Project.). My first, Hazel-Green is one final edit away from being sent out to agents in January (I hope, anyway!). My second, MMORPG, is currently being revised like crazy. And during National Novel Writing Month this month, I started my third, called Accidental Divination.

So I thought, I should do my last two manis based on my own novels!

 Since Hazel-Green is about to go out and brave the world of publishing, let's start with that. Here's the tag line for what it's about:

"A 17th-century woman's tragedy sets in motion a legacy of secrets and lies that compounds through the generations to modern day, where her descendant must pick up the pieces in order to break the family cycle of dysfunction for herself and  her daughter. "

As you can tell, it's an historical novel that follows a family from the 17th century to modern day. The family immigrates from France to the Americas, first to what is modern-day Canada, and then to Massachusetts; it's primarily a story about mother-daughter relationships. So here's the manicure I made for it:


Manicure inspired by Hazel-Green

Manicure inspired by Hazel-Green


There are two colors that play an important role in the book, red and hazel-green, so for the base of the manicure, I chose to do a skittle with an olive green (China Glaze Tribe And True) and red (Zoya Oswin), along with one nail in an off-setting brown (Julep Chloe).

For the stamping, I put a fleur de lis on the pinky, a map of North America on the ring finger, and stars on the thumb to represent the immigration from France to Canada to the US.  On the middle finger I stamped eyes; the name 'Hazel-Green' refers to the eye color of the characters, that's passed from one generation to the next. Finally on the index finger, I stamped a mother and child image to represent the mother-daughter relationships that are central to the book. I stamped with Barielle Kiss Me Kate and Gondola Ride, using the following plates: MoYou London Scholar 07, MoYou London Artist 02, Mash 35, Bundle Monster H25, and Shany SH16


For the second mani, I couldn't resist making a manicure inspired by MMORPG, which is a thriller about a serial killer who finds his victims in online games:


Manicure inspired by MMORPG

Manicure inspired by MMORPG


The binary code and the circuit board make reference to the computer, which is the killer's hunting ground; he kills his victims by strangling them with his tie, so I stamped a body and ties to represent that. :)

The base colors here are Barielle Kiss Me Kate and Zoya Envy; I stamped with Konad White, Konad Black, and Barry M Silver Foil, using MoYou London Comics 03, Sci-Fi 05 and Sci-Fi 06, along with Cheeky 55.

Hope you enjoyed hearing a little bit about my novels, and I hope you enjoyed the manis!

Hugs,
M.


Monday, May 20, 2013

Before & Afters: Kitty & Puppy nail art

Hello hello hello!

I am so excited to show you my second and third attempts at free-hand nail art using my new acrylic paints that Born Pretty Store sent for review. This weekend my local animal shelter had a street-fair style open house to raise money and awareness about animals that need forever homes. Since all 5 of my babies are rescue animals, you can imagine I support such causes with all of my heart and was looking forward to going. The event ended up being very small, but I was extremely glad I stopped by anyway--they had a very cute T-shirt that says 'They aren't my pets--they are my family!' which I love, so of course I had to buy it to support the cause!

Anyway, the point is, I wanted to do a kitty manicure on one hand, and a puppy manicure on the other. Right away you should spot the potential for tragedy here--one design for each hand means that one of the designs would have to be drawn with my off-hand. We'll see how that goes...

For my kitty manicure, done with my main hand, I started with a base of Zoya Rocky, a sky blue creme, because I wanted a background that looked like the sky:


Zoya Rocky, indirect sunlight


Zoya Rocky, direct sun

Next I used the acrylic paints to draw on my kitty design, which combines elements from a number of kitty free-hand designs I've seen since I started blogging:


My kitties #1 pastime--good think there is a window in the way in their case!


I seriously can't believe how great this came out. I mean, it's not perfect, of course. I need a lot of practice. But for someone who can't do a free-hand design to save their life and this is only their second design with the medium? Not too shabby, even if I am the one saying it.

Okay, now for the design I did with my off-hand. I started with a base of Zoya Mitzi, a matte avocado green (yes, I often walk around with different colors on my different hands, except when I'm going some place important--you know, like work, lol!):


Zoya Mitzi, direct sunlight


Zoya Mitzi, indirect sunlight

Here I wanted to do a mani that represented my puppy, who is white with tan spots. I free-handed the puppy with acrylics, leaving the brush strokes thick to give it more of a fur-like look. I stamped the paws on the middle finger with Konad black polish and Shany plate SH08:


Woof!!


Okay, yes, it's a little goofy-looking, but I love it--especially since it was done with my off-hand. The ears are a bit lopsided and it doesn't actually look like the breed my puppy is, but I don't care! It's a cute cute puppy, and I was proud to wear it. It broke my heart to take it off.

I am so happy with these paints--I can't wait to see what I can do once I practice a bit. And seriously guys--if I can do it, ANYONE can. If you've been afraid of free-hand like I was, give it a shot. It's such a different world when you try it with acrylics rather than nail polishes.

I highly recommend the set that I received from Born Pretty Store, which you can find by clicking here. It has everything you'll need to get started, including a nice range of colors. And I do have a coupon code good for 10% off anything and everything you buy (this is not an affiliate link):


Thanks for taking a look! Big hugs,
M.

(The acrylic paints shown in this post were provided for my 100% honest review.)

Friday, November 30, 2012

Before & After Twinpost: Flip Flop Fantasy

Hello!

I promised you a summery manicure today, and here it is! This week Dina and I are up to Cheeky plate 37, and we decided on the flip flop image from that plate.

I want to go on record as saying I was not a fan of this image from the start, lol! I'm not sure why, maybe it's because the full image has the word 'flip flop' in the middle, or maybe because in the whole image there isn't one pair of flip flops that aren't cut off one or the other in some way, and that drives my OCD crazy, lol. Whatever the reason, it just isn't my thing. But as Dina points out, that's what makes this a challenge, because it makes us do stuff we might not otherwise!

So here's what I decided to do with it. I started with a base of China Glaze Bare If You Dare, which is a really pretty coral-orange color with a golden shimmer:

China Glaze Bare If You Dare

I decided to do a layered look for the flip-flops, so I started with Sally Hansen Insta Dry Lightning, and then stamped over it again with Konad red, to make it look like there was a sole and a top-section. Then on the accent nail, I stamped little footsie prints in Lightning, with Shany plate 03...I figure, since the flip-flops are empty, the feet must have gone off on their own! (Note: I never said I wasn't crazy):

Flippety Floppety Feetsies
Overall I like it, I think it's cute; I just have to pretend I didn't mess up on the first finger as badly as I did. Ironically, it was actually the last finger I stamped. Grrrr...

So, there's a little flash of summer for you, and don't forget to check out what Dina did with this stamp, which you can see by clicking here!

Thanks for looking. :)

Xoxox,
M.

Friday, October 26, 2012

NOTD: Witch-Be-Gone

Hello!!

This is my second Witch prompt of the Halloween season, this one for the 'This Is Halloween' challenge. In my first one, I showed a troupe of witches flying through the skies and a beautiful night. Sadly, they did not all get home safely--one of them met with misfortune...so I decided to do another manicure showing her fate. Let's just say she stayed out a bit too late and got caught in the...well, here, see for yourself:


What happens when witches get caught out in the rain...So sad...


Every time I see it, I keep hoping she'll make it...but she never does...sigh...

I started out with a base coat of Barry M Vivid Purple, which I covered with a coat of Barry M Silvery Lilac to make a pretty blue-purple duochrome. I stamped the witch, the lightning bolt and the witch's hat using Pure Ice Silver Mercedes and Shany plate SH02, Bundle Monster plates BM305 and BM 209, respectively. I stamped the raindrops using LeaLaC plate A and Top Shop Cosmic Karma; I also used Cosmic Karma to freehand the puddle of water. I used Silver Mercedes to free-hand the moon, and used Wet n Wild Ebony Hates Chris to stamp the haunted house (BM224).

Luckily, I suspect at least one of her witch friends knows a spell that will reanimate her, so all is not lost! Hee hee hee...

Thanks for stopping by, and please check out the other be-Witch-ing manicures by the other bloggers in the challenge, linked below. :)

Xoxox,
M.


Thursday, October 11, 2012

NOTD: Witches!

Hello!!

I have to start off today by apologizing for my pictures. I was having camera issues, and of course that had to happen the first time I'm trying to do a step-by-step tutorial for you. For the final look, I finally had to take a picture with my cell phone, and you can see I have some tipwear on it from waiting so long. However, at least the problem should be fixed now.

On to the manicure! Today's mani is another one from my Halloween challenges--this one is my CNT challenge, and today's prompt is Witches! I've been wanting to do this look for a long time; here's what I did:


Sexy witches haggy witches, which witch am I?

The final creation picture there is not as impressive as I hoped it would be, due to tip wear and a bad picture. However, you get the idea, and I thought I'd show you how I did it:

Step one: 
First I painted my nails with Barry M Silver Foil. Then I blended some Barry M Silver Foil with some Sally Hansen Gone Grey, and then I did a gradient over the two middle fingers with that mixture.

Step two: 
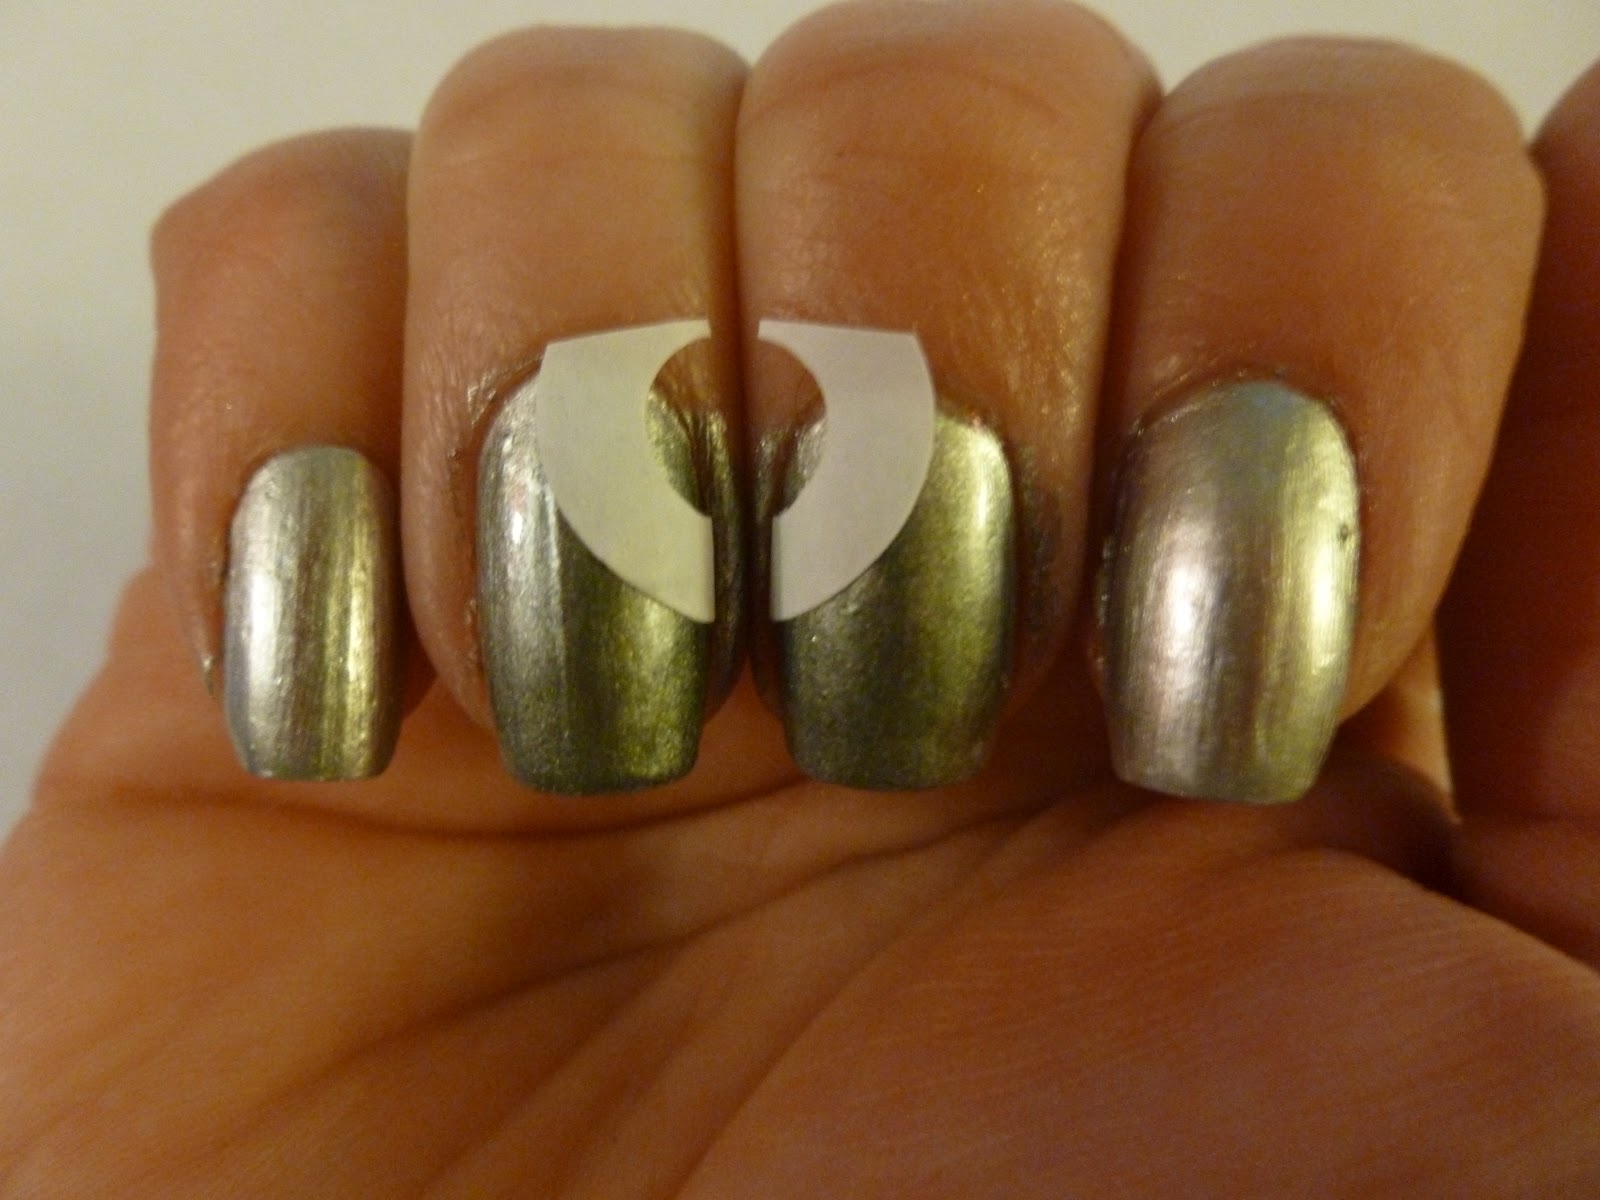
When that was completely dry, I took a hole reinforcer, and cut it in half. I took the two halves and matched them up on the two middle fingers, as shown below:


Step 3:
I then did a purple/orange gradient over the exposed part of the nails (being careful to avoid the hole in the center of the hole reinforcers!) using Barry M Vivid Purple and Sally Hansen Orange Impulse. Then I removed the hole reinforcers, and had this:


Grrr...horrible blurry photo!

Step 3:
On top of this I stamped clouds using Mash plate Mash38 (I only used part of the plate) and Sally Hansen Gone Grey:


Clouds stamped on top of gradients


You can see the part of the image I used where you see the polish streak. :)

Step 4: 
Finally, using Konad stamps, I stamped the other elements on the design, including spooky 'trees' (see below) and a haunted house from Bundle Monster BM224; A witch from Shany plate SH02; another witch from Bundle Monster plate BM13; and the bats and haunted house from QA 26.

I used the vines from the pumpkin image for spooky shrubbery :)

And voila! Here is the final look again:


Thanks for taking a look and putting up with the sub-par pictures! Please check out the other witch manicures linked below. :)

Xoxox,
M.


Thursday, October 4, 2012

Before & After: Black Cats

Hello!!!

Black cat, nine lives
Short days, long nights
Livin' on the edge
Not afraid to die...

Yes, you guessed it, the net installment of my CNT Halloween challenge is 'Black Cats'. You all know I love cats, so this is one I've been looking forward to doing. And right at the perfect moment, the perfect polish appeared to help me execute my vision: Color Club Port-Folio. If you haven't seen this polish, am I very proud to be the one to show it to you--it's one of the most stunning duochromes I've seen. It's a deep grape-purple with an dark grass-green color shift:


Color Club Port-Folio, indirect light

Color Club Port-Folio, indirect light

Color Club Port-Folio, direct sun

I love this polish in its own right, but I also love it for Halloween, since the duochrome has two of the canonical Halloween colors in it. I decided it would make the perfect Halloween night sky...

My concept for my 'black cats' manicure was to have three of my four nails show the black cat against a dark, moonless night sky, and on the accent nail show what happens to the cat when the moon comes out:


Black cats, indirect light

Slightly blurry to show the color shift and the glitter

To make stars in the sky, I did a very light sponging downward from the cuticle with China Glaze Fairy Dust.  On the ring finger, I free-handed a moon with Pure Ice Silver Mercedes. Then I stamped my kitties, regular with Shany plate SH02, and arched-back with SH08, using Konad black. I finished up with Seche Vite, of course. :) What do you think? I think it's meow-tastic.

However, there is a serious side to the topic of black cats on Halloween. Many people are superstitious about black cats and believe they're bad luck, a tragic side-effect of their association with 'witches' who supposedly used them as 'familiars' back in the days of the witch trials. To this day, this has two very sad consequences. Black cats are the least likely to be adopted, and accordingly, are the most likely to have to be put down in shelters; if you're considering adopting a cat, please consider adopting a black cat, since its less likely that someone else will. Second, if you have a black cat, please keep them inside the house around Halloween. Acts of violence toward black cats are heightened that week, and many black cats go missing during that time. Don't let yours be a victim to someone's bigoted stupidity.

Love all da kittehs, I say! And thanks for reading. :)

Xoxox,
M.

Saturday, September 8, 2012

NOTD: Summer Sunset

Hello everyone!

Today is the final theme in CNT's Summer Challenge. And that makes me sad.

Yes, there will be another challenge starting shortly after this one ends, in October; it will be far less intense (once per week instead of 4 times per week). And, I hope to join another group that will be starting an ABC challenge soon (also once per week). But you know what they say--you never forget your first time. Especially when it has played such a big role in the nail polish part of my life. Through this challenge I've met lovely bloggers and have learned amazing techniques. I've improved some skills and learned others. And I've stretched myself creatively in fun (and frustrating!) ways. So this challenge will always have a special place in my heart.

This theme is fitting, in my opinion...a sunset marks and end to a day, just the way this theme marks the end of the challenge. So, my Summer Sunset manicure is also a way for me to say goodbye to this challenge through nail polish.

What with all of that poetic prose, you'd think that my manicure would be some gorgeous, amazing creation. Sadly, it's not. It's perfectly okay, but it didn't come out the way I wanted it to come out, and I don't think that's a coincidence--I think there is a part of me that just didn't want this to end, so just couldn't put together a mani that pulled together. Everything went wrong along the way, from the design to the cleaning up of my cuticles. So I did a second version which I like better...but it's still not quite what I wanted. Sigh...that's how things are sometimes.

Anyway, here are both versions, for what they are worth: my salute to my very first nail-art challenge. I'll show you the better version first:


Summer Sunset--better version

Here is what I used for this first version:
Wet n Wild I Need A Refresh-Mint
Color Club Pure Energy
Zoya Crystal
China Glaze Sun Worshipper, Fairy Dust & Smoke and Ashes
Barielle Soul-er Powered
Sally Hansen Orange Impulse & Lightning
Pure Ice Silver Mercedes
Cheeky CH37
Shany SH08


Summer Sunset--sort-of-fail version

Here is what I used: for the second version:

Wet n Wild I Need A Refresh-Mint
China Glaze Brownstone, Sun Worshipper, Fairy Dust & Smoke and Ashes
Barielle Soul-er Powered
Sally Hansen Orange Impulse
Pure Ice Silver Mercedes
Cheeky CH37
Shany SH08

One last thing. I want to say a huge thank you to Debbie, Queen Crumpet, for all of the work she does to make CNT a fun, supportive place to learn, share, and create. :)

Thanks for looking! Please check out the other summer sunsets by the other CNT bloggers, linked below. :)

M.

Saturday, August 18, 2012

NOTD Before & After: Gamer Geek Chic FTW!

Hello!

Up to a couple of weeks ago, I would have thought that the intersection between nail polish lovers and gamers would have been non-existent group, or a tiny one at best. But in a short period of time, I've found several fellow bloggers who also love to game. One of them, Dina of Secretary's Nail Art, and I found out that we both share a love for World Of Warcraft, and we decided to do a twin post of WoW-themed manicures! I'm presenting mine here, and you can see hers by clicking here..

First, I started with Color Club's Voodoo You Do, which is a deep evergreen that reminds me of pine needles. The color reminds me of some of the saturated colors in the game, and is very earthy, which fit in with what I wanted to do:


Voodoo You Do in shade

Color Club Voodoo You Do in indirect sun

Color Club Voodoo You Do in direct sun
Sigh...I can't wait to do some Christmas manicures with that...

Anyway, back to my WoW manicure! My favorite class to play is druid; I love this class because, among other things, it has a strong base in appreciating nature, and can shape-shift forms to use different abilities. I decided to represent my druids by doing a manicure where each nail celebrates one of the forms that druids can take; these are: 

Thumb: Tree form (allows the druid to heal friends)
Index Finger: Flight form (allows the druid to fly fast!)
Middle Finger: Moonkin form (aka Boomkin form cause it blows up enemies very effectively)
Ring Finger: Cat form (allows the druid to become invisible to stealth past enemies; you only see glowing eyes and a faint outline, while your enemy sees nothing, muah hah hah)
Pinky Finger: Bear form (allows druid to take a lot of damage)

Here is what I came up with:

World of Warcraft Druid manicure

If you're interested, here is what these forms look like in game; it might help the manicure make a bit more sense, lol:


So here's how I did it.

Thumb: To recreate the Tree Form's crazy branch-and-leaf hair, I used Mash plate Mash-37, stamped with Revlon Varnished and China Glaze Passion.

Index finger: To capture Flight Form, I used the eagle from Konad plate m28, and Pure Ice Silver Mercedes.

Middle Finger: To make the feather decorations that the moonkin wear, I used a feather image from plate OB40, stamped with Silver Mercedes, and used a dotting tool to make the medallion, using Varnished and Passion.

Ring Finger: To make my glowy Cat Form stealth eyes, I used the pearl white from my Migi nail art pens

Pinkie: To make my bear tracks, I used Passion and stamped with Shany plate SH11.

If you are a WoW fan, I hope this captured the spirit of the druid for you. If not, thanks for reading this far! Either way, please check out Dina's take on the WoW theme by clicking here. :)
Thanks for looking!

M.

Friday, August 10, 2012

NOTD: A Walk On The Beach

Hello!

Today's challenge theme in PCF is 'A Day At The Seaside'. Earlier this summer I did a beach manicure for a contest I was in (you can see that one by clicking here), and I decided to make this one a sister to that one...this is a close-up look at what was happening on one teeny-weeny part of the shore:


This one shows the tootsies better


This one shows the glitter better


Oh noes, what's happening?! There seems to be a sea crab chasing somebody's tootsies! Maybe they got away, maybe they didn't...aaahhhhhh...:)

Okay, enough silliness! Here's how I made it. For the base color, I used China Glaze's Fast Track (love this color so much, especially to use for sand), and for the ocean, I used Sinful Colors Nail Junkie. To stamp the feet, I used China Glaze's Kalahari Kiss, and Shany plate SH03; I wanted to use a similar color to give the look that you get when you actually walk on the beach and the sand changes color slightly where you step. To stamp the seashells (you can barely see them on the ring and middle finger) I used Piggy Polish in All That Glitters, and Shany plate SH04. Finally, to stamp the crabs, I used Cheeky XL plate L, and Sally Hansen White On; this was actually an image of a lobster, but I just used the head of it. :)

I hope it made you smile. Thanks for stopping by! Please check out the other seaside manicures my fellow bloggers created, linked below. :)

M.


Friday, July 27, 2012

NOTD: Hits Mari Moon Dreamer + Olympics Opening Ceremony Challenge

Hello!

Today I have a NOTD for you that was actually a Before & After, but I'm not going to present it that way. The reason is that the base polish is Hits Mari Moon Dreamer, one of the gorgeous Brazilian polishes I got in my recent swap, and it needs a whole post of its own to do it justice (it needs that many pictures, yes, lol). So, I'll just show you the After part here, and then we'll hop in the way-back machine and do the Before. :)

The challenge in PCF today is to create a manicure with the theme 'Olympics Opening Ceremony/Flag'. I opted to focus on the opening ceremony side of it...One of my favorite moments from any opening ceremony comes from the 2010 Winter Olympics, when they unveiled the stadium torch. Although there was a malfunction and the torch didn't work right at first, it was still exceptionally beautiful, and I thought the symbolism, color, and shapes were a moving tribute to the torch:


So, I set out to do a manicure that captured that moment somehow, to the best of my ability. I decided on a stylized representation of the torch in this moment. Here's what I did:


I started with Hits Mari Moon Dreamer as my polish, since it seemed to have similar colors to the ones I love in the picture. I stamped a firework with Shany Plate SH13 using Color Club's Fashion Addict, to reflect the fireworks, and using the same polish I stamped part of a geometric pattern from Konad plate m64 to mirror the geometric intersection of the bars in the torch. Finally, to capture the glow, sparkle and color of the flames, I dabbed on Lush Lacquer's Cheetahlicious glitter on the designs, and covered up the whole thing with Seche Vite.

The best part is that for once, the sun came out when I stamped with a holo, so the glow that I was hoping would come with the holo actually did show up in the sun, making it (in my opinion) even more like the play of colors in the original:


And finally, as a preview for the swatches I'll be showing you of Dreamer, look at this beautiful duochrome color shift that happens even with all of this stamping on top of it! That's some impressive duochrome...:


So, there is my tribute to the Olympic Opening Ceremonies. I'll certainly be watching on Friday--will you?

Thanks for looking, and please check out all the other Opening Ceremony/Flag manicures done by my fellow bloggers, linked below!

M.

Saturday, July 14, 2012

NOTD + NOTD = Happy Bastille Day!

Bonjour!

Today is the day that France celebrates their independence day, Bastille Day! Part of my family is French, so I've always felt a little comaraderie with this day. On top of that, today's challenge in my Purple Crumpet Fairy challenge group is to do a Bastille Day manicure. So guess what I have for you today? ;-)


I've been looking forward to this challenge for a while, and even practiced my free-hand element for it. Ah, the best laid plans...Here is what I planned out and created:

Happy Bastille Day! Right hand

Happy Bastille Day! Right hand again
 First, the base color is Color Club's Worth The Risque. That was supposed to be awesome, because it's a silver holo that was going to shine and add to the firework effect in the background and under the crackles. But...the sun has not been out, and so the holo cannot shine. And the polish looks more dull silver than pretty-white-sparkly silver.

This is also a problem because I free-handed my Eiffel Tower in a dark gray, that should have shown up against the background. With the dull light, however, it didn't show up very well. So I had to go over it in black (Wet n Wild Ebony Hates Chris), and, well...I'm not a very good free-hander to start with, let alone when I have to try to double-up. So my Eiffel Tower looks a bit like a cell phone tower. Sigh.

I used China Glaze crackle in Oxidized Aqua, which also does not contrast nearly as nicely with a silver gray as with a silver white. I put Revlon glitter over it, and painted the other third of my flag with Sally Hanson crackle, followed by a coat of China Glaze Fairy Dust to make it sparkly. I stamped a blue firework with the Oxidized Aqua (don't worry if you can't see it, it doesn't show up in this light), and then a red firework over it with Pure Ice Siren, using Shany plate SH13.

Don't get me wrong. I like the manicure, I just think I'd like it more if the sun were out!!! I can certainly feel the pain of my British stamping sisters who tend to get a lot of overcast and rainy days even in the summer. The upshot is, I felt like this looked too washed out without the sun to light it up, and I wanted to do something a little more vibrant.

Luckily, I have two hands, so I scrubbed the polish off of my left hand, and designed another manicure! Here is my unplanned creation:


Happy Bastille Day! Left hand


For this one, I painted the bottom half of the nails with China Glaze Frostbite, using scotch tape to colorblock. I learned something important--when you have a thin polish, if you paint upward toward the tape, the polish may leak under it. It's better to paint down off of the tape. After I cleaned up my disaster with an acetone-soaked Q-tip, I painted the top half with China Glaze Adventure Red-y. I used white nail tape to delineate the border between the two. Then I stamped a fleur de lis with Sally Hansen White On off-center on each nail, using Mash-35. This captures the colors of the French flag a little more effectively I think! I'll take a picture of the first manicure tomorrow if the sun comes out. :)

Thanks for looking! Please check out the other Bastille Day masterpieces my fellow bloggers created, and Vive La France!!

M.