Saturday, June 30, 2018

Zoya Jelly Brites!

(Press samples and affiliate links ahead!)

Hello!


Zoya recently their Jelly Brites, a mini-collection of jellies that are meant to build. I'm always on the look-out for good jellies that even well, and that I can potentially use for leadlighting, so let's take a look!
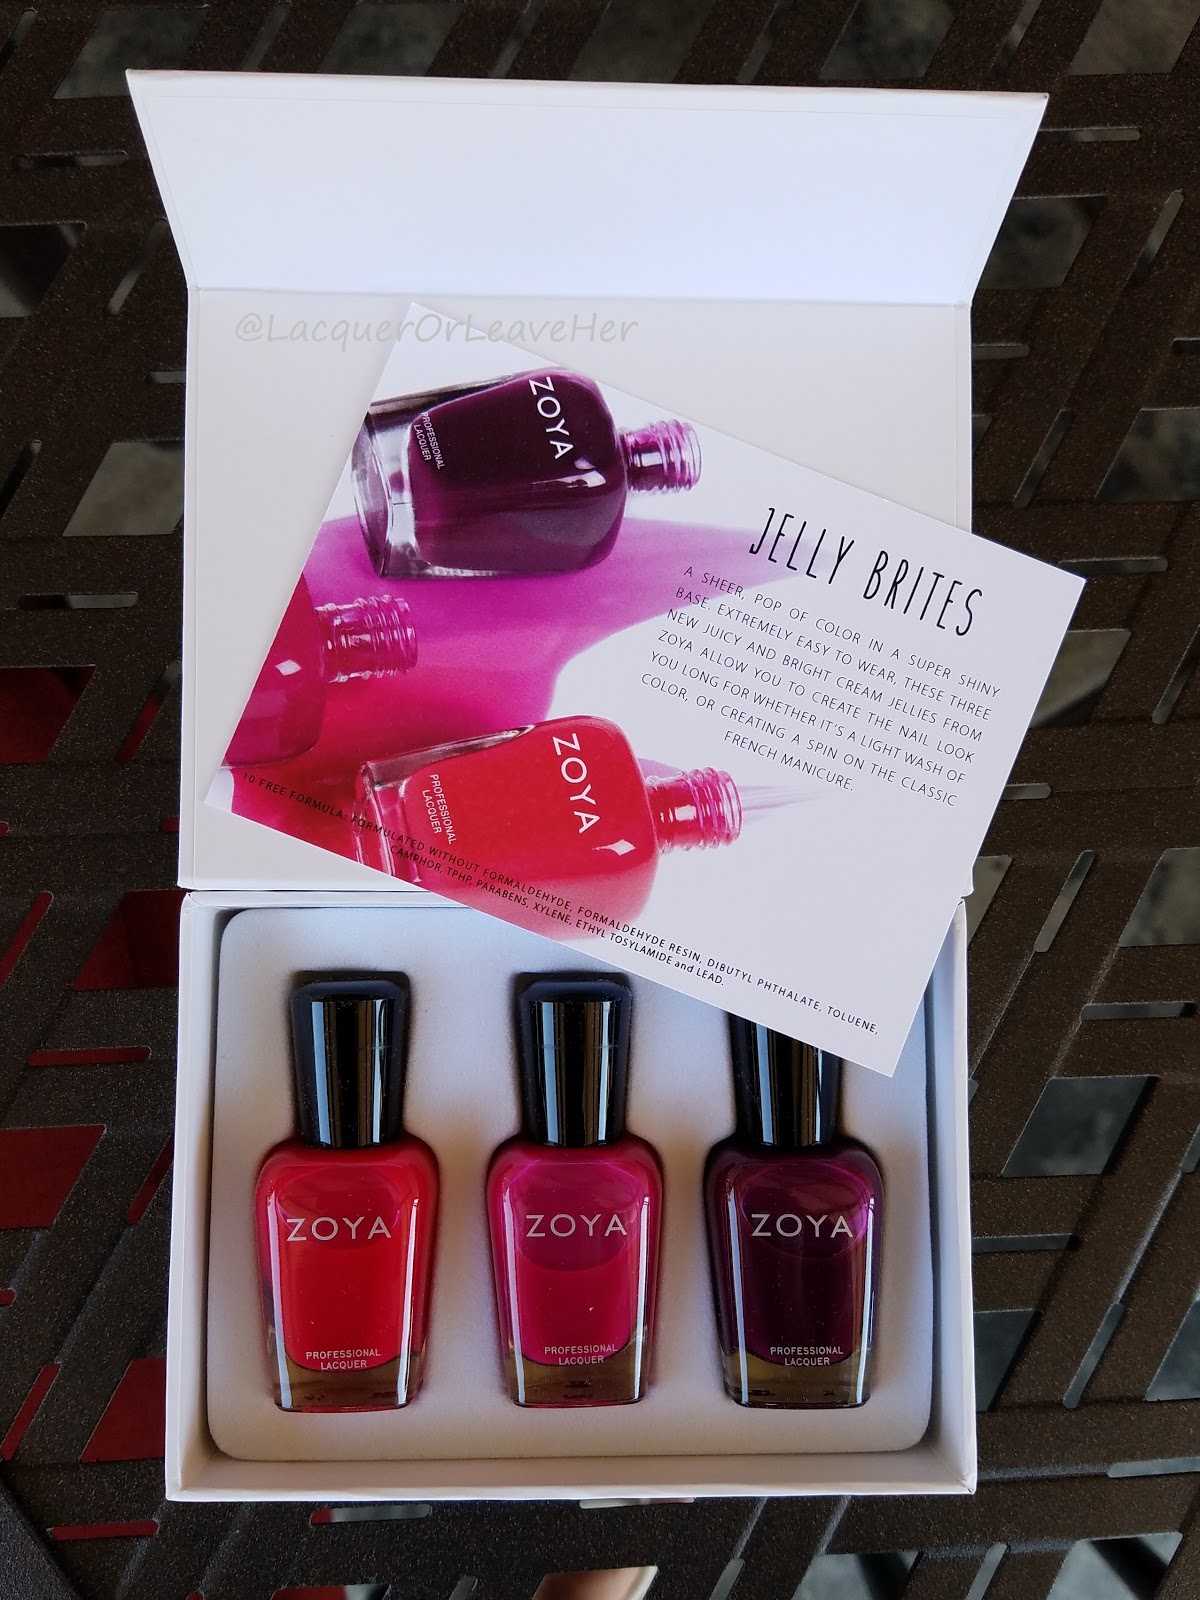
Zoya Jelly Brites


If you want to see them in action, I made a super-quick (I'm talking a minute) swatch video:


Now for some swatches! for each of these I'm showing one, two and three coats. Here's Zoya Molly, a pink-leaning bright red jelly:


Zoya Molly--one coat


Zoya Molly--two coats

Zoya Molly--three coats

Zoya Molly


If a watermelon and a cherry had a little polish baby, it'd be this polish--it's summery with a fun, sexy kick. I had no issues with Molly--she covered evenly for me even on the first coat, and shifted from more pink-leaning to more red-leaning as I put on more coats.


Next we have Zoya Paris, a raspberry jelly:


Zoya Paris--one coats

Zoya Paris--two coats

Zoya Paris--three coats

Zoya Paris


Paris feels like summer in a bottle to me--so cheery and energetic and bikini-licious. Again the formula was excellent; the first coat of Paris went on a little thinner than Molly for me, and again I had perfect coverage at two coats (if you looked closely at my nail IRL you'd see some VNL, otherwise not). This shade got more saturated as I put on more coats.


Finally, we have Zoya Alia, the sauciest, vampiest Brite sister:


Zoya Alia--one coats

Zoya Alia--two coats

Zoya Alia--three coats

Zoya Alia


Alia is more of a red-based purple, and it builds into a gorgeous glossy wine. I had some patchiness on the first coat, that is, my ridges showed--if you don't have a ridge situation like I do, you'll probably be find. I loved how the first coat is still a rich color, and I fell more and more in love as I added coats. :)


So, I mentioned at the start that I was interested in whether these could leadlight. So, I tried it out. First, I tried a sample on a swatch stick:


Then I did a full manicure with the polishes (plus Zoya Cam and Zoya Frida for the lanterns). I did this over Sally Hansen Creme de la Creme and used Moyra's Rivalda plate and Kaleidoscope Black stamping polish:


And here it is matted:


I'm pretty happy with how that came out--the colors are vivid buy you can still see that plack clearly under it. I'd definitely say they pass the leadlighting test. :)


You can find the Zoya Jelly Brites on sale now in Zoya's store, or at any retailer where Zoya is sold. :)


Big hugs,
M. xoxo

Follow me! 

Wednesday, June 27, 2018

Dixie Plates Lines 01

(Press samples and affiliate links ahead!)

Hello!


Today we're gonna take a look at another new stamping plates, Dixie Plates Lines 01...Here's the video review I did of the plate:


And here's a closer look at the plate:


Dixie Plates Lines 01


As the name implies, this plate is mostly filled with lines of different elements, along with some mystical linear elements. This is the sort of plate that I love to keep near my workspace, because so many of these designs work so well with other images, in addition to the design possibilities from the single plate alone.


There are no full-nail images, so here's a shot with a ruler to help you get a feel for size:


Here are a few sample looks I did with the plates:


So let's jump into the manis! For my first mani, I started with a base of Sally Hansen Creme de la Creme. I stamped an image from Dixie Plates Mega Mani Mix, with Moyra Silver, then also stamped the elongated diamonds from the Lines 01 plate. The I stamped a few more with Moyra's silver foil stamping polish, and put on a layer of foil from Beauty Big Bang (I will be reviewing these shortly, in the meantime use my code MISHKA824M for 10% off your order). Here's how it came out:


Dixie Plates Lines 01 and Mega Mani Mix over Sally Hansen Creme de la Creme

Dixie Plates Lines 01 and Mega Mani Mix over Sally Hansen Creme de la Creme


And I had to see how this one looked matted:

Dixie Plates Lines 01 and Mega Mani Mix over Sally Hansen Creme de la Creme


For my second mani, I went patriotic! I started with a base of Spellbound Nails Milky Way and a gradient of Spellbound Nails Rockets' Red Glare and Twilight's Last Gleaming. Then I stamped an image from Dixie Plates Mega Mani Mix with Kaleidoscope White, and then my stars with Messy Mansion Red-y Or Not and Delft Blue:


Dixie Plates Lines 01 and Mega Mani Mix over Spellbound Nails polishes

Dixie Plates Lines 01 and Mega Mani Mix over Spellbound Nails polishes


And here it is matted:


Dixie Plates Lines 01 and Mega Mani Mix over Spellbound Nails polishes

Dixie Plates Lines 01 and Mega Mani Mix over Spellbound Nails polishes


Finally, I fell in love with one of the sample looks above, so had to make a full mani with it. I started with a base of Zoya Blu, Darby, Abby and Delia, then stamped with Hit The Bottle Polish My Suitor Wears, Sally Hansen Thyme Is Money, and Moyra Silver:


Dixie Plates Lines 01 over Zoya Polishes

Dixie Plates Lines 01 over Zoya Polishes

And here this one is matted:


Dixie Plates Lines 01 over Zoya Polishes

Dixie Plates Lines 01 over Zoya Polishes


So what do you think, anything here you like? And what do you think of the plate?


You can find this, and Dixie Plates' other plates, in their store, or if you're in the US or Canada, from Lantern and Wren. And you can find Dixie Plates hanging out around the interwebs here:

Dixie Plates Facebook Fangroup: https://www.facebook.com/groups/461694520667496/
Dixie Plates on Instagram: https://www.instagram.com/dixie_plates/ 


Big hugs,
M. xoxo

Follow me! 

Monday, June 25, 2018

Monday Manis With UberChic Beauty Collection 26

(Press samples and affiliate links ahead!)

Hello!


Mani spam!!! Here are a few more manis I did with UberChic Beauty's Collection 26...


For my first mani, I started with a base of Zoya Midori, then stamped 26-01 with Messy Mansion Bisque, Carbon, Forest, and Holly:

UberChic Beauty 26-01 over Zoya Midori, stamped with Messy Mansion polishes

UberChic Beauty 26-01 over Zoya Midori, stamped with Messy Mansion polishes

UberChic Beauty 26-01 over Zoya Midori, stamped with Messy Mansion polishes

UberChic Beauty 26-01 over Zoya Midori, stamped with Messy Mansion polishes


Inspired by the floral trends this season, for my next manicure, I started with a base of Supernatural Lacquer Wrath of the Heavens, and stamped 26-02 with Hit The Bottle Polish Copper-Haired Girl and Blue-tiful:

UberChic Beauty 26-02 over Supernatural Laquer Wrath of the Heavens, stamped with Hit The Bottle Polish polishes

UberChic Beauty 26-02 over Supernatural Laquer Wrath of the Heavens, stamped with Hit The Bottle Polish polishes


Then I went a little Sci-Fi, starting with Born Pretty Store Years, then stamped 26-02 with Moyra Silver: 

UberChic Beauty 26-02 over  Born Pretty Store Years, stamped with Moyra Silver

UberChic Beauty 26-02 over  Born Pretty Store Years, stamped with Moyra Silver

UberChic Beauty 26-02 over  Born Pretty Store Years, stamped with Moyra Silver


And finally, I did some stylized ocean waves with 26-02 over Girly Bits Cosmetics Le Freak, stamped with Girly Bits Cosmetics Ker-minty Frog Here:

UberChic Beauty 26-02 over Girly Bits Cosmetics Le Freak, stamped Girly Bits Cosmetics Ker-minty Frog Here

UberChic Beauty 26-02 over Girly Bits Cosmetics Le Freak, stamped Girly Bits Cosmetics Ker-minty Frog Here

UberChic Beauty 26-02 over Girly Bits Cosmetics Le Freak, stamped Girly Bits Cosmetics Ker-minty Frog Here

UberChic Beauty 26-02 over Girly Bits Cosmetics Le Freak, stamped Girly Bits Cosmetics Ker-minty Frog Here


Phew, now I'm tired! ;-) What do you think? Do any of them call out to you?


Hope you have a great week! Big hugs,
M. xoxo

Follow me! 

Saturday, June 23, 2018

Meet My New Favorite Stamper...

(Press samples and affiliate links ahead!)

Hello!


Hey guys! I have a large doggie rump in my lap while I'm writing this, which is awesome, but a bit awkward to work around! So I feel crushed, but very loved. :)


Anyway! I recently got the opportunity to try out Hit The Bottle Polish's Double-Shot-No-Ice stamper, which is a double clear stamper force of nature:


Hit The Bottle Polish Double-Shot-No-Ice stamper


If you want to see it in action, take a look at the video review I put together:


You probably guessed from the title of the post that I love this stamper, so let me walk you through why. First, although it's an extra, how cute is this packaging???!!


Inside, you get a little scraper, and the double-decker, two-stampers-in-one stamper XL clear stamper: 

Hit The Bottle Polish Double-Shot-No-Ice stamper


When you pull the stamper apart, here's what you get:


Everything is topped by a lid, to protect your stamper. Then, you have a long-barrel XL clear stamper that has no bottom--this is huge for me, because I have a tendency to set my stamper down into smears of polish and then I can't see through the bottom anymore:


Then you have a short-barrel XL clear stamper which does have a bottom on it:


Because of the shorter barrel on this, I'm far less likely to set it in a smudge of something. Also, I've seen similar stampers (Michelle has one herself) that has bling in the bottom, which is pretty, but for me, just not practical--I want to be able to see through that baby! So that's why this one is called 'Double Shot No Ice', since it doesn't have the 'ice' bling crystals inside.


As always, the first thing I wanted to check was the stamping quality. Clear stampers can be finicky, and it seemed to me the shorter barrel might make it harder to pick up images. However, that didn't turn out to be the case--both picked up my images perfectly. One of each of these pairs were stamped by the short barrel, and once of the long--both thin and think areas picked up with ease:


Very impressive!

So, here's what I love about this stamper:


  • Excellent quality
  • Amazing visibility! Light reaches through no problem, and you can see from just about every angle even with the long barrel, but the short barrel is almost like there's nothing there between you and your stamping. I've started to use it when I film my videos because it makes it soooo easy to see what's happening. 
  • Two stampers together means when I forget to clean my stamper between scrapes, I have another one ready to go. And I often forget to clean off my stamper and don't realize it until I've scraped another image, so this saves me lots of wasted polish.
  • Different lengths for different purposes. For the most part, I prefer the feel of the long barrel. But sometimes if an image is being a little persnickety, it's nice to have the smaller option
  • Two stampers in one means another available stamper for when I do reversed stamping--with no additional storage space needed.


But what if you only like one size of the two barrel stampers? Well, you're still getting two stamping heads in one stamper. One of my YouTube viewers said she'll use the smaller one as a back-up head, and why not? Some other stampers have removable bottoms, so you can think of this as a removable bottom that also stores an extra stamping head.


So, I am again very impressed with a Hit The Bottle Polish product, and recommend you go grab one! You can buy this directly from Hit The Bottle of course (check her site for list of distributors that ship to you), or if you're in the U.S. or Canada, you can find it at Lantern & Wren. And you can follow Hit The Bottle around the interwebs here:


Big hugs,
M. xoxo

Follow me!