Wednesday, October 31, 2012

NOTD x 3: Going out with a bang!

Hello!!

Yes, you read that title right. There will be three manicures in today's post for you. The reason is this. Both of my Halloween challenges end today, and Wednesday is the Llama Nails alphabet challenge day, and this week just happens to be 'H'--I'm pretty sure there is a law that states I MUST do a Halloween manicure for the alphabet challenge if the letter that falls on actual Halloween day is 'H'. And I don't wanna go to jail before Christmas, too much stuff to do. So yep...that makes three manis scheduled for the same day.

First up: To end my CNT Halloween challenge, the last prompt is to recreate someone else's mani from previous prompts that you liked. One of my favorite manicures of the whole challenge was this one. I'm not really great with free-hand art, as you may have noticed, but I really wanted to try to make a version of it. Here's how it came out:


I don't remember planting zombie hands in that part of the garden...


That one on the middle finger is a zombie skeleton. Not at all a zombie hand that looks like a skeleton. Nope, not at all.
I was so happy with how this came out, I almost couldn't bring myself to take it off. It's not perfect, and I'm sure there are many others out there that are better. but I managed to do it, make it recognizeable, and even used gray polish to shade the black polish. It just goes to show that it's always worth giving something a try, even if you aren't sure you can do it. :)

To make it, I started with a base of China Glaze Elephant Walk, my go-to grey. I free-handed a moon with Pure Ice Silver Mercedes, and then free-handed the zombie hands with Wet n Wild Ebony Hates Chris. Then I tried to highlight/shade appropriately with Silver Mercedes and Elephant Walk. I used The Nail Junkie Black Cat to make the ground at the bottom of the nail.

The last prompt in my 'This Is Halloween' challenge was also to recreate someone else's mani from the earlier prompts. I chose this one from Lissa's Polish Addiction, because it was sleek but spooky. Yes, it's another free-hand manicure--let it never be said that I'm not willing to push myself, lol! Sadly, my results were not quite as good this time:


In my mind I decided that it would be cool to have a spooky night sky instead of her beautiful purple, and a blood-red house because...honestly, I don't know what the heck I was thinking, I really don't. I mean, it's not *horrible*, but it's not good. Nope...not good. The only good thing about this mani is that you'll never have to see it again. I tried to rescue it by turning it into an Amityville Horror manicure, and it did work better for that. But it still wasn't my favorite.

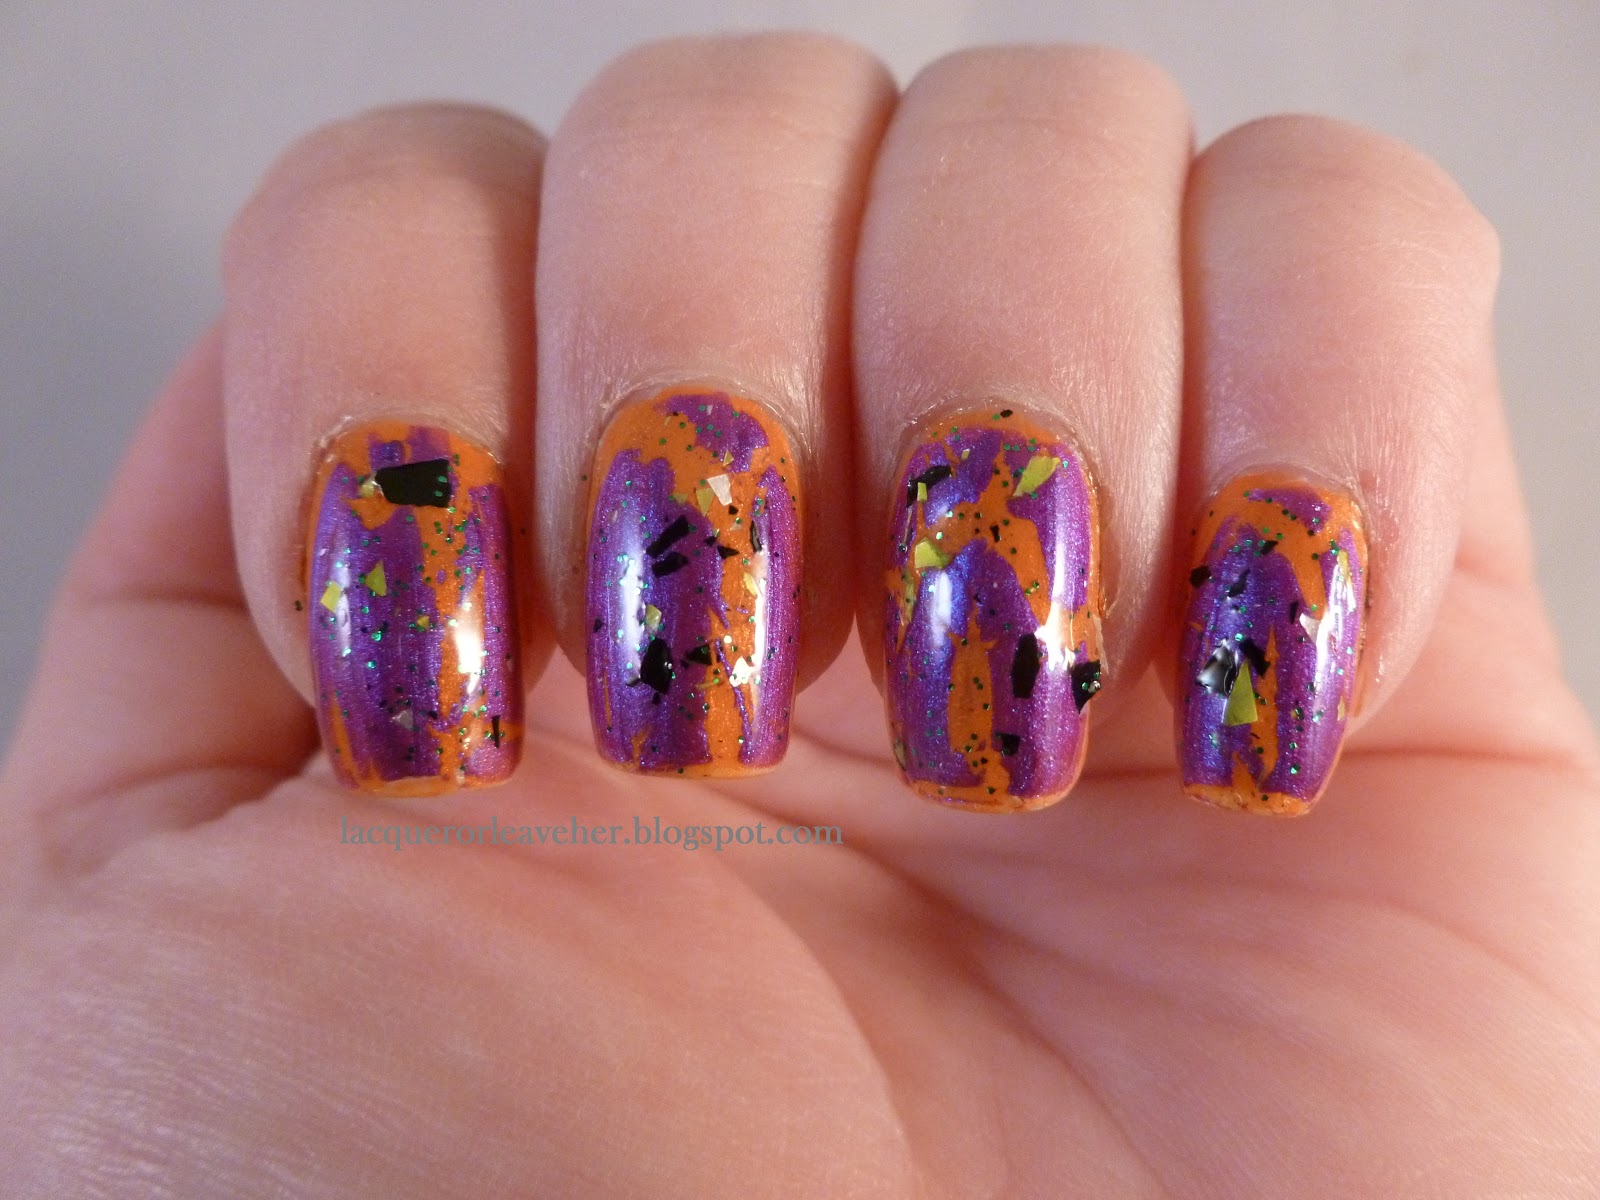
And last but not least...My Llama Nails 'H' is for Halloween manicure. This is the actual manicure I'm wearing for Halloween. I've done so much nail art with these challenges that I wanted to just chill out and layer some pretty polishes in Halloween colors. Here is what I ended up with:


Yes, I know crackle is not in fashion at the moment. Don't care. I love it, especially for Halloween, and I think it goes beautifully with shard glitter (also not a favorite of most polish fanatics...fine, more for me!!). To make this, I started with a base of China Glaze Code Orange, a beautiful pumpkin orange that manages to be just the right amount of bright. Over it I put Sally Hansen Vintage Violet crackle, and over that, I put a coat of Sation's Ego-Friendly, a very pretty polish that has small green hex glitter, lime green shards, black shards, and white pearlesent shards in a clear base. Not to harp on it, but I really do love how well the shard glitter and the crackle go together. And this combination of colors is fun, but not crazy bright.

Phew! That's a lot of manicures for one post! But it just seemed silly to do a separate post for each manicure. So, this way, I hope there is something here for everyone, to end the month with a big Halloween bang. :)

And don't worry, I've learned my lesson--only one Christmas/Holiday challenge for me come December. Well, probably. I mean, most likely. Okay, we'll see. :P

Thanks for looking! Please take a look at (1) the other CNT challenge manis, (2) the other 'This Is Halloween' manis and (3) the other Llama Nails 'H' manis, all linked below. :)

Xoxox,
M.

Tuesday, October 30, 2012

NOTD: Oh noes! Zombie Candy Corms!

Hello!!

I've just received word of a horrendous zombie virus that is attacking...our candy!

It spreads quickly, but once the candy is infected, it takes a while for them to be converted into zombie-candies...I have a first picture of some of these sad, unfortunate candies, hot off the press!

They are young, they've just been turned! They are confused, they don't know what to do! We can stop the spread of the zombie virus if we act quickly! Under no circumstances should you eat any infected candy corn!!!


So frightened! So confused!

We must fight back against the spread of infected zombie candy!

Okay, it's silly but I love it! :)

Here's how I made it. I started with a base of Misa Fountain of Youth, and then did a gradient over it with China Glaze Westside Warrior and Barielle Positive Zen-ergy. I used a dotting tool to create the eyes with Sally Hansen Lightning, and Pure Ice Siren. I finished up with Wet n Wild Ebony Hates Chris for the mouths.

I hope it made you smile! Thanks for looking, and please check out the other 'Trick Or Treat' manis below. :)

Xoxox,
M.

Monday, October 29, 2012

Great link: Nail art types/definitions

Hello everyone!

I found a post on www.jamegackie.com that does a really nice job of showing what different nail art terms mean, like what an 'ombre' manicure is, what a 'ruffian' is, etc. I thought I'd pass it on because I remember a time not too long ago when I didn't know what half these things meant, and spend a fair amount of time trying to find them out! You can check it out by clicking here.

Thanks for reading. :)

Xoxox,
M.


Before & After: Graveyard

Hello!!

Today's prompt in my 'This Is Halloween' challenge is 'graveyard'. I've been so excited about this one since I saw it on the list!

I started with a base of A'dor Beauty Supply Starry Night, to look like a dark blue night sky with stars in it:


I have to admit to wearing Starry Night for more than just a day...I really enjoyed it. It's the perfect sort of glitter for me--beautiful base color that holds its own, and glitter that peeks out at you. :) But I finally convinced myself to decorate it for this challenge:


Here's what I did. I free-handed the gravestone using China Glaze Elephant Walk, and then sponged The Nail Junkie Black Cat along the bottom to make the ground. Then I stamped the tree using LeaLaC plate LLB and China Glaze Call Of The Wild; I also used this color to free-hand the letters on the grave. I stamped the bats using Konad black and QA26; I finished up stamping the skull and bones with Sally Hansen White On and Bundle Monster plate BM225.

Thanks for looking, and please check out the other spooky graveyards, linked below! :)

Xoxox,
M.

Sunday, October 28, 2012

Before & After: Thing!!

Hello!

Today I was playing around a bit with some new colors and plates I got and did a simple little Halloween mani. It all started with a base of Pretty Serious Emma Louise:

Emma Louise indirect light

Emma Louise in the sunlight
Emma Louise is a purple polish with silver glass flecks, with purple and green-teal glitter hexes. This is one of those polishes that doesn't live up to how beautiful it looks in the bottle; on the nail, the glitter doesn't show up often or much, and most of what you get is the glass-flecked finish. This isn't necessarily bad news, however, if you like a more subtle glitter look; now and again some pretty glitter catches the light and gives the polish a bit of extra bling. These pictures actually show more glitter visible than you actually see with the naked eye; this is two coats of the polish. 

After I'd worn this for about a day, a new set of plates arrived in the mail and I had to get a Halloween manicure out of them quickly, since 5 out of 6 of the plates were Halloween plates! I decided to do an accent nail featuring 'Thing', the disembodied hand from The Addams Family.

First I did a gradient to give the nails a more creepy, fun, Halloween-y feel; I started with Cult Nails Hypnotize Me about 1/3 of the way up the nail. Then I put a tiny bit of Pretty Serious VT100 along the very bottom to make it a bit more green. Then I stamped the hand with plate HD04, using Sally Hansen Lickety-Split Lime. I used a dotting tool to accent the fingers and the top of the arm:

This one shows the full 'Thing' design, but the gradient doesn't show as well


This one shows the gradient accurately :) This also shows more how much the glitter is actually visible.


This show the design in direct sunlight
Thing was always my favorite -ahem- thing on the show; I just thought it was soooo cool to have this hand running around taking care of stuff for you, and I'd just watch it, fascinated. Okay, so it wasn't green. But still. :P

Thanks for taking a look! Please check out the other CNT Halloween manicures below. :)

Xoxox,

M.

Saturday, October 27, 2012

Dupe Or No Dupe: Quickie post!

Hello everyone!

Recently I got a chance to try out the Sally Hansen Lustres and while I had access to them, I did a quick comparison post between Sally Hansen Lustre Firefly, Sally Hansen Lustre Plume and China Glaze Swanky Silk. I don't actually own the two Sally Hansens, so I had to jump on the opportunity to get them, and so the polish job isn't the most perfect (don't judge the texture of these polishes based on these pictures, only the colors). But it does the job!

In the pictures, I have the colors on in this order:

Index finger: China Glaze Swanky Silk
Middle finger and pinkie: Sally Hansen Lustre Shine Plume
Ring finger: Sally Hansen Lustre Shine Firefly

China Glaze Swanky Silk, Sally Hansen Plume, Sally Hansen Firefly, Sally Hansen Plume

Swanky Silk, Plume, Firefy, Plume

So, dupe or no dupe? No Dupe, but the colors on all of these are very similar, and in my opinion you can get away with owning only one of them if you like. Plume has a green-gold duochrome with a flash that feels a bit reddish-bronze. Swanky Silk and Firefly both have green-gold duochrome with a rose-pink flash; the only difference is in the intensity of the pink. In Swanky Silk the flash is a bit more subtle, while in Firefly it's a bit more intense.

Can you justify owning all three if you want to? Of course, since none of them are exact dupes ::evil grin::. But you can certainly get by with one. My personal recommendation would be China Glaze, because you can get it for half the price. And half the price means twice da polishez!

Thanks for reading. :)

Xoxox,
M.

NOTD: Influenced by scary movie

Hello!!

Today's prompt in the CNT Halloween challenge is 'influenced by a scary movie'. As I was working on recreating a manicure I liked from earlier in the competition (the last prompt in each of the challenges is to recreate someone else's manicure), I was inspired to do Amityville Horror for this prompt. :)

To do this, I wanted an evil looking house, so I went with a blood red house under a spooky night sky. Then, of course, I had to represent all of the ghosts lurking around the house:


Horror House--are those ghosts flying away, or just circling?

Fly away ghosties! Fly away!

To create the manicure, I started with a base of China Glaze Smoke And Ashes, and added a layer of Max Factor Fantasy Fire to give the night sky a little mystery. I freehanded the moon with Pure Ice Silver Mercedes, and the house with Pure Ice siren and Sally Hansen Lightning. I stamped the ghosts using Anna plate W227, and Sally Hansen White On. And there you have it!

Thanks for looking, and please check out the other scary movie manicures linked below. :)

Xoxox,
M.


Friday, October 26, 2012

NOTD: Witch-Be-Gone

Hello!!

This is my second Witch prompt of the Halloween season, this one for the 'This Is Halloween' challenge. In my first one, I showed a troupe of witches flying through the skies and a beautiful night. Sadly, they did not all get home safely--one of them met with misfortune...so I decided to do another manicure showing her fate. Let's just say she stayed out a bit too late and got caught in the...well, here, see for yourself:


What happens when witches get caught out in the rain...So sad...


Every time I see it, I keep hoping she'll make it...but she never does...sigh...

I started out with a base coat of Barry M Vivid Purple, which I covered with a coat of Barry M Silvery Lilac to make a pretty blue-purple duochrome. I stamped the witch, the lightning bolt and the witch's hat using Pure Ice Silver Mercedes and Shany plate SH02, Bundle Monster plates BM305 and BM 209, respectively. I stamped the raindrops using LeaLaC plate A and Top Shop Cosmic Karma; I also used Cosmic Karma to freehand the puddle of water. I used Silver Mercedes to free-hand the moon, and used Wet n Wild Ebony Hates Chris to stamp the haunted house (BM224).

Luckily, I suspect at least one of her witch friends knows a spell that will reanimate her, so all is not lost! Hee hee hee...

Thanks for stopping by, and please check out the other be-Witch-ing manicures by the other bloggers in the challenge, linked below. :)

Xoxox,
M.


Thursday, October 25, 2012

NOTD: Bloody Gore!

Hello!!

Today's Halloween challenge theme is Blood/Gore/Splatter...so I kinda did all three. :) I loved my zombie gradient from the other day, and couldn't resist turning this into a bloody mess for this prompt......So I pulled out some red polish and made some awesome blood spatter tracks on them:


BlooD! goRe! sPLatteR!!


Mmm...look at that yummy blood sparkling in the sunshine...

I started with a base of The Nail Junkie Frankenstein, and created a gradient with The Nail Junkie Black Cat. Then, I used Pure Ice Siren to make the awesome blood trails...:)

Thanks for looking! Please check out the other gory, splattery, bloody manicures linked below. :)

Xoxox,
M.

Wednesday, October 24, 2012

Before & After: G is for Ghost

Hello!

Oh yes, it's the Halloween season, so you know I had to do it--'G' is for Ghost! :)

I haven't done anything super cutesy and child-like yet this Halloween, so I thought I'd go there for this one. :)

To start, I used a base of Revlon's Grape Icy (which has the side benefit of being a scented polish, which is cool and disconcerting at the same time--it's odd to keep getting whiffs of candy from your hand):


(Pay no attention to those sheet marks on my nails--I painted these about 4 hours before I went to bed, but because I forgot to put on a topcoat, this is what happened when I did go to bed--yargh.)

Next, I put on some awesome Phantom Frights duo polish glitter on that I found for $1.99 at Rite Aid that doesn't have a name; it's orange and black bar glitter with orange hexes and a spray of orange micro-glitter in a clear base. It's cheap and it curls a bit and I don't care because I loves it:


For the final stages, I stamped with Sally Hansen Lickety-Split Lime using the lines and rectangle image from LLC-B; then I finished up by stamping a little ghostie with Sally Hansen White On using the image from Bundle Monster plate BM223:


This makes me think of the fun Halloween parties we used to have at school when I was a kid. It makes me smile, and I hope it makes you smile, too.

Thanks for looking, and please check out the other 'G' entries, linked below. :)

Xoxox,
M.

Tuesday, October 23, 2012

Before & After: Pumpkins

Hello!!

Today's prompt in my CNT Halloween challenge is 'pumpkins'. I did the manicure for this one ages ago, because I love pumpkins, and couldn't wait! I actually did it before I knew officially when I'd be posting it, because I knew one of my challenges would have a pumpkin prompt in it. :)

I started off with a base of Revlon Orbit; this is a polish I got on one of the dual-ended polishes, with a flakie on the other end. It's a deep purple that goes almost to black. On the accent nail  put two coats of The Nail Junkie's Tiger. I wanted to spice up the purple a bit--it's sort of flat on its own--so I put a coat of CND Amethyst Sparkle over it:


Revlon Orbit + CND Amethyst Sparkle + The Nail Junkie Tiger
To make the pumpkin look, I stamped using Sally Hansen Orange impulse, and the pumpkin image from Bundle Monster plate BM222:


Pumpkins, indirect light


Pumpkins, direct light

Pumpkins, shade
I love this shade of purple with this shade of orange, and I was so excited that the stamping polish was so close to the color of Tiger when put over that orange! Something about this combination just makes me happy. I hope you enjoy it, too. :)

Thanks for looking, and please take a look at the other pumpkin manicures linked below. :)

Xoxox,
M.


Monday, October 22, 2012

Before & After: Halloween Gradient

Hello!!

Today is another Halloween challenge manicure from the 'This Is Halloween' challenge...the theme today is to do a Halloween gradient. I chose to do a simple one, that I think is pretty creepy...muah hah hah haaaah haaaaaah...

I started with a base of The Nail Junkie's Frankenstein, a green-based polish with a mustard shimmer and black hex and bar glitters:

The Nail Junkie's Frankenstein


To create the gradient, I combined this with The Nail Junkie's Black Cat (I'm holding the bottle for it in the first picture), a black jelly with silvery-black glitter:


Frankenstein + Black Cat

Creepy monster gradient
Together they make creepy monster nails, the kind you see on that nasty swamp monster coming up out of the sewers to eat you during the night! What's that sound I hear coming from the drain in the bathroom? Aaaaahhhhhhhhhhhhhhhhhhhhhhhhhhhhhh....

If you haven't checked out The Nail Junkie's polishes, I highly recommend that you do. A few days after I did this manicure, I saw on her blog that she did the same gradient! Great minds think alike--I swear I didn't steal the idea! :)

Happy Halloween everyone! It's getting close! And please check out the other gradients done by the very talented bloggers participating with me in the challenge, linked below. :)

M.

Sunday, October 21, 2012

Before & After: Skulls & Glitter

Hello!

That's right, what could be better than skulls & glitter??

Today's manicure is simple, but not understated by any means. Simple design, but tons of awesome Halloween glitter!!!

As I was looking through my polishes yesterday, I realized that I still hadn't tried China Glaze's Mummy May I, an amazing purple glitter in a black base, and I just couldn't stand to let this Halloween season finish without wearing it:


China Glaze Mummy May I: Yes, yes you may.

I wore it like that yesterday, and then when I woke up today, I decided it was time to decorate it. But when you have a polish that awesome, you don't want to cover it up...so I decided to add some orange glitter, and did a gradient with Cult Nails Captivated:

China Glaze Mummy May I + Cult Nails Captivated

Sparkling in the sun


Oh yeah, that'll do just fine. At this point in my glitter evolution, that's about as glitter-bomb as I get, lol. :) But, it still needs a little something. But only a little, because seriously, that's a ton of glitter. Hmmm...How about a skull? I'm no Stacy London or Clinton Kelly, but I'm pretty sure skulls go with everything. Let's try one on:


Love how the orange glitter sort of looks like flames


Yup. That looks cool...and one on every nail would be too much. But hey...one more on the thumb won't hurt...


Perfect! An adult, glittery Halloween manicure that makes a statement. Oh, and I should mention that I stamped the skull using Mash plate 29, and Pure Ice Silver Mercedes.

Thanks for looking! Have a great Sunday. :)

Xoxox,
M.


Saturday, October 20, 2012

Twinpost: Cheeky 33 (Fall Leaves)

Hello!!

Today is the third installment of my twinpost series with Dina of Secretary's Nail Art; this week, we're both doing manicures using the leaf image from Cheeky plate 33.

For my manicure, I started with Ulta Ginger Peach, a really pretty neutral shade that I'm falling in love with (I'm very picky about neutrals because they tend to bore me, but this has just the right amount of pretty peachy flash in it):

Ulta Ginger Peach in the shade


Ulta Ginger Peach in overcast sunlight

For the next step, I painted over the accent nail with Cult Nails Iconic, and freehanded French tips on the other nails. Iconic is one of my favorite polishes; it's a beautiful wine-red with gold-bronze flakies that are unfortunately really hard to photograph!:


Grrr...you can see the flakies better in the bottle than on the nails...sheesh
Finally, I stamped the target image over all of the nails except the accent nail; for the accent nail I isolated one whole leaf, and stamped it twice, overlapping the stamps. For all the stamping, I used China Glaze Passion:

Pretty leaves


Falling leaves...


You can see the color of Iconic best in this shot

 This would be a great way to jazz up a neutral manicure after work for a night out! I like how the stamping works with the French tip to make it all look more fluid.

Don't forget to check out what Dina did with this image--she used a really cool technique for her, and you can see it here.

Finally, I'm also starting a new thing where I link my favorite artwork for the week up with some friends of mine; they link their favorite manicures, too. Check them out below!

Thanks for looking.

Xoxox,
M.


Blogger 1.0 -