Friday, August 31, 2012

Something funny happened on the way to the mermaid...

Hello everyone!

Today's challenge in CNTs is to do a mermaid manicure. Since I just did a traditional one of these a while back for an MSMD monday, I wanted to do something a little different for this one. After bouncing some ideas off of my awesome buddy Dina (of Secretary's Nail Art), I decided both to use some non-traditional colors and to do a flakie mermaid rather than a glitter mermaid.

I started off with a coat of Barielle's Secret Encounter, a deep wine purple shimmer. Then, I topped it with two thin coats of Hits Can Can, a purple jelly with blue and green flakies. :) The look was subtle, so I didn't want to go for a stark contrast by using silver or gold to stamp the 'scales', so I tried China Glaze's Metallic Muse, a light blue metallic that stamps like a dream.  Here is what that looked like:


It's definitely pretty, yes, but it takes away from the flakies a bit more than I'd hoped, making them seem sparse and putting the focus on the scales. At this point, I'd normally either remove the stamp, or start over (I often use my thumb as my testing ground).

But, having just been thinking a lot about glitter sandwiches, another solution occurred to me.

What about a stamping sandwhich?? Where, instead of the glitter being between two layers of polish, the stamp was?

So, I put another layer of Hits Can Can on top of it, and here's how it turned out:


That's much better! Now the is more contrast between the flakies and the stamp, but the stamping still shines through loud and clear.

I love this manicure, but what I love more are the thoughts running though my head of how I can play with this stamp-sandwich concept...

Thanks for reading! Please check out the other mermaid manis by my fellow CNTs below. :)

M.


Thursday, August 30, 2012

NOTD Before & After: Pure Ice Super Star

Hello!!

Today I'm going to show you a manicure that started out a little iffy, and then got really cool, in my opinion!

I started off with Pure Ice's Super Star. It's a dark red jelly with a sprinkling of multi-color glitter in it. The glitter shows up more in real life; it looks a bit more like what you see in the bottle:


Pure Ice Super Star in the shade

Pure Ice Super Star in indirect sunlight
Among the different glitters are orange, blue and gold, and I was really drawn to the combination. So to decorate it, first I stamped using Bundle Monster plate 301, and China Glaze Passion (I feel like I'm stamping with this all the time these days--it's amazing!). I used just the tip of the stamped image, to get the dot-like spray portion. Then, using my dotting tool, I went over it and placed random dots of China Glaze Metallic Muse and Sinful Colors Serena & Chloe:


I'm really happy with how this came out. It picks up the glitter in the polish, but doesn't just blend in with it. it gives it sparkle and cheer without being too over-the-top. :)

Thanks for taking a look! Hope you liked it. :)

M.

Wednesday, August 29, 2012

NOTD Before & After: Summer Glitter Sammich

Hello!!!

Today's challenge in the CNT group is to make a glitter sandwich. I've been waiting for this for ages because I've come to really love glitter sandwiches. Sometimes you want over the top glitter. But sometimes--not so much! A glitter sandwich--putting a coat of glitter in between two coats of other polish--is a great way of creating depth and subtlety in a manicure.

For this one, I started with a coat of Up Colors Mutacao, A dark brown-gold-red duochrome:
Up Colors Mutacao in the shade

Up Colors Mutacao in the shade

Up Colors Mutacao in the sunlight

Another in the sun. :)
Then I added some glitter, in this case Cheetalicious by Lush Lacquer (Indie alert! Don't worry, I'll be doing a special post about this one), and topped it off with Ulta Pro's Molten Copper for the top layer. Molten Copper is a very unique sheer duochrome that does incredible color changes depending on the undwear you pair it with. In this case, it went wine-with-olive flash over Mutacao:


Mutacao + Cheetalicious + Molten Copper


Mutacao + Cheetalicious + Molten Copper

Mutacao + Lush Lacquer's Cheetahlicious  + Ulta Pro Molten Copper

And here is the combo in direct sun:


I love all three of these polish, and I love the impact of the three of them together. There seems to be different colors and textures wherever you look, but it's never too much--that's the beauty of the glitter sandwich. :)

Thanks for taking a look! And please check out the other glitter sandwiches put together by the other bloggers in the group, linked below. :)

M.

Tuesday, August 28, 2012

Indie-licious Review: All That Glitters Very Peacock-ish

Hello!

This is the first post in my new Indie-licious attempt to support Independent polish makers that produce quality products and customer service!

One of the first indie polish I bought is this one, Very Peacock-ish by All That Glitters. It's a beautiful mix of blue and green glitters in small and medium hex, small bar glitter and large gold hex glitter. The large hex glitters are few--you might not get one even on each nail unless you make sure of it--but I think that's purposeful, and the large glitters are just meant to give a bit of extra bling here and there, like the large spot on a peacock feather. Application is very easy, and doesn't require extra effort to get the glitters even, other than placing extra large hex glitters if you want them. Here is my application of Very Peacock-ish over Pure Ice's Not Now; I did not take any extra effort to put glitter anywhere other than where it naturally fell with my application:

All That Glitters Very Peacock-ish in the shade

Very Peacock-ish in indirect sunlight
In other words, I couldn't be happier with how this applies, and with the final look. It's beautiful just as a topper, but is wonderful for nail art, too--if this looks a bit familiar to you, it's because I turned this into my peacock nails a while back. Here is the final result:


All That Glitters sells through an Etsy store, and while they are out on vacation right now, they will have their next restock on 5 September 2012. You can find the store by clicking here. If you haven't checked out their polishes yet, I believe they're worth a look. :)

Thanks for looking, and happy Indie Polish-ing!

M.

(the products in this review were purchased with my own money.)

Indie-licious: Support Independent Polish-Makers!

Hello everyone!

As you probably know, there has been a movement going around the nail blog-o-sphere designed to support  independent polish-makers (Indies) that are dedicating to providing excellent quality products and taking care of their customers. The general sentiment behind it is that there are some good independent product lines out there, and some not-so-good ones, and that the not-so-good ones sometimes ruin it for the good ones. So, a number of bloggers have decided to make a special effort to spread the word about the good product lines in their blogs. To help spread the word about this, bloggers who are doing this are putting this logo into their sidebar:


I support this effort completely, and am happy to post today saying that I'll be taking part in this effort. I will try to highlight an independent polish at least once a week in some way--either by reviewing it, swatching it, or pointing out how I used it in nail art. This is coming at a perfect time for me--I recently had a birthday, and  ordered myself a few indie polishes as a happy birthday to myself--so I'll have a number of them to show off to you. This is a bit ironic, because when I first started blogging, I wasn't really that much of a glitter person, and I've become one with time, thanks largely to the range of really amazing indie glitters that exist out there.

I'll kick this off with my very first Indie-licious post later tonight, featuring All That Glitters' Very Peacock-ish.

If you know of any indie polishes that you'd like to recommend, please let me know, and I'll take a look at them. I'm always looking for good products, and would love to discover new indies out there lurking outside of my current sphere!

As always, thanks for reading. :)

M.

Monday, August 27, 2012

Dupe Or NO Dupe: Ludurana Show Vs. Essence Where's The Party?

Hello!!

Okay, this time I know why my post previously didn't have the writing. So if you came before and saw only the pictures, I apologize! But I know what the problem is now.

Today I'm going to compare Ludurana Show and Essence Where's The Party for you. This is potentially an important Dupe-off, because one of these is very expensive and relatively hard to find and the other one isn't!

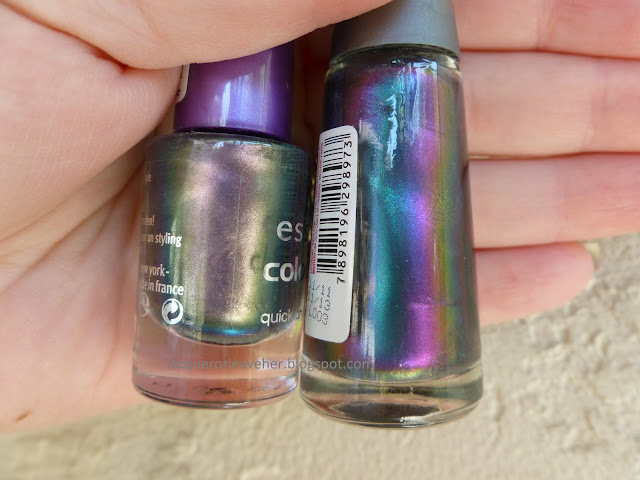
First, let's look at them in the bottle. On the left is Essence Where's The Party, and on the right is Ludurana Show:


In direct sunlight, they look very much alike; in the indirect light, they look a little bit different. Close...Now let's take a look at them on the nail.

First, here are the two colors with no underwear. Essence is on the left, Ludurana on the right, in all pictures:


Now, here they are over Wet n Wild Everyone Hates Chris:


And finally, all playing nicely together (Essence, Ludurana over black; Essence, Ludurana alone):


Definitely NO DUPE. While these polishes are both gorgeous multichromes, they are not identical. Ludurana  shows more blue-purple, while Essence shows more purple-green. So while these were close enough in the bottle to get me excited, they are definitely not really even close enough to make you happy if you really want the other one. I think they're both must-haves for polish fanatics like me. :)

Thanks for looking, and I hope to have an MSMD for you later today. :)

M.

Sunday, August 26, 2012

Dupe or No Dupe: China Glaze Beach Cruise-r and Under The Boardwalk

Hello!

Today's Dupe or No Dupe is an interesting and rare one--it's comparing two polishes from the same collection, Beach Cruise-r and Under The Boardwalk from China Glaze's 2012 Summer Neons collection. Two polishes from the same collection couldn't be dupes...could they?

When I got these and the other polishes that I bought from the collection, I couldn't wait to try them on...but was surprised at how close these two looked in the bottle. I figured you'd be able to tell more of a difference on the nail, so I swatched one hand with each color.

First up, let's take a look at Beach Cruiser alone:
China Glaze Beach Cruise-r in the shade

China Glaze Beach Cruise-r in the sun
Next up, let's have a look at Under The Boardwalk, which has more of a creme finish, but is a highly similar purple:


Hmm. These two look pretty darn similar. Not identical, but pretty similar nonetheless...But maybe that's just because of light differences or something between the two hands. So, here's a look at both hands together:

Top hand: Beach Cruise-r. Bottom hand: Under the Boardwalk


Top hand: Beach Cruise-r, Bottom hand: Under the Boardwalk

These two polishes are pretty darned close to one another, too close for one collection, in my opinion. Beach Cruise-r is a shade lighter, and has a more shimmery finish; but otherwise...yeah. If these two polishes were not in the same collection, I'd say it was no big deal that they were so similar, because they are NO DUPE. But in the same collection? Tsk, tsk, China Glaze--tsk, tsk.

Of course, if you like both of these you can certainly justify having both. But if you are on a polish budget like many of us, maybe you only need one of these. If I had to choose, I'd go with Beach Cruise-r cause I love me a little shimmer. :)

Thanks for stopping by!

M.

Saturday, August 25, 2012

NOTD Before & After: Broken-Hearted

Hello--

I'm very excited to report that I have made my third franken, and can't wait to show it to you! I don't think I've shown you my second franken yet, but I'm so excited about this one that I have to show it to you NAO!

I've decided to name it Broken-Hearted, because it's such a deep red. It''s a blood-red with copper shimmer to it, and just a dusting of scattered holo in the sun:


Broken-Hearted with my highly professional label on the bottle

Love how this picture shows the copper shimmer


A little holo sparkle there for you

And a little more...

And even a little more...:)

After wearing it for a bit I wanted to decorate it, but was so busy having a love affair with it, I wanted to do something simple and elegant, that wouldn't hide the polish. So I decided to try a simple tip along with a lily stamp I just got from Anna's Nail Art, plate W226 (using China Glaze Passion):


I love how crisp and clean the image came out--I'll show you the plates I got sometime in the next few days. For now, I'm going to bask in the beauty of this polish and this manicure. :)

Thanks for stopping by! Hope you have a great weekend.

M.


Friday, August 24, 2012

NOTD Before & After: Fall into orange and green :)

Hello there!

Ever since I did a 'Can't Wait For Fall' challenge recently, I'm completely into fall colors. I'm also currently swatching some colors from the Misa fall collection (the Wanderlust collection), which puts me even in a more fall sort of place! So when I saw today's challenge in CNT was 'Green & Orange', I decided to go for a fall palate and pattern.

The day before I had swatched Misa's Taking Chances, a subtle pumpkin-rust orange with gold glass flecks, and it seemed like a perfect backdrop for this challenge:

Misa Taking Chances in indirect light

Misa Taking Chances in direct sunlight
 I settled on China Glaze Agro for my green, but made sure to scrape it well to make the color a little more faint. I used Red Angel plate RA-115 to stamp the small leaves on the vine, and Cheeky XL plate L to stamp the big leaf. Then I added a few more using China Glaze Passion:

Now I want to go to a puniken patch

This one shows off the gold a bit more


Beauty shot! :)
These colors all work so well together, they play off each other and create dimension! It's a subtle look, but I think it's pretty and interesting. I can't stop staring at it and I have a feeling it will stay on for a couple of days at least.

Thanks for taking a look, and please check out the manicures created by the other Crumpet Nail Tarts, linked below. :)

M.