Showing posts with label Essence. Show all posts

Thursday, November 8, 2012

Before & After: No H8!

Hello!

I've said it before and I'll say it again--since I started blogging, I've met some wonderful people and have even made some friends. People have supported my blog even though I'm not perfect, and often times not even very good at nail art! I personally have only met with joy and kindness since I came into the nail blogging community.

So I am pleased to join a group of ladies who are today presenting purple manicures in support of the 'No H8' cause--to remember not to spread anything but support and kindness to our fellow bloggers and nail artists. I'd go farther and say that my manicure today is dedicated to reminding myself to be kind to everyone, always. As the saying goes, if it isn't necessary and it isn't kind, don't say it/do it. I don't always live up to that ideal (okay, I sort of fail at it all the time!) but I will continue trying. And I want to be clear--my participation in this event is not pointed at anyone other than myself! It is my pledge to support my fellow bloggers in a positive, kind way.

So here is my manicure! I started with Essence Chic Reloaded which is an extremely dark purple (almost black) with a teal flash. This actually is quite an amazing duochrome that shows other colors as well, including blue and a dark gold:

Essence Chic Reloaded

Essence Chic Reloaded

Essence Chic Reloaded


To decorate this, I stamped using China Glaze's No Plain Jane, and a Cheeky XL stamping plate. Then I added glequins for a little added sparkle:


This is a subtle swirly stamping that lightens up the polish a bit but keeps that underlying duochrome flash. Apart from the tip wear, I love it. :)

Thanks for looking, and have a look at the other No H8 manicures, linked below. :)

Xoxox,
M.


Monday, August 27, 2012

Dupe Or NO Dupe: Ludurana Show Vs. Essence Where's The Party?

Hello!!

Okay, this time I know why my post previously didn't have the writing. So if you came before and saw only the pictures, I apologize! But I know what the problem is now.

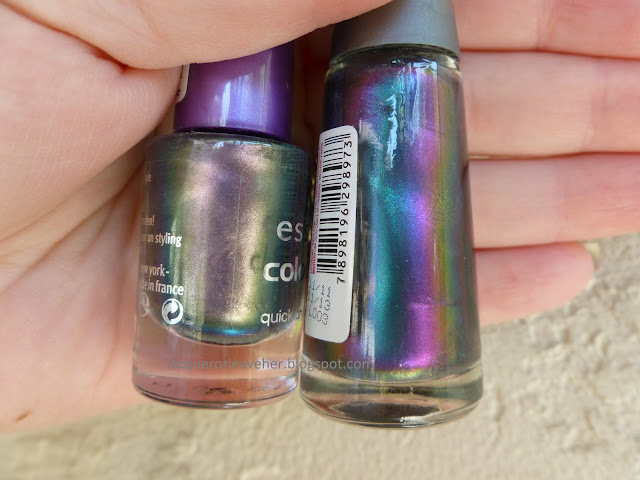
Today I'm going to compare Ludurana Show and Essence Where's The Party for you. This is potentially an important Dupe-off, because one of these is very expensive and relatively hard to find and the other one isn't!

First, let's look at them in the bottle. On the left is Essence Where's The Party, and on the right is Ludurana Show:


In direct sunlight, they look very much alike; in the indirect light, they look a little bit different. Close...Now let's take a look at them on the nail.

First, here are the two colors with no underwear. Essence is on the left, Ludurana on the right, in all pictures:


Now, here they are over Wet n Wild Everyone Hates Chris:


And finally, all playing nicely together (Essence, Ludurana over black; Essence, Ludurana alone):


Definitely NO DUPE. While these polishes are both gorgeous multichromes, they are not identical. Ludurana  shows more blue-purple, while Essence shows more purple-green. So while these were close enough in the bottle to get me excited, they are definitely not really even close enough to make you happy if you really want the other one. I think they're both must-haves for polish fanatics like me. :)

Thanks for looking, and I hope to have an MSMD for you later today. :)

M.

Friday, June 22, 2012

NOTD: Jungle Boogie

Hello!

Today my summer challenge was Jungle/Parrots. To honor the theme, I decided to do an abstract-ish version of a jungle in green tones with a vibrant parrot-like-bird-of-paradise-absolutely-not-a-red-Amazonian-chicken bird sitting on the leaf of the accent nail:

It's a parrot. It really is. It is NOT an Amazonian Chicken. Not even a little bit.

This parrot wouldn't vroom if I put four thousand volts through it. 
I used a combination of stamping and freehand to do this. I started with a base of Essence High Spirits and then stamped some leaf-looking like ovals in a very light neutral color. Using those shapes as a rough guide, I painted over them in Wet n Wild Sagreena The Teenage Witch and China Glaze Tree Hugger. I liked the stroke marks that the brush in Sagreena left, so I didn't cover them up, they seemed to make it look a bit more leaf-like to me. I then put teal-green dots in the negative space using a dotting tool and China Glaze's Exotic Encounters.

Then came the chicken, er, parrot. I stamped this using Red Angel plate RA-102 (with Konad Red and Sally Hansen Insta-Dry Lively Lilac), but the top half of the bird did not come out very well. So, I freehanded over it trying to connect the blank spots and even it all out. The part that stamped the worst was the head, which came out as a weird little blob...to help it along I added a beak with Sally Hansen Insta-Dry Lightning, and an eye using Konad black. A tip for the future...when doing freehand nail art, quick-drying polishes and polishes meant for stamping are not the easiest to work with, lol.

I have decided to name my mangy jungle parrot 'Voltie', in honor of the Monty Python Parrot Sketch:


While he's clearly neither Norwegian nor blue, he does look like he might have suffered a similar fate. But he's cute and he has personality and I loves him. :)

Thanks for stopping by, and please check out the other bloggers' creations!

M.

Monday, June 18, 2012

NOTD: MSMD Gilded Mermaid nails

Hello!

I've recently seen several versions of 'Mermaid Nails' that I adore, and wanted to try my own version of them. You can see two of my favorites by clicking here and by clicking here.

I wanted a blue-green base that had texture, so I started with two coats of Orly's Halley's Comet:

Orly's Halley's Comet (well, mostly...the ring finger is actually Essence's Choose Me)

On top of that base, I put a generous layer of Spoiled's Pet My Peacock glitter, trying to get both a random spray of glitter, but making sure there weren't any super obvious holes. Then, I covered all of that with a layer of LA Color's Radiation, a sheer greenish blue, with gave an opalescent look to the glitter and tone down its sparkle just a little bit. I decided that I wanted my version to be a 'Gilded Mermaid', so I stamped my 'scales' with China Glaze's Passion (by far the best gold polish I've found for stamping by the way), using Mash Plate 46. To give a final subtle sparkle of a different kind, I went over all of it with China Glaze's Golden Enchantment.

Then...Ah, then.


Then I decided to put on gold French tips...This was not my finest decision-making moment:

Gilded Mermaid nails...that are maybe a little too gilded.

I don't often do this, but the tips bugged me so much, I removed the whole thing and started over. Here is the look without the tips:

Mermaid nails in the light

Mermaid nails in the shade

And I think I do like that much better. The gold tips just make it a little too...I don't know what the right word is, but just a little too.

Strangely enough, when I was trying to decide if I would still like the gold stamping without the gold tips, of if I should go with another color to stamp the scales, I took this picture, which shows the layers, textures, and colors really well, I think:

Some texture for ya!
At the end of it all, I'm pretty darn proud of them, especially because I've never done a glitter sandwich before. Next time, however, I think I might go for the smaller, typical scale lines, rather than these thicker ones. But I loved the deco sort of look to these!

Thanks for taking a look. And don't forget to check out the other ladies that participated in MSMD Monday, shown below.  :)

M.