Friday, December 18, 2015

Before & After: Holiday Seriotype! (Or, nobody expects the white poinsettia)

(Press sample, affiliate links)

Hello!

Today's theme in the Crumpet Nail Tart's challenge is simply 'Christmas', so I thought I'd take the simple theme and go the extra mile by giving you several looks.

I started with a holiday seriotype featuring Zoya Aspen, Zoya Amal, Zoya Honor, and Zoya Sue, all from their 2015 Matte Velvet collection (full review here)--I've been using these like crazy this season because I just adore the holiday colors, and mattes are so great to work with for nail art.

If you've never done a seriotype, I highly recommend them--they are super easy, you just sponge your polishes one at a time over your nails randomly until you get a look you like. I suggest using latex around your cuticles to ease clean-up, because they can be messy.

Here's how mine turned out, first in matte form:

Holiday seriotype featuring Zoya Aspen, Zoya Amal, Zoya Honor, and Zoya Sue


Holiday seriotype featuring Zoya Aspen, Zoya Amal, Zoya Honor, and Zoya Sue

For my first look, I went all out. I wanted to do a baroque sort of look, and I wanted to include the poinsettia from UberChic Beauty's Christmas 01. But, I wanted to do something a little different and special, so I decided to go with the oft-ignored white poinsettia instead of the typical red one. So I made a poinsettia decal with Zoya Honor and Sally Hansen White On; then I stamped scrollwork using UberChic Beauty 6-01 with Barry M Gold Foil and Sally Hansen White On:


Here's how it turned out:


Uberchic beatuy christmas 01 and 6-01
Nobody expects the white poinsettia

uberchic beauty christmas 01 6-01
Nobody expects the white poinsettia

There are things I like about this mani--I love how the layered scroll work in white and gold go well together and create an old-fashioned Christmas look. However, I can't decide if I like the poinsettia--the white feels a bit stark, and I'm not sure if that's because I'm just not used to white poinsettias, or because it's just too stark. Overall, I'm happy with how it came out.

For my second look, I decided to go a little simpler. I used two complementary images from the upper right of UberChic Beauty 6-02; this is one of the features I love about UberChic's plates, the images designed to play well together:


I stamped the full image on most of the nails, and the inset on the accent nails:


uberchic beauty 6-02
Serious swirls

uberchic beauty 6-02
Serious swirls

This second look has more of a whimsical look to it, and lets the underlying seriotype shine through.

I love both of them--do you have a favorite?

Happy stamping!
M.


Thursday, December 17, 2015

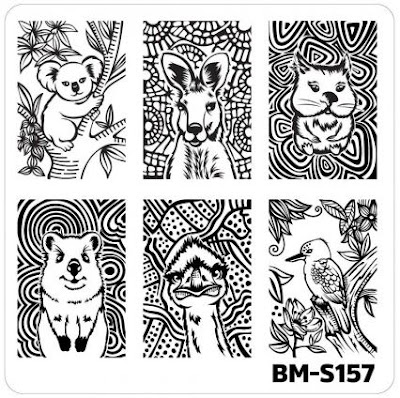
BundleMonster Fuzzy & Ferocious plates now available on Amazon!

(affiliate links)

Hello!

If, like me, you've been waiting for the BundleMonster Fuzzy & Ferocious plates to be available on Amazon, the time is NOW! They're on sale for 11.89, three dollars cheaper than the BundleMonster site, plus FREE shipping. The perfect time to make sure something you'll love from Santa! And depending on where you live, maybe in time to be under the tree!


Now please excuse me while I run to order mine...::whoosh::

Happy stamping,
M,

Before & After: The Lady Varnishes Give Me What I Want + UberChic Beauty Christmas 01

(Press sample)

Hello!

Today's theme in the Winter Nail Art Challenge is: Christmas sweater! I love Christmas sweaters, and defend them vociferously--they aren't ugly (most of them), they're beautiful expressions of holiday joy! That's my story, and I'm stickin' to it.

Despite that, I don't think I've ever done a Christmas sweater manicure on the blog, so this was past due.

To start with, I used The Lady Varnishes Give Me What I Want, a deep plum scatter-fleck holo from the Maleficent collection (see my full review here):

The Lady Varnishes Give Me What I Want

I chose this lovely because I wanted the undercoating of my 'sweater' to have a beautiful sparkle to it. Next I used two images from UberChic Beauty Christmas 01:


UberChic Beauty Christmas 01


I stamped the images with Barry M Cotton, and finished off with some three-dimensional snowflake accents, because when you go out in your awesome sweater, you're probably gonna get a few flakes of snow on it! Here's how it turned out: 


The Lady Varnishes Give Me What I Want uberchic beauty christmas 01
Awesome Christmas Sweater manicure
 The Lady Varnishes Give Me What I Want + UberChic Beauty Christmas 01
That's right, I said AWESOME, not ugly

 The Lady Varnishes Give Me What I Want + UberChic Beauty Christmas 01
Awesomest Christmas Sweater mani ever!

What do you think? Would you wear that sweater? What about the mani?


Happy stamping!
M.


Wednesday, December 16, 2015

Review & NOTD: Christmas Tree Skittle Mani with Born Pretty Store nail tape dispenser

(Press sample)

Hello!

Born Pretty Store recently sent me this nail tape dispenser to review; I chose it actually because I tend to struggle a little with nail tape:

Born Pretty Store nail tape dispenser

Born Pretty Store nail tape dispenser


My issue with nail tape is two-fold. The main problem is that I lose the end and struggle to find it again, and in the meantime what I've already applied catches on something and pulls off. Of course, one solution to this is to cut off as many pieces as you need, and pull them off the corner of your table or some such as needed. That sounds good, but what happens is, when I pull one of those pieces off, it instantly flaps over and sticks to my hand or something else, and then I have to try to pull it back off while not destroying the tape on the artwork I'm trying to do. AND, I still can't find the end of the tape the next time I go to do another mani.

So, when I saw this, I figured it would be good for someone as nail-tape challenged as me--it will keep the end ever-ready, and maybe even help me keep the tape under control while I'm working.

I did a video review of the case here, just showing how easy it is to open and put the tape in:


I also did a second video, a tutorial using the dispenser to make the manicure you'll see below:


What I like about it:

  • It keeps the end easily accessible
  • It's easy to pull off what you need as you need it
  • It's easier to grip than the rolls of tape, so I find it easier to use while I'm applying the teap
  • It opens easily so you can change the color of your tape as often as you want
For my test mani, I did a little twist on a simple, traditional nail-tape manicure, the simple Christmas tree. Normally what you do is put on your base polish, and then when it's fully dry, you lay your tape, put the polish for your tree over it, then pull up your tape.

For my tree, I wanted the tree to be on a naked nail, and have two layers--and undercoat of glitter that would show through as the 'garland' on the tree, and the tree itself:


Christmas tree skittle mani nail tape
Christmas tree skittle mani


Christmas tree skittle mani nail tape
Christmas tree skittle mani


Christmas tree skittle mani


As you'll see in the video, I messed up my first attempt. See, what you have to do is:

1) Try not to overlap your glitter coat with your tape.
2) Let this coat dry completely.
3) Put your 'garland' tape on.
4) Put your green polish on, and give it a few seconds to set but not dry
5) Remove your tape in the reverse order you put each piece on.

So this look can be a little tricky, but I think it's worth it, because I love the spray of glitter showing through as the garland on the tree.

Here are the products I used:
Colors By Llarowe Pirates of Penzance (holo red!)
Colores de Carol (silver holo glitter!)
Colors By Llarowe Gemini Rising (Holo green!)
Color Club Marina (textured gold--I think this looks like Christmas garland!)
Bunny Nails HD-F to stamp the star pattern on the thumb and pinkie, and the star at the top of the tree
Barry M Silver and Gold Foil Effects.

I love how it came out, and have already gotten compliments on my sweet little tree.

If you get frustrated with nail tape like I do, a little dispenser like this might be just the trick for you; for $1.59, it's hard to go wrong. You can also use my Born Pretty Code for 10% off  you full-priced order:


Happy taping!
M.

Tuesday, December 15, 2015

Review: DazzleGlaze polishes

(Nothing to disclose)

Hello!

As you know, I've been trying to expand my efforts to support the indie polish community in light of the summer's events, and I'm back today with a lovely brand I discovered a few months ago: DazzleGlaze Lacquer, part of Radiantly Vivacious.

I discovered the brand when I posted in an indie group looking for someone to create a custom gift for me; I thought I'd give a new brand a try, and loved what she mixed up for me. The custom was a gift, but of course I had to order a couple of beauties for myself...*ahem*...

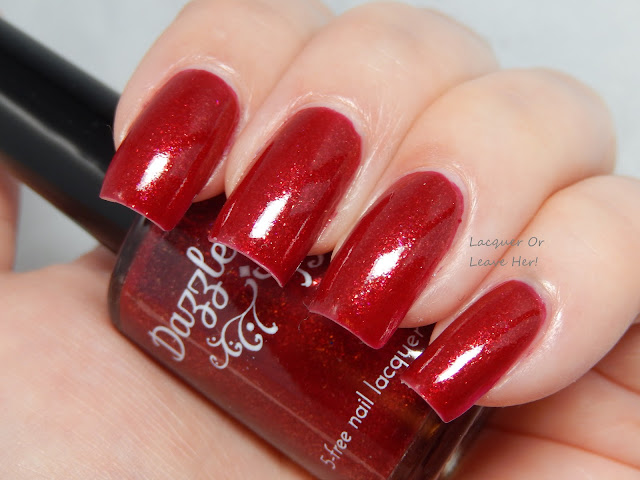
I couldn't resist trying a bottle of Persephone's Pomegranate, a pomegranate-red jelly with gold flecks that give the polish a deep glow:

DazzleGlaze Persephone's Pomegranate

DazzleGlaze Persephone's Pomegranate

DazzleGlaze Persephone's Pomegranate

DazzleGlaze Persephone's Pomegranate

This is two easy coats--excellent formula, excellent application, one coat of topcoat. This is a gorgeous polish for the holiday, a pretty Christmas red with just enough glow-from-within to make your nails look elegant and special. Love, love, love!


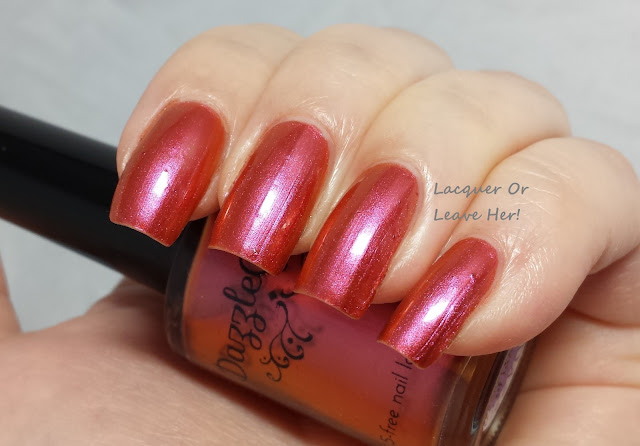
And with my ever-lasting love of multichromes, I had to try Sunsets Of Tahiti, which shifts through pink and coral to an almost bronze shade:


DazzleGlaze Sunsets Of Tahiti


DazzleGlaze Sunsets Of Tahiti


DazzleGlaze Sunsets Of Tahiti

DazzleGlaze Sunsets Of Tahiti


This is also two easy coats, excellent formula and application, with topcoat. This gives exactly what the name suggests--the beautiful colors of a tropical sunset, flashing across your nails all day long. I once was lucky enough to visit Maui, and there was a sunset with just these colors, so I don't know about Tahiti, but Maui works for sure!


There was a small snafu with my order, and because of that, DazzleGlaze sent me a mini of Super Cool Sleepover (excellent customer service!), a mix of silver and pink holographic glitters that seemed to me a perfect match to go over Sunsets of Tahiti:


DazzleGlaze Super Cool Sleepover over Sunsets Of Tahiti

DazzleGlaze Super Cool Sleepover over Sunsets Of Tahiti

This s one coat brushed on, with no muss or fishing. This is a fun, girly topper that adds a dose of twinkle to your day. Love. :)

I found the quality of all three polishes to be excellent, and I'll definitely shop at DazzleGlaze polish again. She has quite a selection, and did an excellent job making up a custom to my specifications! You can find her etsy shop here, and you can also follow her on the Radiantly Vivacious Facebook page here.

Happy polishing!
M.

Monday, December 14, 2015

NOTD: Candy cane skittle with UberChic Beauty 6-01 and Zoya polishes

(Press sample; affiliate links)

Hello!

Today's theme in the Winter Nail Art Challenge is Candy/cookies, and the candy that says 'Christmas' to me more than any other is the candy cane. Even the little round peppermints...and don't get me started on peppermint mochas...nom nom nom sip sip...

Focus, Michelle, focus. For my candy cane manicure, I did a skittle with Zoya Aspen and Zoya Amal, both from their holiday 2015 matte velvet collection (I am obsessed with this collection), and then I stamped the accent nail using UberChic Beauty 6-01 (you can see my full review of this collection here); I stamped using Zoya Amal:


Candy cane skittle with UberChic Beauty 6-01 and Zoya Matte Velvet polishes


Candy cane skittle with UberChic Beauty 6-01 and Zoya Matte Velvet polishes


I love this, it feels like the accent nail is a one of those little round peppermints...but it felt like it needed a little something, so I put on a stud:


Candy cane skittle with UberChic Beauty 6-01 and Zoya Matte Velvet polishes


Candy cane skittle with UberChic Beauty 6-01 and Zoya Matte Velvet polishes


What do you think? Do you like it better with the stud, or without? Is it candy-cane-a-licious?

You can find this plate and lots of other UberChic lovelies in the UberChic Beauty store. Oh, btw, I had a slight stamping snafu with one of the stripes and fixed it useing the UberChic Beauty detail brush...I bet you can't even tell where...:)

Happy stamping,
M.


Saturday, December 12, 2015

Before & After: Zoya Aggie + UberChic Beauty 3-02

(Polish is press sample; affiliate links)

Hello!!


I am so excited about today's before & after...every once in a while, now and then, here and there, the beauty you have in your head when you think up a manicure actually comes to pass when you try to make it. Often you might get close, but rarely as close as you want. But sometimes...just sometimes...


There's a history to this mani. A friend of mine posted a mani with this image, and I had to have it. I discovered it was an UberChic Beauty plate--I'd heard of UberChic, but never tried one of their plates. I went. I found. It was out of stock.

I e-mailed the owner, and got some of the best customer service I've ever had answering my questions. I waited for it to come back in stock, and ordered it...and finally, finally, I got to stamp with it. After all of that build up, it was nearly certain the image would never live up to my expectations. But it did.

I started with a base of Zoya Aggie, and brown-green duochrome:


Zoya Aggie


Zoya Aggie


Then I stamped the highly-anticipated image from plate 3-02, using Sally Hansen Silver Sweep:

UberChic Beauty 3-02


My long-anticipated

super magical 

awesome manicure!


I love the way the duochrome polish plays with the art-nouveau image. I love how beautifully intricate the image is--pretty enough that it doesn't need a lot of decoration (although you could do crazy awesome stained-glass stuff with it), elegant, sophisticated, amazing.

What do you think, isn't that totally worth waiting for a restock??

Happy stamping,
M.