Hello!!
A few days ago, I showed you this manicure using a technique I'd recently heard about, that adds nail foil on to stamped designs. I had some interest in the technique, so I have put together a tutorial for you on it.
First let me be clear, though--this was totally not my idea, it's just a technique I tried out. Here is the video, which I saw in The Joy Of Nail Stamping group I'm in. She shows how to do it on nail decals, which I'm excited to try but haven't done yet. But I have played around a bit now with the technique on my nails and have a few tips and tricks to share with you. :)
For today's design and tutorial I started with LynBDesigns Spot The Cuttlefish, a delightfully unique fall polish that I've fallen in love with. It's a caramel brown jelly with gold and brown flakies (flakies!!!) and a scatter of holo:
.JPG "LynBDesigns-Spot-The-Cuttlefish") |
| LynBDesigns Spot The Cuttlefish |
 |
| LynBDesigns Spot The Cuttlefish |
.JPG "LynBDesigns-Spot-The-Cuttlefish") |
| LynBDesigns Spot The Cuttlefish |
.JPG "LynBDesigns-Spot-The-Cuttlefish") |
| LynBDesigns Spot The Cuttlefish |
This polish is like walking in a fall wonderland...it's the epitome of the season to me. This is three coats and I wish it covered like this in two coats--but seriously, I'll get over it, it's just so gorgeous.
So let me show you the end result of my design first, and then I'll show you the tutorial on how to do it...I was inspired by the fall feel of the polish to do a fall leaf design, using the stamping + nail foil technique:
.JPG "Fall-foil-leaves") |
| Fall foil leaves |
.JPG "Fall-foil-leaves") |
| Fall foil leaves |
Direct light to show the foil close-up before topcoat:
.JPG)
And after topcoat:
.JPG)
.JPG)
I stamped the leaves using Anna's Nail Art plate W231; I stamped with Barry M Gold Foil for my stamping polish, and then used three different foils on top, a green foil, a gold foil, and a duochrome-y foil that goes from purple to gold (that one is on the pinky and the index finger).
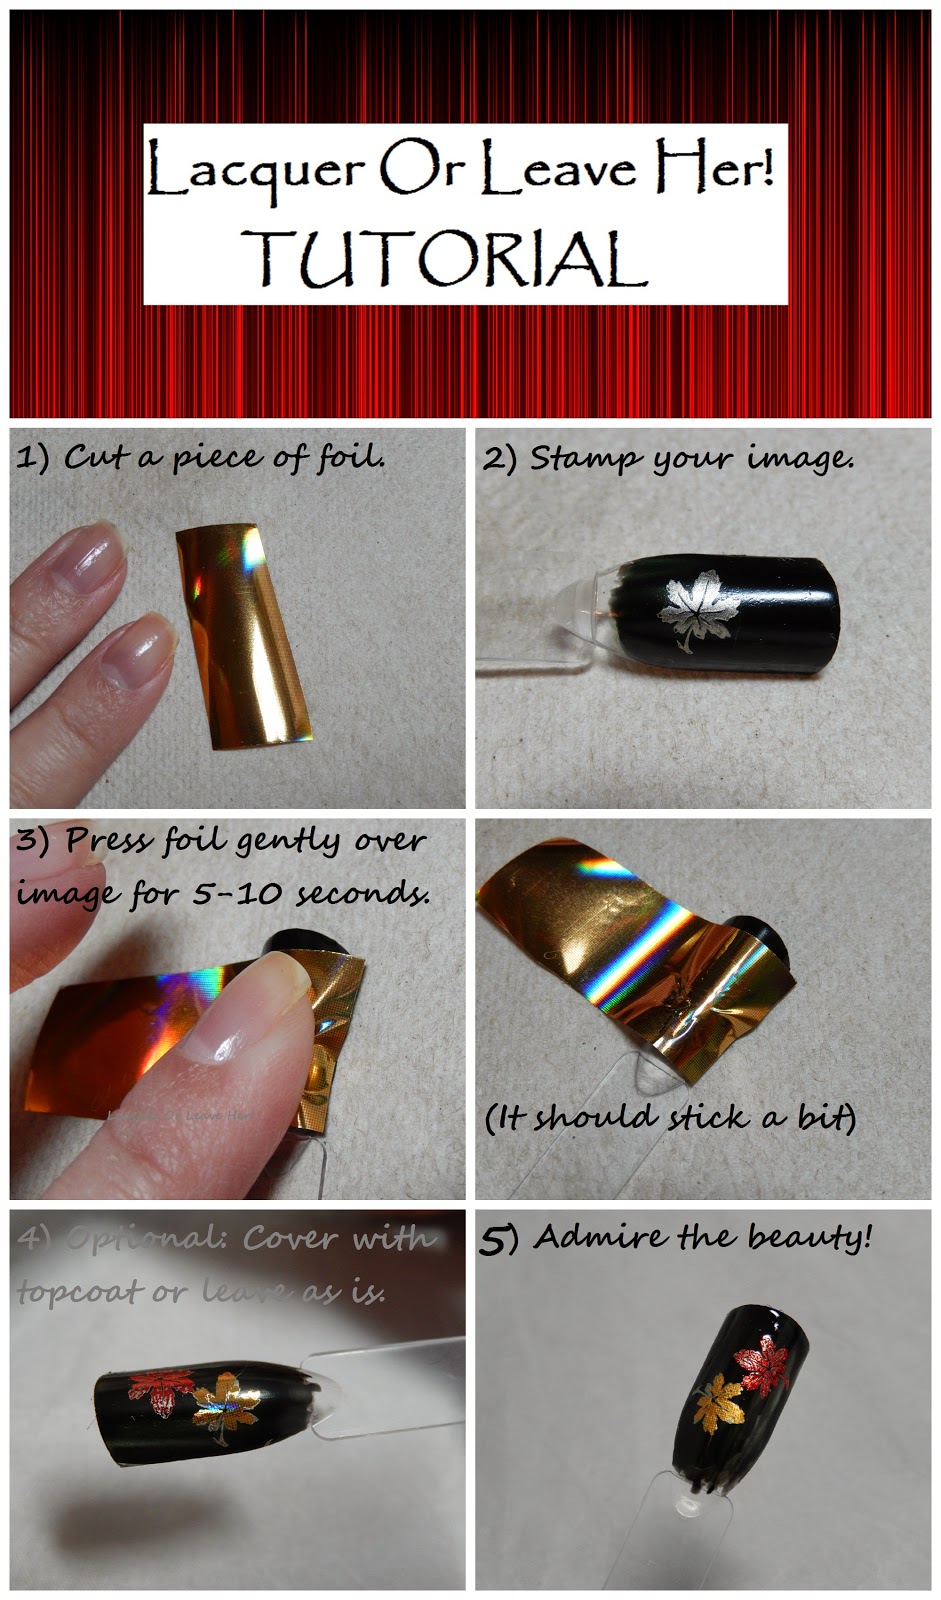
Okay, so...how do you make this happen? Let's take a look:
1) First you're gonna need some foil. You can get these on most nail art supply sites; I got mine at Born Pretty Store (and I paid for them with my own money, not sent for review). The most often come in little bottles like this, rolled up inside:
 |
| Gold nail art foil |
Cut off a piece that you can work with, at least a little bit larger than your design. The foils are inexpensive for the amount you get, so I lop off a fairly big piece that's easy to work with:
 |
| Cut off a piece of that foil!! And ignore those nekkid nails! |
2) Stamp your image.
 |
| Stamp your image. |
There are two important things I learned about this step. The first is, you want your base polish to be completely, 100% dry. Not tacky at all, otherwise your foil will stick to the entire nail. Which is a cool look, but not the one you're going for here.
The other issue is the stamping polish you choose. It's very likely that not all of your design will be perfectly covered; if you look at my manicure above, you can see spots where the foil didn't transfer. That can be a good thing or a bad thing depending on what you're doing for; for fall leaves, I wanted to get a variegated look and didn't mind that at all. But if you want to try to get a uniform look, it's best to choose a base color that's fairly similar in color to the foil that you're using. I'll show you what I mean below.
3) Apply your nail foil on top of the stamped image.
You're going to want to do this fairly quickly after you've stamped your image, otherwise the polish will dry and the foil won't stick well. Don't freak out, you have a few seconds, but don't push it either. lol. And I've found that it's best to use gentle even pressure over the image, and to hold the foil in place for about 5-10 seconds.
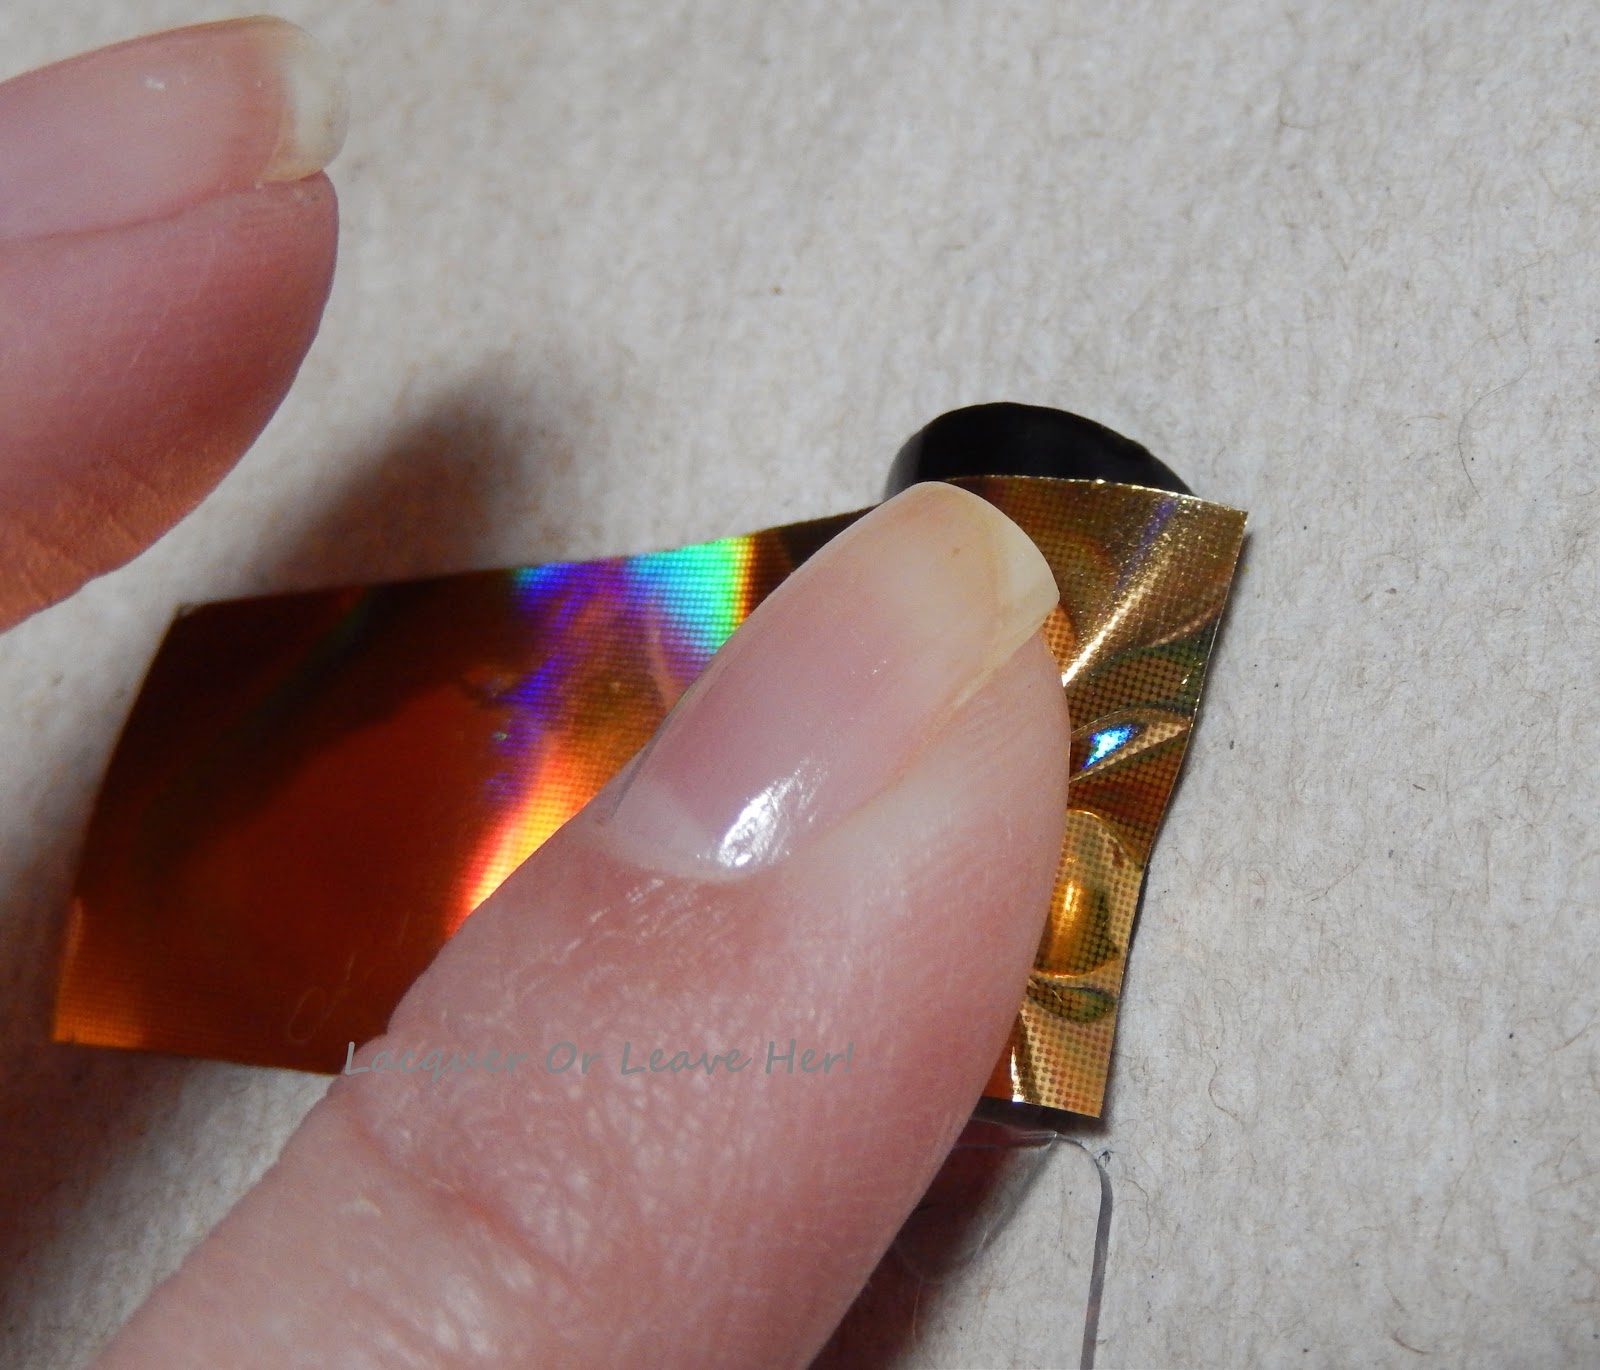 |
| Hold foil on top of your image for 5-10 seconds. |
When you lift your finger, your foil should be stuck to the image like this:

Then just lift it off. :)


Notice how there are small bits missing from both images, but in the case of the gold foil, it's not nearly as noticeable. So it depends on the look you're going for whether you should match your stamping polish to your foil.
4) Decide if you want to use topcoat or not.
It's not a secret that most topcoats cause nail foil to crinkle and dull somewhat. This is a major problem if you have an entire nail covered in foil and are going for a shiny mirror sort of look. There are some topcoats out there that leave foil intact, and you can certainly invest in one of those for this purpose. You can also choose not to use topcoat, but I wouldn't advise it if you want your look to last for more than an evening--the foil will rub off.
In my opinion, while the topcoat does make a difference, it's not a big enough one to worry about. Take a look at these pictures of the design with topcoat, and compare them to the pictures above. Do the same with my full manicure above; I took before and after pictures there as well. Yes, there is a difference, but how noticeable is the difference, really, especially when you're looking at an actual nail and not a huge close-up picture? The answer is, not much:


But, it's completely up to you! And whatever choice you make, remember to:
6) Step back and enjoy your design!

Here it is put into a single image for ease of pinning:
I hope you've found this helpful, and I encourage you to try this technique. It's stunning!
Hugs,
M.
This is really pretty! I'm going to have to pick up some foils now!
ReplyDeleteThey are awesome! You can also use them with the saran-wrap method if you move quickly--I've done that before and love that effect, too. :)
DeleteReally pretty look, and a fab tutorial! Thank you :)
ReplyDeleteThank you so much! It's so easy, I had to encourage everyone to try it. :)
DeleteThis is such a great look! I have Spot the Cuttlefish, but I had to use it over another color because it seriously just looked like I had stained nails. :(
ReplyDeleteI feel you. Usually if a polish needs three coats to cover, it's out the door, unless it has something really special to it. This one was special enough, thankfully, but I do wish it were more opaque.
DeleteWhat a pretty mani...I absolutely love this design! I so need to try this technique!
ReplyDeleteThank you so much! Yes, you should try it, it's soooo easy. :)
DeleteI have not seen this yet and am super excited to try it. Thank you so much for the tutorial!
ReplyDeleteI would love to see what you do with it. Post it on my FB page if you take a pic!
DeleteGreat tutorial! This was so helpful to see and the results are pretty.
ReplyDeleteThis comment has been removed by the author.
ReplyDeleteI love love love this!! It just adds that little more "oomph" to the stamping. And it works great for your chosen theme!
ReplyDeleteYes! Just a little turbo charge with very little extra effort. Come the holidays, I'm gonna go nuts with it...!!!
DeleteVery interesting technique! I definitely want to give it a try some time.
ReplyDeleteTry it, you won't be sorry. If you take a pic, post it to my FB page, I'd love to see it!!
DeleteVery interesting. I didn't bring my foils over, but as soon as I do I might have to give this a try.
ReplyDeleteTry it try it try it, you're gonna love it!!
DeleteGreat tutorial! Just what i was looking for. I'm going to try this right now. Do you happen to know which brand of top coat doesn't ruin the foils? I have quite a few and was curious if I happen to have it. Thanks again.
ReplyDeleteI'm not sure, so I did a quick check around to see what I could find. One person recommends 'Nail Foil Transfer Top Coat'; I could only find that sold with nail foil sets. But this might be the best answer: http://mylucidbubble.blogspot.com/2012/09/a-topcoat-that-works-for-nail-foils.html Hope that helps!
DeleteThanks for tips m tricks. Love the tutorial.
ReplyDeleteMy pleasure! I'm glad it was helpful!!
DeleteDịch vụ ship hàng nhanh từ việt nam sang lào chi phí rẻ
ReplyDeleteSHIP HÀNG CẤP TỐC Ở VIỆT NAM ĐI LÀO
Dich vu ship hang câp tôc ơ viêt nam sang lao chi phi re