Tuesday, October 31, 2017

Final Halloween look for the year--featuring UberChic Beauty Texture-licious 03!

(Press samples and affiliate links ahead!)


Hello!


Well, I can't believe it, but...the day of Halloween is here! And so, today I have my last Halloween mani of the year...sniff, sniff...I'm so sad to see it go...


This manicure features UberChic Beauty's Texture-licious 03 plate; I love texture plates, and this one is no exception. Here's the video review I did of the plate:


And here's a closer look:

UberChic Beauty Texture-licious 03


Since I'm in a Halloween place right now, I see tons of Halloween potential here--the squiggly lines can be brains, the second from the left on top can be blood spatter (so can the one on the top end, and the first left on the top can be spooky gauze behind your images. But these can be use for any time of the year, too, of course--I love the second from the right on the bottom for rain (stay tuned and I'll do a mani like that for you), the leftmost on the bottom looks like the globe to me, and third from the right top looks like rays of the sun.


How about quality? These swatches were done with Sally Hansen Insta-Dri Plummet and my clear stamper:


Excellent as always!


For my manicure, I started with a base of Sally Hansen Get Mod. Then I stamped my Texture-licious 03 image with Messy Mansion Red-y Or Not. Then I pulled out my UberChic Beauty Halloween 03 plate, and made some decals and stamped with Messy Mansion Carbon, Sterling, and Red-y Or Not:


UberChic Beauty Texture-licious 03 and Halloween 03 over Sallly Hansen Get Mod

UberChic Beauty Texture-licious 03 and Halloween 03 over Sallly Hansen Get Mod


What do you think? This is one of my favorite Halloween looks of the year. It's a little bit creepy, a little bit spooky, and a little bit cute. :)


You can find both of these plates in the UberChic Beauty store, and you can follow them around the interwebs here:


Hope your Halloween is filled with fun scares and lots of candy!
M. xoxo

Monday, October 30, 2017

My Halloween Party Nails!

(Press samples and affiliate links ahead!)

Hello!


So last night I went to a Halloween party, and you know I had to do a special manicure to match my costume...I went as the ringleader of the undead:


If you look closely you can see that I have a skeleton cameo choker, and skeleton earrings hidden in my hair. So, for my manicure, I started with a base skittle of Zoya Sheri, Storm, and Troy. Then I stamped images from Born Pretty Store BP-57, Messy Mansion MM 58, MoYou London Gothic 01, and UberChic Beauty Texture-licious 03 (I stamped with Messy Mansion Sterling and Chalk, and with Zoya Sheri itself for the texture under the crazy beastie on my thumbs). I finished the look up with nail charms, and with nail skull nail foil from Born Pretty Store. I changed up the look slightly on each hand; here's how they come out:

Right hand:

BP-57, MM58, MoYou London Gothic 01 over Zoya Sheri and Storm

BP-57, MM58, MoYou London Gothic 01& UberChicBeauty Texture-licious 03 over Zoya Sheri, Storm and Troy

Left hand:

BP-57, MM58, MoYou London Gothic 01 over Zoya Sheri and Storm

BP-57, MM58, MoYou London Gothic 01& UberChicBeauty Texture-licious 03 over Zoya Sheri, Storm and Troy

 What do you think? Did I capture the spirit of the costume? Which hand do you like better?


Happy Halloween polishing!
M. xoxo


Saturday, October 28, 2017

Sugar Bubbles SB 030!

(Press samples and affiliate links ahead!)

Hello!


Today I have a second Sugar Bubbles plate I've been wanting to get my grabby paws on for quite some time, Sugar Bubbles 030! Here's the video I did reviewing the plate (along with 037):


And here's a closer look at the plate:
 

Sugar Bubbles SB 030

The full-nail images are 1.5 x 2.3 cm, and here's a look at the rest:


I tested the plate using Sally Hansen Insta-Dri Plummet, and my clear stamper:


The image quality was excellent, although I did find the images were deeply etched, which meant my cotton pad caught on the edges when I cleaned them up. Not a biggie--if I press a piece of scotch tape on the image and lift a couple of times, that pulls off the fibers. But, be sure you do, otherwise your images will get hairy and muddy.


I bought this plate mainly because I adore all the funny little witches on it, so I wanted to do a manicure that featured them. I started with a base of Zoya Cam, and then stamped the pumpkin image for background with Messy Mansion Chalk. Then I stamped the witches with Messy Mansion Carbon. Here's how it came out:


Sugar Bubbles 030 over Zoya Cam

Sugar Bubbles 030 over Zoya Cam


Those kooky little witches just make me smile! I loved them so much I wore them for several days, and was still sad to take them off. :)


Happy stamping! :)
M. xoxo

Thursday, October 26, 2017

Review: Sugar Bubbles 037!

(Press samples and affiliate links ahead!)

Hello!


Today I have Sugar Bubbles 037 to show you--no, this is not a new plate, but I've been wanting it and finally got my hands on it, so I thought I'd do a review and some manis for you. Here's the video review I did:


And here's a closer look at the plate:


Sugar Bubbles 037
Sugar Bubbles 037


How about the quality? Here are swatches I did with Sally Hansen Insta-Dri Plummet and my clear stamper: 


As you can see, the images stamp well. There was one thing to beware of, though--the images are etched deeply, and will pull fibers from your cotton when you clean, which will muddy your next image if you don't get rid of them. To pick them up, I use a piece of tape over the image.


Why do I love this plate so much? The main reason, plain and simple, is that I'm a huge Hocus Pocus fan. So, my first manicure was an absolute no-brainer.


I started with an alternating gradient of Girly Bits Cosmetics The Hustle and Stayin' Alive, then I stamped my images in simple black (Messy Mansion Carbon) to let the Halloween goodness shine through:


Sugar Bubbles 037 over Girly Bits The Hustle and Stayin' Alive

Sugar Bubbles 037 over Girly Bits The Hustle and Stayin' Alive

My favorite part? Binx, of course. :)


Watch out for that spell book, and happy stamping!
M. xoxo

Tuesday, October 24, 2017

NOTD: The Gates of Hell...

(Press samples and affiliate links ahead!)

Hello!


Today I have a quick NOTD to share with you that I think is just heaven...well, okay, maybe hell...


I started with a base of Morgan Taylor All Tango-d Up, then stamped Winstonia W202 and Bundle Monster H-07, using Messy Mansion Chalk and Carbon:


Winstonia W202 & Bundle Monster H-07 over Morgan Taylor All Tango-d Up

Winstonia W202 & Bundle Monster H-07 over Morgan Taylor All Tango-d Up


Go ahead...open the gates and walk on in...but don't forget: Abandon all hope, ye who enter here...


Happy stamping!
M.

Friday, October 20, 2017

Dixie Plates DP 05!

(Press sample and affiliate links ahead!)

Hello!


Today we're going to take a look at another Halloween plate from Dixie Plates, DP 05. This plate isn't just a Halloween plate--there is some other holiday stuff on it, too, but of course this time of year I'm fixating on the Halloween, hehe.

Here's the video review I did of DP 05 and Halloween 2017:


And let's take a closer look:

Dixie Plates DP 05

What I love best about this plate:  The row of trick-or-treaters are charming, and while you won't fit them head to toe on your nail unless you have really long nails, you can put one on each nail and make a super cute scene. I also love the negative space jack-o-lanterns and faces, and this is the only grim reaper I have that is spooky and not cute. But most of all--jumping skeletons. Seriously now, that's about as awesome as it gets.


Dixie Plates' full nail images are 2.1 x 2.5 cm, and here's a shot with a ruler so you can judge the other images:


How about quality? The other plates I have from Dixie Plates are excellent quality, so I was expecting the same from this one:


These images were swatched with Sally Hansen Insta-Dri in Grease Lightening, and with a clear stamper. The lines are crisp, transfer is excellent, and look at the little fine-line details on that skeleton. LOVE.

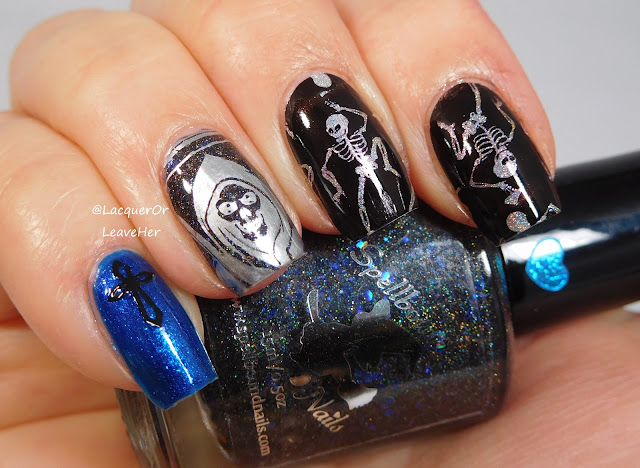
For my first mani, I couldn't resist playing with that jumping skeleton image...I started with a base of Spellbound Nails Dementor and The Lady Varnishes Fairy Queen. Then I stamped with Messy Mansion Sterling and Carbon:

Dixie Plates DP 05 over Spellbound Nails Dementor and The Lady Varnishes Fairy Queen


Lately I've been doing two versions of every mani I create, I don't know why--maybe I'm just being indecisive. Whatever the reason, for my second version, I used Girly Bits Cosmetics Sploosh on my pinky and thumb, and added some cross charms from Charlie's Nail Art  (use code LOLAM10 for 10% off your order) for some added gothic splash--I love how I can bend their little metal charms to fit the curve of my nail, as you can see on the pinky:


Dixie Plates DP 05 over Spellbound Nails Dementor, The Lady Varnishes Fairy Queen, and Girly Bits Cosmetics Sploosh

Dixie Plates DP 05 over Spellbound Nails Dementor, The Lady Varnishes Fairy Queen, and Girly Bits Cosmetics Sploosh


For my second mani, I wanted to do a night sky mani, featuring colors that work for Halloween, but also could just be a regular spooky fall evening. I started with Zoya Aster on my middle and ring fingers, and Zoya Olivera on the rest, then sponged around the edges of the middle and ring fingers to create a moon sort of look. Then I stamped my images first with Messy Mansion Sterling, then with Moonflower Polish Mar Caribe--I did this both to create a shadowed effect, but also so the blue would look the same over both the light and the dark polishes:


Dixie Plates DP 05 over Zoya Aster and Olivera

Dixie Plates DP 05 over Zoya Aster and Olivera


After I finished this one, I liked it, but it just annoyed me that I could see the purple through the owl. So, I decided to do a second version with a decal of the owl, and thanks to the miracle of clear stampers, I just stuck it on right over what I already had:


Dixie Plates DP 05 over Zoya Aster and Olivera

Dixie Plates DP 05 over Zoya Aster and Olivera


The first way is fine, but the second version just feels a little more three-dimensional to me, it just has a little more pop. I made a video tutorial to show you how to get the look:


If you're in the US or Canada, you can find this and other Dixie Plates plates at Lantern & Wren; in the UK you can find them at Nail Stamping Queen UK. For shipping to other locations, check the Dixie Plates site, and in the meantime, follow them here:

Dixie Plates Facebook Fangroup: https://www.facebook.com/groups/461694520667496/

Dixie Plates on Instagram: https://www.instagram.com/dixie_plates/


Happy stamping!
M. xoxo

Tuesday, October 17, 2017

Zoya New Fall Lipsticks (with polish pairings!)

(Press samples and affiliate links ahead!)

Hello!


Zoya sent me the newest fall additions to their lipstick lines to review for you, and I thought I'd do something a little different with them this time...

First up, let's take a look at the colors:


Zoya Addie, Bristol, Tommy, Maggie, Layne, Lucky, and Izzy

From left to right, we have:

Zoya Addie: a warm neutral
Zoya Bristol: a creamy mauve
Zoya Tommy: a bold blurple (My skin can't pull this off on regular days, but I'm gonna rock this on Halloween)
Zoya Maggie: a raisin-y wine (this one's my favorite)
Zoya Layne: a pink-y neutral
Zoya Lucky: A bright pink-purple shimmer (makes me think of bougainvilleas)
Zoya Izzy: A mid-range berry


Some of them look a little different on, so here they are against my skin (and note, Tommy has a bit more purple, but just like with polishes, it wanted to play hide and seek):


Zoya Addie, Bristol, Tommy, Maggie, Layne, Lucky, and Izzy

As always, the formula on these were excellent. They went on smooth and felt great, didn't dry out my lips, and stayed on well until I started shoving food in my face.


Since this is a nail blog, I thought it would be fun to dig through my Zoya polishes and do some pairings with the closest shades I have; these pairings are based on the color as it showed when I had it on, not in the tube:


First up, Zoya Addie and Zoya Jill make the perfect neutral pairing:


Zoya Addie and Zoya Jill


Next, I love the way Zoya Bristol looks with Zoya Hera (this is one that matches a little better when I'm wearing the lipstick):

Zoya Bristol and Zoya Hera


Zoya Izzy was the hardest to find a match for from my collection; I chose Arianna because the glitters capture the same look as the lipstick, and captures the bright berry blitz:


Zoya Izzy with Zoya Arianna


I matched Zoya Layne with Zoya Joni, and I think this is a great pair for looking pretty, but subdued, at work: 


Zoya Layne with Zoya Joni


I couldn't choose between Zoya Gilda and Zoya Mandy as a match for Zoya Lucky--they both have a duochrome sort of play between pink and fuchsia, and I think these are great for any day this fall and winter when you want a little spring pep in your step:


Zoya Lucky paired with Zoya Gilda and Mandy


And for Zoya Maggie, I chose Padma, which is a little lighter than Maggie, but still complements it well:

Zoya Maggie with Zoya Padma


And for the Zoya Tommy, Zoya Isa was a no brainer:


Zoya Tommy with Zoya Isa

So there you have it, the new Zoya lipsticks, and my pick for the perfect polishes to wear with them! I hope there's something there you love. :)


You can find these lipsticks (and the polishes) on Zoya's website, and you can stalk them around the interwebs here:


Happy pairings!
M. xoxo