Showing posts with label free-hand. Show all posts

Friday, February 23, 2018

The Digit-al Dozen Mythical Creatures Day 5: A Mani of Dragons and Zombies

(Press samples and affiliate links ahead!)

Hello!


I have to admit, I'm a little sad this is the last day of this month's Digit-al Dozen theme. I had sooo many mythical creatures I wanted to do, it was hard to narrow it down...maybe I'll do a few extras later in the month. ;-)


First of all--if you aren't caught up on Game of Thrones, here's your warning: MAJOR SPOILERS AHEAD! Stop reading if you don't want to be spoiled. 


To end the theme, I decided to go out with a bang. Here's my logic. Dragons are epic. Zombies are epic. So a zombie dragon = epic x epic = VISERION!


If you're a Game of Thrones fan, this needs no explanation. If you're not, here's a quickie. In the Game of Thrones world, there's a Queen (Daenerys) who is also the mother of dragons--she 'birthed' three dragons from fire. There are also these things called White Walkers, which are pretty much albino zombies, with the power to resurrect dead corpses as more White Walkers. White Walkers and Dragons are both super powerful, and they're enemies.  In the second most heart-wrenching moment of Game of Thrones, the White Walkers killed one of Daenerys' dragons, Viserion. In the absolute most heart-wrenching and dramatic moment of Game of Thrones, Viserion was resurrected as a White Walker dragon zombe--and that was revealed when Viserion opened his eye--and it was blue, like those of the White Walkers. Here's what I did to recreate that moment: 


Viserion! Pueen 10 and BM-224 over Zoya Hadley, with freehand

Viserion! Pueen 10 and BM-224 over Zoya Hadley, with freehand


For this mani, I used a combination of stamping and freehand. I started with a base of Zoya Hadley, a smokey navy blue. I used Pueen 10 and Bundle Monster BM-224 to stamp some subtle scales with Sally Hansen Slick Slate. I used acrylic paints to freehand the eye and some spiky areas, and I stamped a chain with Marianne Nails n. 20 to represent the chains that the White Walkers used to pull Viserion out of the frozen lake (how handy that they happened to have a crap-ton of chain and suddenly got over their fear of water enough to go down into the lake and attach it to him--ahem--don't get me started!). 


I didn't quite capture the emotion in the eye I wanted to capture, and the index nail looks more like a rhino than a dragon's face ridge, but otherwise, I'm pretty happy with how it turned out. :)


So what do you think? Are there any mystical creatures that you hoped to see that we forgot? Let me know and I might try to make a mani of it for you...;-)


Big Hugs,
M. xoxo

Follow me! 


Tuesday, April 18, 2017

Review: Sally Hansen's color of the moment Miracle Gel Tipsy Gypsy and Electric Pop

(Press samples and affiliate links ahead!)


Hello!


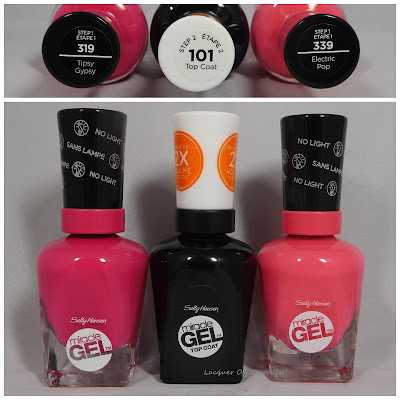
I've been a big fan of Sally Hansen's polishes for years, so I was delighted to be asked to review some of their color of the moment polishes, Tipsy Gypsy and Electric Pop Miracle Gel shades, along with the Miracle Gel topcoat.


Sally Hansen Miracle Gel polishes in Tipsy Gypsy and Electric Pop


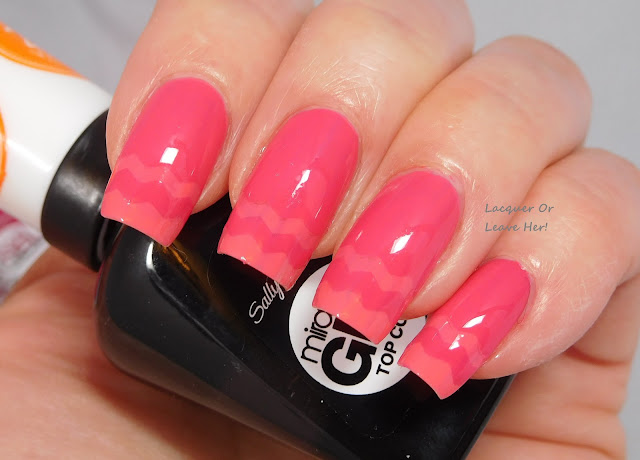
I did two nail art manis with the polishes; for the first, I did a sort of funky French mani with chevron stripes:

Sally Hansen Miracle Gel polishes in Tipsy Gypsy and Electric Pop


Sally Hansen Miracle Gel polishes in Tipsy Gypsy and Electric Pop


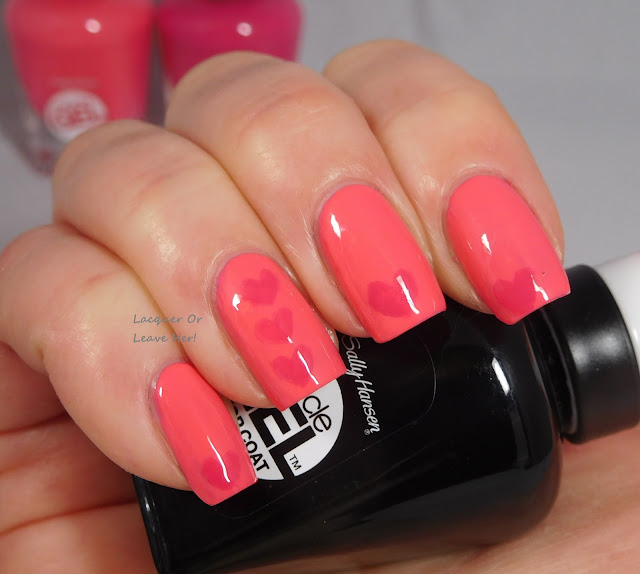
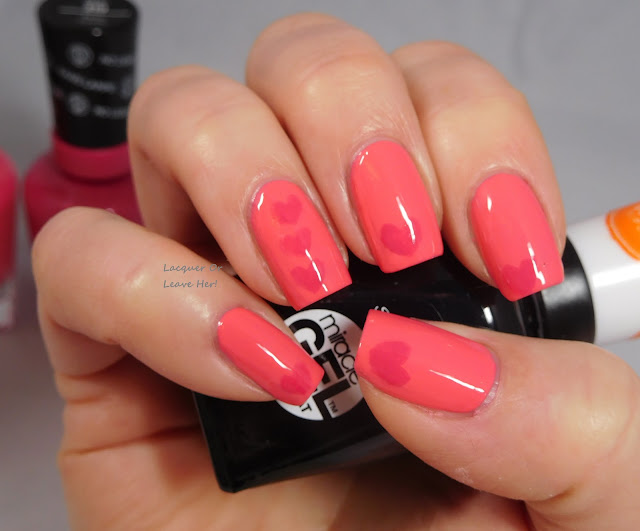
And for the second I freehanded some hearts:

Sally Hansen Miracle Gel polishes in Tipsy Gypsy and Electric Pop

Sally Hansen Miracle Gel polishes in Tipsy Gypsy and Electric Pop


I've never used a gel polish of any sort before because I change my manicures so often--it just doesn't make sense for me to worry about curing a polish for long-term wear when I'm going to remove it in two days. But, of course there are times like vacation when I want to have that long term wear, so I figured these polishes might be a cool way to get a no-fuss long-term mani. The bottles say you get up to 14 days of wear with the Miracle Gel system.


I followed the instructions--two coats of polish followed by one coat of the topcoat, which cures with regular light (no special equipment needed). I did find this took a bit longer than my normal Seche Vite to dry enough that I didn't have to worry about dinging my manicure--but only about ten minutes more. And, this isn't about fast-dry, it's about long wear!


So did it wear well? I'm very hard on my nails--I spend a lot of my day typing, and even thought I know I'm not supposed to, I tend to use my nail as tools way too much. With normal polish, if I go more than two days without a chip, I'm impressed. So I was very pleased when I went six days without any sort of serious chip with these polishes. For me, that more than doubled the normal life of my polish, and I'd definitely use this line for vacations and the like.


You can find these polishes anywhere you buy Sally Hansen (around me, that means drugstores like CVS, Walgreen, and superstores like Target, etc.), as well as their associated online stores. You can also find the Miracle Gel line and other Sally Hansen products on Amazon, if that's easier for you. And here's where you can follow them around the interwebs:


Happy polishing!
M.


Sunday, August 14, 2016

Before & After: Who ya gonna call?!

(Press samples and affiliate links ahead!)

Hello!

So I went to see the new Ghostbusters with a friend of mine a few days ago, and I wanted to do a special mani for the occasion. I figured it was about time I bust out my freehanding mats because it's been forever since I've done any of that, and I decided to make the focus of the art the Ghostbusters logo. :)


I started with Spellbound Nails Dementor because I'm obsessed with it and it seemed like the perfect spooky night-time polish; here it is to refresh your memory:


Spellbound Nails Dementor

Then I drew my logo using acrylic paints; I finished off with stripes that represent the reflector stripes on the ladies' ghostbusting overalls. Here's how it came out:


Who ya gonna call? Acrylic freehanding over Spellbound Nails Dementor
Who ya gonna call? Acrylic freehanding over Spellbound Nails Dementor

Who ya gonna call? Acrylic freehanding over Spellbound Nails Dementor
Who ya gonna call? Acrylic freehanding over Spellbound Nails Dementor

Who ya gonna call? Acrylic freehanding over Spellbound Nails Dementor
Who ya gonna call? Acrylic freehanding over Spellbound Nails Dementor


What do you think? I'm pretty happy with how the little guy turned out. His face could be better for sure, but not too shabby for a teeny tiny ghostie!


BTW, I loved the movie, and definitely recommend it if you're looking for something to do with your weekend. :)


Happy ghostbusting,
M.

Wednesday, January 27, 2016

Before & After Twin Post: Native War Paints Extra Crispy Walkers + UberChic Beauty plates

(Plates sent for review)

Hello!

Recently the lovely Amanda, my friend and fellow blogger over at Polish & Plates gifted me a bottle of Native War Paints Extra Crispy Walkers, because  I'd admired it on her blog and told her what a huge fan I am of The Walking Dead (and of the zombie flambe scene that inspired the polish). And now since we each have a bottle of it, she suggested we do a twin post with it, and I jumped at the chance!

You may know that The Walking Dead is now on hiatus, scheduled to return with the mid-season premiere on *Valentine's Day*. And, you now know that I have in my possession an awesome polish that pays tribute to zombies. So, I think we can agree that what's about to happen was completely inevitable...

Zombies. Valentine's Day. Hmm...When I think of the combination of zombies and love, I can't help but think of The Zombie Song:


It's a touching, heart-rending (or, rendering) story about a sweet girl zombie who has fallen in love with a non-zombie guy--talk about your star-crossed lovers...sigh...

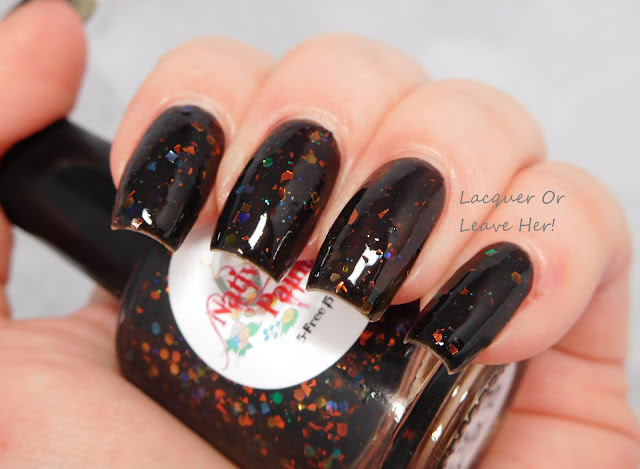
I started with my base of Native War Paints Extra Crispy Walkers, a black jelly polish with orange, blue, and green flakies and glitter; it looks like either a charred zombie corpse, or the ash and embers flying up as the zombies are being fried:


Native War Paints Extra Crispy Walkers


Then I set to decorate it, based on the artwork in the video...


...and the fact that part of the chorus is 'I'd never eat your brain.'


Here's what I came up with:


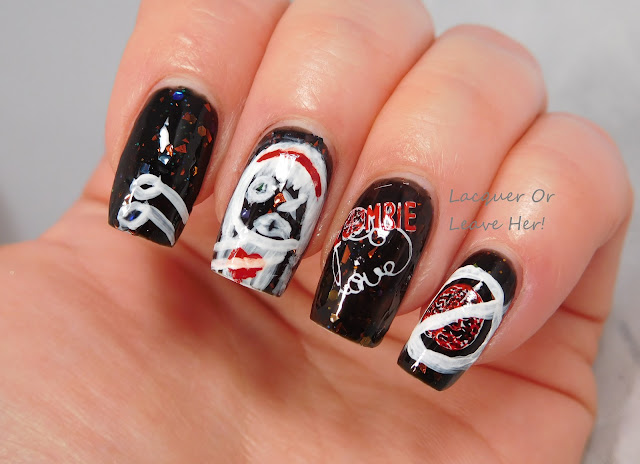
zombie love manicure with native war paints extra crispy walkers and uberchic beauty zombie love and marriage plates
If I were a zombie, I'd never eat your brain

zombie love manicure with native war paints extra crispy walkers and uberchic beauty zombie love and marriage plates
I'd just want your heart, yeah I'd want your heart, just want your heart.


I freehanded the girl (obviously, lol) trying to re-create the stick-figure look, but I wanted her to look a little more gnarly and I added in a red heart on her dress and a red headband; I also freehanded a slashed circle around the brain on my pinkie. I used UberChic Beauty's Love & Marriage 02 plate (review coming very soon!) and UberChic Beauty's Zombie Love plate; I stamped with Konad White and Red.


For the freehand portion, I used white and red acrylic paints, and did a test run of this brush from Born Pretty Store:


Nail art brush from Born Pretty Store

Nail art brush from Born Pretty Store

The handle turns into the cap. 


The brush gave me good control, and finer lines where I needed them, bigger lines where I wanted them for the stick figure look. The brush was excellent quality; I love that it pulls apart and the handle becomes a lid to help protect your brush.


What do you think? Yes, the manicure is kooky and crazy and just a teensy bit sick and twisted. Okay, a lot sick and twisted. But I love it, and I never want to take it off! I'm going to recreate it for the premiere on Valentine's Day, luckily Mr. LOLH loves zombies as much as I do. :)

But that's not all! Don't forget to go check out what Amanda did with this polish, over on Polish & Plates! She does great polish reviews as well as cool nail art--my kind of girl. You can find her on Facebook, too.


You can find the nail art brush here, and don't forget you can use my Born Pretty Store code off you full-price purchase.


Happy stamping!
M.


Thursday, December 3, 2015

Review: UberChic Beauty Nail Art Brushes

(Press sample)

Hello!

When I tried UberChic Beauty's uber mat, I completely fell in love with the mat, and the brand. That love has grown as I've played with their awesome plates and there excellent stampers. So when I heard UberChic was putting out brushes...well, just sign me right up.


I made a video so you can see them in in motion:


There are four brushes, three for art, and one for clean up, and as I've come to expect from UberChic Beauty, they're not just great quality, but very attractive as well. Take a look:


nail art brushes uberchic beauty
UberChic Beauty nail brushes

In the ends, there are super cute gemstone-y things, and the caps have inset rhinestone butterflies:


UberChic Beauty nail brushes art
UberChic Beauty nail brushes--how cute are those caps!!

UberChic Beauty nail brushes art
UberChic Beauty nail brushes--love the gemstones


And yes, that's right, I said caps--beautiful bejeweled caps that keep your brushes safe from smashing, mushing, bashing, and particularly important in my case: the teeth of wee kitties and a not-so-wee puppy. As Robin Moses is my witness, I'll never go capless again! Okay, maybe just for a minute to show you all the awesome tips:


UberChic Beauty Brushes


Let's move on to the brush portion of the brushes. There are three art brushes that will make your freehand work easy and awesome, a striper, a liner, and a detail brush.


The striper will give you great control for bold, solid stripes:

UberChic Beauty striping brush

The outlining brush will help you create the defining lines of your freehand work:


UberChic Beauty liner brush

And the detail brush will let you draw smaller details, and will give you excellent precision when lead-lighting or doing reversed stamping:


UberChic Beauty detail brush

I did this entire poinsettia with this brush, and check how perfectly it gets into those eensy teensy areas:

This will get into those teeny tips for you!


The fourth brush is a clean-up brush, which I think is a must-have item whether you do nail art or not--even if all you do is paint your nails, this will help you get perfectly clean cuticles easy as pie. Take a look particularly at the fine beveled edge that allows you to get at your cuticles without damaging the polish you want to keep intact:


UberChic Beauty clean-up brush

UberChic Beauty clean-up brush

Check out how beautifully it gets on in there:

UberChic Beauty clean-up brush getting into that tight spot between the nail and the skin

The brush is broad enough that you aren't going over the same spot for hours, but thin enough at the tip that it slips into that almost non-existant space. Excellent control that goes exactly where I want it to go.


What more can I say? These brushes are excellent quality from tip to toe. They're balanced so they feel good in the hand; in fact, the weight reminds me of my fountain pen, which I selected because of the perfect weight. The control is excellent, clean-up is a breeze, the caps keep them looking awesome and working well, and on top of all of that, they're bejeweled and blinged.

*drops mic*

You can find these, along with other fun treasures, on the UberChic Beauty website. Your manicures will thank you!

Happy brushing,
M.

Friday, October 2, 2015

NOTD: Painting my nails

(Nothing to disclose)

Hello!

I'm starting a new challenge with the lovely artists in Crumpet's Nail Tarts, and today's theme is 'Hobbies'. I have several hobbies, but the one that seemed the most appropriate for nail art was, well...nail art.

I started with Colors By Llarowe Pirates of Penzance, and put it on all of my nails except for one, which I left nekkid (well, other than basecoat). Then, I did some freehand nail art of a polish bottle brush painting that last nail. My first attempt looked like this:


It came out looking pretty good, but something about it bothered me, and I couldn't put my finger on exactly what it was at first (pun not intended)...And then it hit me--nobody paints their nails from tip to cuticle!! You always brush from cuticle to tip! So, I redid it:


Yes, that's MUCH better, haha! Okay, so maybe I'm being a little picky here, but it does make me happy to have the brush painting in the proper direction. :)

Oh, and can I say how much I'm in love with Pirates of Penzance? It's the absolute true red holo I've been wanting my whole life, and it applies like a perfect dream, easy, smooth, wonderful. I'm sad that Llarowe is downsizing their shop, but extremely happy that they're still making CBL, and can only hope for more amazing beauties like this.

Happy polishing!
M.


Sunday, February 1, 2015

Getting to know me, and meet some other bloggers!

Hello!!

Some of my fellow bloggers and I decided it would be fun to have a round-up to each other's blogs; just answer a few fun questions and let our readers discover some new bloggers. This idea came from Inky Whisker's Musings, so thank you Jenna for an awesome idea!


What is the focus of your blog?

My blog has a blended focus. My core has always been my 'Before & Afters', where I show a swatch of a polish with no nail art, and then show it decorated. Sort of like a two-fer! I do all sorts of nail art, but my preferred method is stamping. I also do reviews of the products I use.


What made you start blogging?

My love of nail art was rekindled after I saw a video on youtube about nail stamping. I started playing with it, and was plastering nail pictures all over my Facebook page; I thought to myself that probably most of my friends aren't interested, so I started a blog to show those who were interested and keep track of my designs for myself. I originally did this as part of a larger website I had, and then decided a stand-alone blog would be easier. When other people started following, I was extremely surprised!

What keeps you blogging?

The people I've met through it, and my continued passion for nail art and nail polish. I've met so many wonderful people in the US and Canada of course, and have people I now count as friends in Norway, Slovenia, Australia, and Brazil. How amazing is the internet!!


What other blogs were inspirational to you?

My first real nail art inspiration was the now defunct Konad Abuse ( :( ); she did something similar to before-and-afters, and inspired my format. My other inspirations were Pointless Cafe, My Simple Little Pleasures, and Dressed Up Digits.


What advice would you give to someone just starting a nail blog?

Do it for the love of polish/nail art, support brands you love, and do honest reviews. I've known people who think 'I'm going to do this so I get free polishez!', and then get a very rude awakening when they see how much time and energy is involved in it. It takes at least ten hours for me to do a post about a six polish collection that would cost me $24 to buy myself (and that has colors I wouldn't necessarily have bought myself, or that I have ten similar colors already), between initial swatching, taking/selecting/editing photos, and writing up the post. Do the math--this isn't a lucrative way to spend your time. But if you have a passion for the polishes and the art, and you're introducing your readers to products you love and supporting brands you believe in, you'll be happy and will enjoy blogging. And when you enjoy what you do, that shows.


What is your polish Holy Grail?

At my very best effort, I can come up with a list of 20 polishes that I can't decide between. So I'm going to answer this way--specialty polishes. Holos, flakies, duochromes. I'm a sucker for anything like that! When I first started blogging there were very few of these around, but now they're everywhere and are even combined in one polish! Duochrome holos! And now even duochrome flakies!! It's enough to make a girl swoon...sigh...


If you were stuck on a deserted island, what one item would you take with you?
My kindle kitted out with an everlasting power source. Life on a desert island with tons of books to read--there's worse ways to spend a life. :)


Can you share a couple of manis you are especially proud of?

Sure thing!!

This peacock manicure is one that I'm very proud of:


As so is this free-hand Monet manicure:


So there's me! I hope you enjoyed my 'about-me', and if you want to discover some awesome bloggers, check the link-up below. :)

Happy Superbowl Sunday!!
M.


Saturday, January 17, 2015

NOTD: Veronika Layne Gets The Scoop!

(Nothing to disclose)

Hello!

A few nights back, I got to go to my very first book launch party! This was an especially fun event for me, because I know the author, and have read the book--so of course I had to do a manicure for it. :)

The book, Veronika Layne Gets the Scoop by Julia Park Tracey, is a mystery/romance/chick-lit romp with some history thrown in for good measure. The heroine is Veronika Layne, a reporter for a small-town newspaper that's taken over by a big conglomerate. In the course of her reporting (sort of), she discovers that some builders seem to be destroying Native American 'shell mounds' in their haste to make a buck, and decides she needs to find out what's going on. It's a fast-paced, fun read perfect for a winter afternoon or a beach read. She has two more books in the series on the way, and I'm looking forward to reading them. Oh, and if you have Kindle Unlimited, you can read the book for free right now!

Anyway, the point is, I decided to do a manicure based on her cover art:


I made a sky gradient with  Zoya Rocky and Color Club Endless Summer for the background; then I stamped Bundle Monster 503 to get the cityscape. Since the shell mounds play a central role in the book, I wanted to focus on recreating that element; I free-handed the hand holding the shell with acrylic paints, except for the thumbnail on the hand, which is Barry M Silver Foil.


Veronika Layne Gets The Scoop!

Zoya Rocky and Color Club Endless Summer

Bundle monster 503 and some freehand art. :)

What do you think? I think I could have gone a shade darker with the gradient, and the shell is not the best thing I've ever drawn, but I'm pretty pleased with the hand (they're so hard!) and I think I captured the overall spirit.

Congratulations Julia on your launch! I enjoyed reading the book so much, and need you to get the next one out ASAP!!

Hugs,
M.

Sunday, October 26, 2014

NOTD: Freshly Dead

(Nothing to disclose)

Hello!!

I recently saw a 'burnt parchment' technique on my friend's blog (Bob Plays With Polish), and my mind went a little crazy with the idea...and I decided to turn it into a little Halloween experiment.

Basically how the technique works is, you layer several colors of polish, then you take a brush dipped in acetone and swipe down through the layers to show the different colors. If you do it with whites, browns and blacks, you get a burned parchment look the the beautiful one she made. But my mind thought...what about flesh, blood, and bone?

And thus was my 'Freshly Dead' manicure born:


Freshly dead corpses

with lots of yummy maggots...

nom nom nom nom nom


I'm not sure if the corpse has started to split open due to decomposition, or if it was sliced into before death...either way, the maggots don't care and are enjoying their feast!

Because this month's theme in the Nail Challenge Collaborative is 'stripes', I decided to go for the most Halloweenest stripes ever...this is why the rotted parts are up-and-down stripey splits (and yes, sometimes my brain scares me, too).

Here's how I did it:

(1) I started with a base of Color Club Look Don't Tusk, which is an off-white bone color, for my 'bone' layer. I used two coats, but if I were to do this again, I think I'd do three, to make sure I had enough white.

(2) I put on two coats of Barielle Miami Heat, for my 'blood' layer.

(3) I put on two coats of Barielle Pillow Talk for my 'flesh/skin' layer.

(4) I stamped some stitches using Konad Black and MoYou London Gothic 04.

(5) I free-handed some yummy maggots with acrylic paints. Yes, I know maggots don't usually have big eyes like that, but I thought it made them creepier, so I went with it.

(6) I used a layer of Seche Vite between each of the colors, and then on top of the art.

What do you think? Is it deliciously disgusting?

Happy Halloween Hugs,
M.

Saturday, April 5, 2014

Review: Incoco Garden Daydreams Spring 2014 collection

(Press Sample)

Hello!

I'm back with two very sweet sets of nail appliques from Incoco's Garden Daydreams Spring 2014 collection. The collection features pastels and watercolors and subtle florals; it's feminine but not sickly sweet the way some floral collections go. I wore each of these for a few days, and then added some nail art when I was ready for a change (so you'll see a little tip-wear on the nail art photos).

Here is the lovely Tea Party, a very soft pink background with a spray of pink and peach roses, amid faint polka dots:


Incoco Tea Party

Incoco Tea Party

Incoco Tea Party

These applied with Incoco's characteristic ease. One of the things I liked about these sets was the flexibility to choose the look I wanted for each nail, and how each nail related to one another; for my index, ring, and middle finger, I have several wraps to choose from, and each one is double-ended; this let me have one nail with no flowers, and to place the flower sprays in what I found to be a pleasing array; if each nail wrap had been the same, I wouldn't have been able to do that. Also, another benefit of this particular set is the multiple colors within the flowers, something that's hard for me to do with stamping, and time-consuming with freehand.

Possibly my favorite set from the collection is Garden Path, an off-white background with a very light green-gray textured effect, topped off with a selection of pink, yellow, and blue flowers:


Incoco Garden Path

Incoco Garden Path

Incoco Garden Path

Incoco Garden Path

These speak directly to my heart because they have a very impressionist feel, like little Monets on my nails. And, if you like the look of those little dried flowers that people do nail art with, but you don't want the hassle of messing with them, these give the same effect. :)

For my nail art, I wanted to add a little bit of extra without detracting from the original design; with Tea Party, I added a little distressed mesh look to the pattern with Sally Hansen Mint Sprint, using Pueen 54 (this is from their new collage-style set, and I'll be reviewing it soon):


For garden path, I was so inspired by Monet that the only logical thing in my mind was to throw up a little Japanese bridge running through the flowers...you'll notice that on three of the four nails I put the sprays near my cuticle, because I knew I wanted to do this when the time came. I freehanded this with acrylic paints:


Because I'm happy

Clap along if you feel like happiness is the truth

Because I'm happy

Clap along if you know what happiness means to you


These appliques are playing a bigger and bigger part in my personal nail-art repertoire, in their own right, and as a spring board for my own nail art. :)

Happy Saturday!
M.