Showing posts with label reversed-stamping. Show all posts

Thursday, March 15, 2018

The Digit-al Dozen Does Stamping Day 4: Reversed Stamping (featuring Dixie Plates Botanicals 01)

(Press samples and affiliate links ahead!)


Hello!


So far during The Digit-al Dozen's stamping week, I've shown you some beginning and intermediate looks--we've played with placement, layering, and color. Now we're going to move into the advanced techniques, with one of my very favorites--reversed stamping. I have several tutorials that use this technique on my YouTube Channel, but my favorite is this one, because is shows my tip for making reversed stamping easy peasy.


To show off this technique, I chose Dixie Plates Botanical 01, one of her new plates for spring 2018. I reviewed the plate in this video:


And here's a still shot of the plate:


Dixie Plates Botanicals 01


Dixie Plates makes her images generous, so if you have longer nails, you won't have to worry about images disappearing on your nail. Here's a shot with a ruler, so you can get a feel for how the sizes work for you:


Here's a look at a few test swatches:


Since this is stamping week, this is a good place for me to mention my tips for working with intricate, fine-lined images. Plates with those types of images can be finicky, so if you find yourself having trouble with the images, try one or more of these:

1) Try a different stamping polish
2) Try a different clear stamper (I have one that refuses to pick up fine-lines off most plates, no idea why!)
3) Cover your entire image with polish (not just halfway, a cheat I use all the time)
4) Scrape veeery gently.


On to the manicure! For this look, I started with a base of Zoya Darby. Then I stamped the crocus image using Hit The Bottle Polish My Suitor Wears Pewter. I overlapped the images for a graphic sort of look. On two separate stampers, I stamped another crocus, then colored them in, first with Zoya Leia (a topper that gives a flakie-like shimmer), and then when that was dry, with a layer of Zoya Trudith. Here's how it ended up:


Dixie Plates Botanicals 01 over Zoya Darby

Dixie Plates Botanicals 01 over Zoya Darby


Okay, so, here are the two tricks I use for perfect reversed stamping. First, once you've colored in your image, hold your stamper up to the light and look down the barrel at your image. This will let you see if you have any bald spots you need to fill in more before you apply. Then, once you're ready to apply, rather than a coat of topcoat on the nail where you will be rolling on your image, use a coat of bonding basecoat. Even when completely dry, the bonding basecoat will stay sticky, and will grab onto your image when you apply it to the nail! No more ending up with half of your image on your nail, and half still on your stamper. :)


If you're in the US or Canada, you can find this plate (and the Hit The Bottle Polish) at Lantern & Wren; if you're elsewhere, check out Dixie Plates' site for a retailer that ships to you. And you can stalk Dixie Plates around the interwebs:

Dixie Plates Facebook Fangroup: https://www.facebook.com/groups/461694520667496/

Dixie Plates on Instagram: https://www.instagram.com/dixie_plates/


I'll be back next time with my very favorite advanced stamping technique (at least, currently!). In the meantime, check out all the gorgeous stamping by the other ladies, below. :)


Big hugs,
M. xoxo

Follow me! 

Saturday, February 3, 2018

Dixie Plates Mega Mani Mix 01!

(Press samples and affiliate links ahead!)

Hello!


Today we're gonna take a look at a new plate from Dixie Plates, her Mega Mani 01 plate, with three manis I did using the plate. Here's the video review I did of the plate:


And here's the still shot:

Dixie Plates Mega Mani Mix 01

This plate has very generous images at 2.1x 2.5 cm, great for longer nails (which just rubs in the fact that I just broke a ton of nails because I switched my basecoat--noooooooo), and gives you a variety of looks. Remember that that because the images are so big, you'll be picking up only a section of them--that means you can get a variety of looks from within the same image depending on where you look, so pull out your little nail guide and play around. :)


The stamping quality is top-notch as always:


I did these with my clear stamper and Sally Hansen Insta-Dri in Midnight Flight.


For my first mani, I started with a base of Girly Bits Shake What Ya Mama Gave Ya, then stamped using Kaleidoscope White. To pop the design, I added reddish-brown diamond glitters. Here's how it came out:


Dixie Plates Mega Mani Mix 01 over Girly Bits Shake What Ya Mama Gave Ya

Dixie Plates Mega Mani Mix 01 over Girly Bits Shake What Ya Mama Gave Ya

I love how the design lets the gorgeous duochrome holo shine through, and i love how the diamond glitters gives it a little bit of contrast to accent the different colors of light thrown by the holo. Easy mani that looks lush!


For my next mani, I went a little darker...I started with a base of The Lady Varnishes Harpy, and then stamped over with Hit The Bottle Polishes Copper-Haired Girl (also available at Beautometry):


Dixie Plates Mega Mani Mix 01 over The Lady Varnishes Harpy

Dixie Plates Mega Mani Mix 01 over The Lady Varnishes Harpy

Dixie Plates Mega Mani Mix 01 over The Lady Varnishes Harpy

I love the rich colors, and love that the negative space in the design lets the holo sparkle on through. Something about this feels like it comes from a sci-fi movie, something a beautiful alien race would wear from some exotically named planet. Or maybe an ancient civilization...


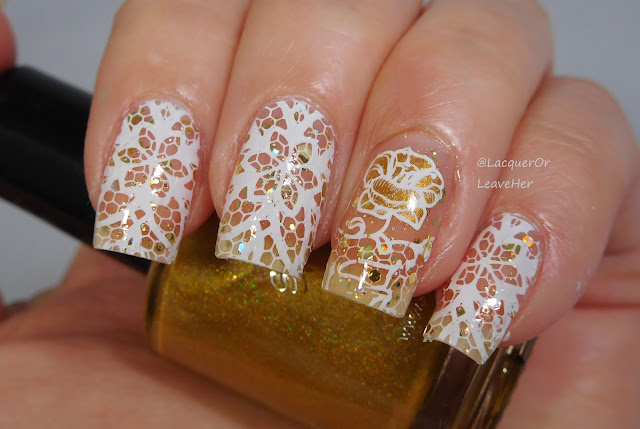
For my third mani, I wanted to play with the lace images. Whenever I see lace, I want to do a 'naked' lace look, so I picked two lace images that had a similar mesh pattern, and mixed and matched. I started with a base of clear polish with gold glitter, Blue-Eyed Girl Lacquer's Four-Star Daydream, and then stamped with Kaleidoscope White. I did reversed stamping for my accent nails, and filled in the flower with Spellbound Nails In Just 7 Days. Here's how it came out: 


Dixie Plates Mega Mani Mix 01 over Blue-Eyed Girl Lacquer Four-Star Daydream

Dixie Plates Mega Mani Mix 01 over Blue-Eyed Girl Lacquer Four-Star Daydream

I adore this look and this technique, so I made a tutorial if you want to replicate it:


So what do you think? Do you have a favorite of the three? I think together they show what a wide range of looks you can get from this plate, and even more so if you have longer nails.


If you're in the US and Canada, you can find this plate at Lantern & Wren. If you're elsewhere, check out Dixie Plates website for a retailer that ships to you. In the meantime, stalk Dixie Plates here:

Dixie Plates Facebook Fangroup: https://www.facebook.com/groups/461694520667496/

Dixie Plates on Instagram: https://www.instagram.com/dixie_plates/


Hope you have a great weekend!
M. xoxo

Tuesday, January 30, 2018

Dixie Plates Love 2018!

(Press samples and affiliate links ahead!)

Hello!


Romance is in the air...Love is in the air...So you know I gotta put it on my nails, too.


So let's jump right in and take a look at Dixie Plates Love 2018! Here's the video review I did of the plate:


And here's a still shot:

Dixie Plates Love 2018


Love the range of images here, from super cute and fun, to pure romance. My favorites? The flirty clouds, the hot air balloons, the hands making the heart, and all the languages proclaiming their love.


Dixie Plates' full nail images are very generous, 2.1 x 2.5 cm, and here's a shot so you can tell the sizes of the smaller images:


The stamping quality is top-notch, as always:


These swatches were all done with my clear stamper and Sally Hansen Insta-Dri Midnight Drive.


For my first mani, I just had to layer the flirty clouds with the hot air balloons...I started with a base of Spellbound Nails Beauxbatons, and then used reverse stamping to stamp (Messy Mansion Sterling), fill in (Messy Mansion Chalk), and apply my image to the nails. Then I stamped the rest on top with Messy Mansion Red-y Or Not:


Dixie Plates Love 2018 over Spellbound Nails Beauxbatons

Dixie Plates Love 2018 over Spellbound Nails Beauxbatons


I am soooo excited about how cute these came out! I love the depth, and those clouds just make me smile.


I did a tutorial to show you how I did it, and to share with you a little tip for making your reversed stamping easy as pie...


...instead of using a coat of topcoat on your nails before you roll your reversed-stamped images onto the nail, use a rubberized/sticky basecoat instead. That will grip your image like crazy, so you'll never leave half your image on your stamper again. ;-)


For my second mani, I started with a base of The Lady Varnishes Turkish D'Lightspeed, then stamped the striped image with Sally Hansen Insta-Dri in Thyme Is Money and Peach Buzz. Then I stamped the words with Kaleidoscope White:


Dixie Plates Love 2018 over The Lady Varnishes Turkish D'Lightspeed

Dixie Plates Love 2018 over The Lady Varnishes Turkish D'Lightspeed

Dixie Plates Love 2018 over The Lady Varnishes Turkish D'Lightspeed


This love how soft and romantic this is, still with a Valentine's feel, but an alternative to bright pinks and tons of hearts, when you're in the mood for something a little different. And how cute are those love birds?!?!


If you're in the US, you can find this plate (and Kaleidoscope stamping polishes) at Lantern & Wren, and if you're elsewhere, check out Dixie Plates site for a retailer that ships to you. In the meantime, you can stalk Dixie Plates around the interwebs here:

Dixie Plates Facebook Fangroup: https://www.facebook.com/groups/461694520667496/

Dixie Plates on Instagram: https://www.instagram.com/dixie_plates/


Hope love is all around you, in all of its forms!
M. xoxo

Monday, July 4, 2016

Review: Winstonia Beach, Please plate (plus sample manis!)

(Press samples and affiliate links** ahead!)

Hello!

Today is the first of a four-post series I'm going to do about several new Winstonia plates. I have a video showing and testing all four plates here:


Today we're going to take a look at the new Beach, Please plate (and yes, the name does crack me up every single time I see it). As the name suggest, the plate has a beach/pool theme:


Winstonia Beach, Please!


This plate has plenty of flexibility: several areas big enough for full nail images, and lots of little elements to mix and match. You can build your own scene, make a collage, stick with one image, or just pull out some texture. It has everything you need for beach, pool, or tropical manis: tons of possibilities here for one small plate. :)


Let's talk size. The plates themselves are just under 3 inches wide and 3 1/4 inches long:


Since the elements are all different sizes, I took these shots to help you see how big they are:


Winstonia Beach, Please!


So how do they stamp? Well, here's my test swatch:


But, I think what you really want to see are some manis with the plate, am I right?! I'm completely obsessed with this pineapple on this plate with his rockin' sunglasses, mostly because he reminds me of a character in a show from my childhood ("Mais, les ananas ne parlent pas!"), so I had to do something with him:


Les ananas: Winstonia Beach, Please! + Zoya Cam + Messy Mansion stamping polishes
Les ananas: Winstonia Beach, Please! + Zoya Cam + Messy Mansion stamping polishes


For this mani, I started with a base of Zoya Cam, then stamped with Messy Mansion Petal. For my decal, I used Messy Mansion Forest for the fronds on the pineapple, Soft Gold for the rest of the outline, Banana Bender to fill in the pineapple, and Petal to fill in the sunglasses. I'm pretty sure he wears them at night.


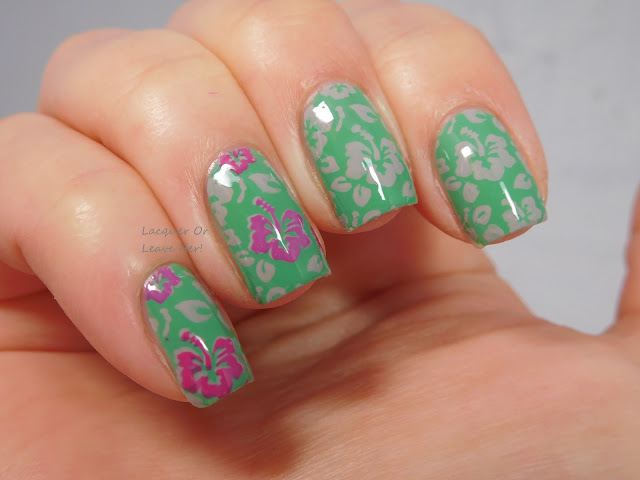
For the second mani, I had to do something with the hibiscus flowers, because you know me and tropical flowers:


Tropical flowers: Winstonia Beach, Please! + Zoya Ness, Brynn, and Live
Tropical flowers: Winstonia Beach, Please! + Zoya Ness, Brynn, and Live


For this mani, I started with a base of Zoya Ness, and stamped with Barry M Almond. Then I used my clear stamper to overlap slightly a couple of the flowers with Zoya Brynn and Zoya Liv. This is what I love about the clear stamper--a manicure like this that would have been a huge pain in the tushie before is a breeze now. :)


You can find this and many other adorable plates in the Winstonia shop; use my code MICH10 for 10% off of your order. You can also find them on Amazon if that's more convenient for you.


And make sure to follow Winstonia on Facebook and Instagram to keep up on news, updates, and sales!


Happy stamping!
M.

Friday, January 8, 2016

Before & After: The Lady Varnishes Bio Exorcist + MoYou London Sci-Fi 04 (or, Alien Whales)

(Nothing to disclose)

Hello!

So, a while back I bought MoYou London Sci-Fi 04, made a video reviewing it, and set it aside until inspiration grabbed me with a great idea for a manicure using it. But, as much as I loved the plate, Nothing inspired me to use it, and it just sat, neglected, among my plates.

And then I met The Lady Varnishes Bio Exorcist, and I knew exactly what I had to do.

First of all, here's the video review of the plate, for your viewing pleasure:


And here is a still image:

MoYou London Sci-Fi 04


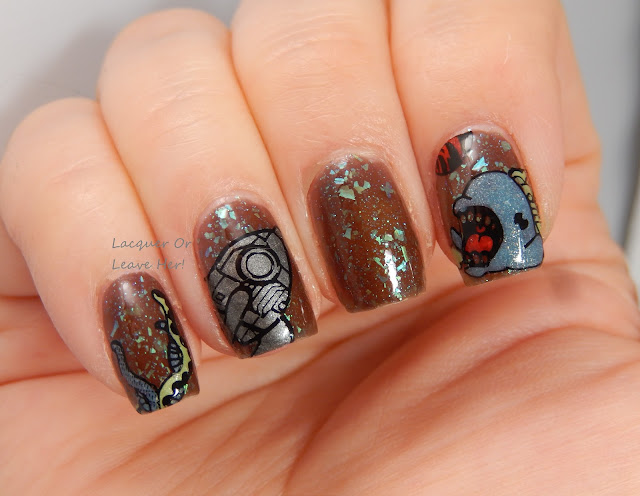
But, let's get back to The Lady Varnishes Bio Exorcist. Have you heard the phrase 'ugly pretty', used to describe a color or a combination of colors that really should be ugly, but somehow, someway are just amazing and pretty? For me, this polish is the ultimate version of that. Bio Exorcist is a lovely conconction of mint-green-to-bright-blue duochrome flakies that send out beams of luminescence from the depths of chocolate-sludge jelly squishiness. It looks like the sea on some dark alien planet:


The Lady Varnishes Bio Exorcist

The Lady Varnishes Bio Exorcist


So that's exactly what I decided to do with it--make it into a story about a spaceship traveling through the beautifully sludgy depths of an alien planet's ocean:


The Lady Varnishes Bio Exorcist + MoYou London Sci-Fi 04
The Lady Varnishes Bio Exorcist + MoYou London Sci-Fi 04

The Lady Varnishes Bio Exorcist + MoYou London Sci-Fi 04
The Lady Varnishes Bio Exorcist + MoYou London Sci-Fi 04

The Lady Varnishes Bio Exorcist + MoYou London Sci-Fi 04
The Lady Varnishes Bio Exorcist + MoYou London Sci-Fi 04

The Lady Varnishes Bio Exorcist + MoYou London Sci-Fi 04


I decorated it using the reversed-stamping technique, stamped with Eat Sleep Polish Endless Sheets of Canvas, and filled in with Zoya Tracie, Zoya Zuza, Sally Hansen Red-io Active, and Orly Iron Butterfly.

I love how this came out--it's like one of those movies from the 1960s, like Voyage to the Bottom of the Sea or something. Fun, kitschy, and just a little bit scary!

Happy stamping,
M.

Friday, December 25, 2015

Before & After: Simple Poinsettia with Zoya Sue + UberChic Beauty Christmas 01

(Press sample; affiliate link)

Hello!

Christmas day, for me, is the calm after the storm. The presents are purchased and wrapped. Cards have been sent. The decorations are up, the cooking is done, the stockings have been filled...and now it's time to enjoy it all with family and friends. It's peaceful and soothing. My Christmas day offering for you is my attempt to capture that beauty and serenity.

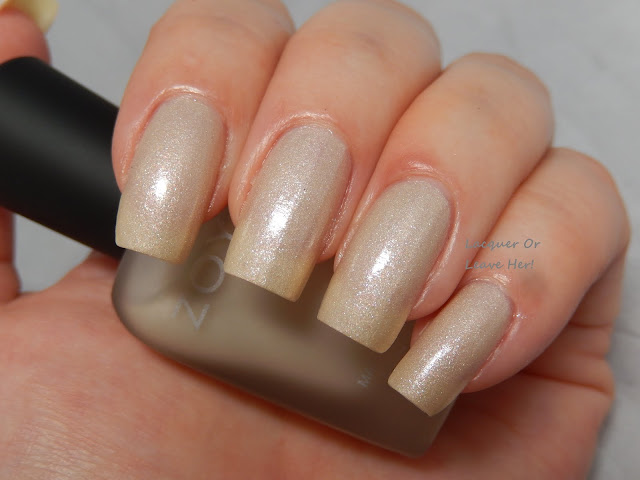
I started with Zoya Sue, an almost-white gold matte with soft, frosty white shimmer:


Zoya Sue without topcoat

Zoya Sue with topcoat

For this manicure I did a single accent nail, made with a reversed-stamping poinsettia from UberChic Beauty's Christmas 01 plate; I stamped with Zoya Honor, and filled in with Zoya Amal:


The beauty of a single poinsettia


The beauty of a single poinsettia

I think poinsettias are elegant, understated, and beautiful, all of the things I wanted this mani to be. I've been waiting to have my pretty red poinsettia since I first saw this image on the plate.

I apologize that two of my nails are a little wonky in terms of shape--they're casualties of all the nail-destroying cooking, cleaning, and wrapping of the season! And I wouldn't change a bit of it.

I hope your Christmas is warm and happy and filled with the beauty of love.

Merry Christmas,
M.