Showing posts with label microbeads. Show all posts

Friday, December 8, 2017

Dixie Plates Nail Gems 01!

(Press samples and affiliate links ahead!)

Hello!


Today we're going to take a brief break from holiday manis to look at Dixie Plates Nail Gems 01, a plate designed to help you create 3D-nail art with all your awesome gems, but can also make beautiful designs without them. Here's the video review I did of the plate:


And here's a closer look at the plate:


Dixie Plates Nail Gems 01

What's special about this plate: Settings for jewels!!! Use them for actual rhinestones and 3D gems, or make decals to create your own jewelry. My particular favorites are the flowers with the spaces for a little rhinestone or half-pear to accent them.

The images are all different sizes, so here's a shot with a ruler to help you decide if it'll work for you:


Hey, how about quality? Let's take a look:


These swatches were done with Sally Hansen Insta-Dri Plummet, and my clear stamper. Fine lines, thick lines, a combination of the two--great quality images. :)


For my first manicure, I wanted to do a manicure to show off some awesome turquoise-y gems I've had forever...I started with a base of Sally Hansen Teal Good, then created a marble to match the gem with Dixie Plates' Marbled 01 plate and Messy Mansion Carbon and Chalk. I stamped my gem setting with  Messy Mansion Sterling, and filled it in with Shinespark Polish Moondust (a holo topper) to give the illusion of crushed diamonds:


Dixie Plates Nail Gems 01 over Sally Hansen Teal Good

Dixie Plates Nail Gems 01 over Sally Hansen Teal Good


I love how this came out--like a gorgeous piece of turquoise jewelry right on my nails!


For my second manicure, I wanted to try something a bit different with that gorgeous dragonfly image. I made a promise to myself recently that I'd free up space in my line-up to get back into nail art challenges--I love them so much, but never seem to have time to do them anymore. So this is my jump back in--the 26 Great Nail Art Ideas group has 'bugs and insects' as its theme this week, so I jumped all over that dragonfly image!


I started with a skittle of The Lady Varnishes Broken Carousel and Dragon (over Sally Hansen Blacky O undies), then stamped with Messy Mansion Sterling and Soft Gold. Then I accented two of the dragonflies with half-beads in gold and silver: 


I am soooo happy with how this mani turned out! It's like magical creature in an enchanted forest. Can somebody please make me a dress with these colors and patterns?!?!!!! But if dragonflies aren't your thing, check out the manicures done by the other participants, linked below. :)


You can find Dixie Plates Nail Gems 01 at Lantern and Wren if you're in the US or Canada, and can check sourcing for other locations on the Dixie Plates site. And don't forget to follow them around the interwebs here:

Dixie Plates Facebook Fangroup: https://www.facebook.com/groups/461694520667496/

Dixie Plates on Instagram: https://www.instagram.com/dixie_plates/


Happy stamping!
M. xoxo


Friday, April 29, 2016

Review: Born Pretty Store rhinestone sorting tray

(Press sample)

Hello!!


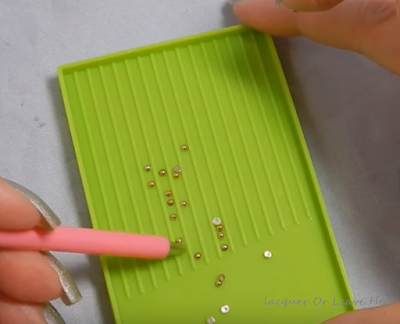
I have a neat little gadget to show you today, sent to me for review by Born Pretty Store! It's a little tray designed to help you keep track of your rhinestones or other bitty ditties, and it comes with a little pen-type thing to help you pick them up and place them.

I made a video to show it to you in action:


Now let's take a look at it up close and personal like.  Here's everything in the package:

Born Pretty Store rhinestone sorting tray


There's a little lip around the edge of the tray to keep the rhinestones from going everywhere, and there are little ridges to help you sort everything out and keep them straight:


Born Pretty Store rhinestone sorting tray


On the back side the ridges are a little wider, for bigger rhinestones and other decorations:


Born Pretty Store rhinestone sorting tray


So here I've poured out some half microbeads; you can see that the tray is small enough to not get in the way of everything on your work space, but big enough to sort out what you need:


Born Pretty Store rhinestone sorting tray


I like to use it to count out the right number and turn them over so they're all ready to go when I want to apply them, since I usually have to work fast before my topcoat dries:


Born Pretty Store rhinestone sorting tray


The set comes with a pink stylus and some soft pink wax; you put the wax on the top of the sylus, and it allows you to pick up your decorations (these are stills from the video):


Born Pretty Store rhinestone pick-up stylus

Born Pretty Store rhinestone pick-up stylus


One of the things I love best about this is how easily it helps you put everything away:


Easy clean-up with the Born Pretty Store rhinestone sorting tray

Easy clean-up with the Born Pretty Store rhinestone sorting tray


So much easier than trying to round them all up with your fingers or a scraper!


All in all, I love this little device, and I'm glad I have it. It's a simple thing, but sometimes the simplest things are exactly what you need to get the job done.


Now...you know I wouldn't leave you hanging with no sample mani, right??


I started with Sally Hansen Lava, one of my favorite multichromes ever, which shifts from bright pink through burnt coral:

Sally Hansen Lava
Sally Hansen Lava


I stamped it using Messy Mansion Symetrika 04, with Messy Mansion Carbon:


Messy Mansion Symetrika 04


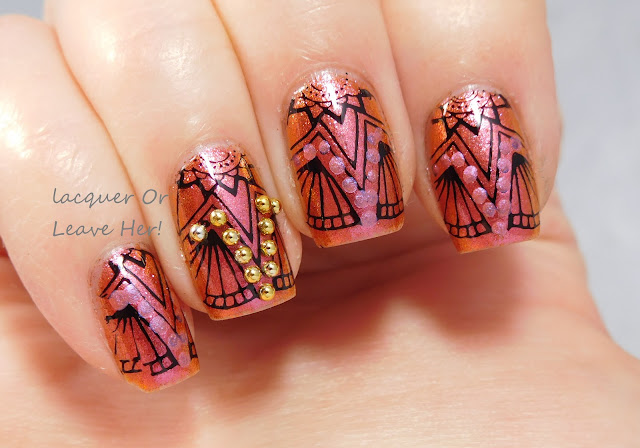
Then I put pink duochrome dots on with Hit The Bottle Polish Peach Blow, and then added my half gold beads:


Happy Henna with Sally Hansen Lava and Messy Mansion Symetrika 04

Happy Henna with Sally Hansen Lava and Messy Mansion Symetrika 04


What do you think! I love the way the colors work together, and I love how the edge of the star pattern makes such a pretty fan-like pattern. Very warm and pretty!

You can find the rhinestone sorting tray here on Born Pretty Store's site, and don't forget to use my code to get 10% off your purchase:


Happy stamping!
M.

Sunday, February 14, 2016

Review: UberChic Beauty Furry Best Friends plate (or, Happy Valentine's Day from mah furry brood!)

(Press sample; affiliate links)

Hello!

I believe that Valentine's day is a time to celebrate everyone in our lives that we love, not just our romantic relationships. And for me, a big part of that is the kitties and puppy that make every hour of my day brighter.

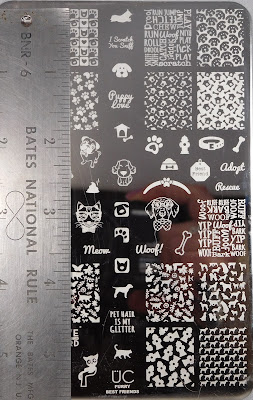
So, I want to share with you UberChic Beauty's Furry Best Friends plate, and a special manicure I did with it to celebrate my wee beasties.

Of course I did a video review:


And here are the still shots of the plate:

UberChic Beauty Furry Best Friends

UberChic Beauty Furry Best Friends

UberChic Beauty Furry Best Friends


How adorable is this plate?! The hipster cat and dog alone are worth having, for sure. And those little kitties!! And that pug!! There's a ton of cute fun to be had with this one, and lots of mix-and-match potential.

Here's a look at the relative size of the images:


UberChic Beauty Furry Best Friends

UberChic Beauty Furry Best Friends


And let's see how it stamps:


Some warping from my stamper, but otherwise pretty darn good. :)

So for my sample mani, I started with a skittle using Zoya Dillon, Color Club Riviera and Green Piece. Then I stamped images from the plate with Barry M Cotton, and colored them in using China Glaze Sexy In The City, Zoya Eden, and Zoya Cala.


Kitty Love with UberChic Beauty Furry Best Friends

Kitty Love with UberChic Beauty Furry Best Friends

What do you think? I think the kitty images are soooo adorable! I picked the blue for their eyes to match the glitter, but I think it's a little too dark, and makes them look a little like baby lemurs! Still 100% cute and I love how it all came out. :)

You can find this plate in UberChic Beauty's shop, and don't forget to follow them on Facebook!

Happy stamping,

M.


Saturday, August 1, 2015

NOTD: Mint Chintz with UberChic Beauty plate 4-02

(Press sample; affiliate link)

Hello!!

I'm loving my UberChic Beauty Collection 4 plates, and I'm back today with a manicure from plate 4-02:

UberChic Beauty plate 4-02


I did something very bold and bright last time, so this time I thought I'd go delicate and soft. I started with a base of Zoya Dillon, a very soft mint shimmer, and then I stamped the chintzy frond patter, using Konad white; I finished off with some microbeads on my middle finger for extra accent bling:


Zoya Dillon + UberChic Beauty plate 4-02


Zoya Dillon + UberChic Beauty plate 4-02


So feminine and pretty! I love this pattern, it would work so well in so many colors, and for so many things, since it looks like ferns or flowers, or even mistletoe for Christmas. Simple, easy, but lovely.

You can buy this plate as part of collection 4, directly from UberChic Beauty, by clicking here.

What do you think? Is chintz your thing?

Happy stamping,

M.

Monday, December 22, 2014

Before & After: The Gift of the Magi

(Press sample)

Hello!

Every year I tell myself I'm gonna plan everything so that I'm not overwhelmed and running behind in the stretch leading up to Christmas, and here I am again, overwhelmed and running behind in the stretch leading up to Christmas. I'm sure I'm probably the only one, right? ;-) This year at least I know it couldn't be helped, with an unexpected two-week jury trial (I was called as a juror) coming early in December, right after my month-long National Novel Writing Month sprint in November. As I write that out, I'm frankly impressed I'm not further along and more overwhelmed!

Point is, I missed several challenges and need to hurry my tush up to get my last three holiday manicures out for you. Today's theme in my Stamp All Ten group is to make a manicure based on a holiday book or movie.

My favorite Christmas story has always been, and likely always will be, The Gift of the Magi, by O. Henry. If you've never read it, I'll give you a short summary so the manicure will make sense, but I strongly recommend you read it for yourself first, because it has a surprise ending which I will ruin for you in the next paragraph. Seriously, go read it--it's free because it's in the public domain, and you can find it by clicking here. Then come back and check out the mani. :)

Okay, here is the SPOILER summary. The story is about a young  married couple, Della and Jim. They are like many of us, trying to make ends meet, and despite saving all year, Della doesn't have enough to buy Jim what she wants to buy him, a watch fob for his pocket watch, his most treasured possession. Filled with despair, she hits upon an idea; she'll sell her long, beautiful, beloved hair, hair that reaches past her knees, for the money to buy the fob. In the meantime, unbeknownst to her, Jim sells his watch to get the money to buy her a set of beautiful hair combs for her gift.

Why do I so deeply love a story that has such a sad twist? Because I don't think it's sad at all. I think the notion of two people loving each other so much that they're willing to give up the thing they value most in the world just to see a smile on the other person's face is the very essence of love. And love is supposed to be the essence of Christmas and the holiday season, isn't it? Through these two selfless acts they both truly live and learn that their love for each other is more valuable and beautiful than any material thing in the world could ever be. It's a story I've always tried to keep close in thought and action.

For my manicure, I started with Incoco Enigma, from their Double Take duochrome collection; the wine-to-olive-to-gold duochrome has a very vintage, Victorian feel to me that fits right with the story:


Incoco Enigma
Incoco Enigma


Incoco Enigma
Incoco Enigma


Incoco Enigma
Incoco Enigma


Enigma is also extremely sparkly in direct light:


Incoco Enigma
Incoco Enigma

I stamped coins and put rhinestones on my pinkie, and hearts on my ring finger; this is supposed to look like coins/jewels are turning into love, and symbolizes the importance of love over money.  On my ring finger I've stamped Jim's watch, and on my index finger I've stamped Della's flowing hair; I put a gold half-bead at the top of the watch where the fob would connect, and a flower rhinestone in Della's hair to symbolize the hair combs.

I stamped my designs on with Barry M Gold Foil; I used Cheeky, Bundle Monster, and Winstonia plates to make the collage, and then accented with rhinestones and a half gold bead.


Of all who give and receive gifts, such as they are the wisest.

Everywhere, they are the wisest. They are the magi.


It's hard to do justice to something you love so much, but I feel like I've captured the essence and the message of the story and the season here. I hope you like it as much as I do!

Holiday hugs and loves,
M.


Sunday, November 9, 2014

Review and How-to-use: Tourist 20

(Nothing to disclose)

Hello!

Are you ready to go on a trip? Today I have a plate from MoYou London's Tourist collection, and it takes us on a fun trip to India!

Here is my video:


And here are the stills:


MoYou London Tourist 20


MoYou London Tourist 20

MoYou London Tourist 20

MoYou London Tourist 20


How-to-use!

This is a combination plate; it has a selection of single images you can easily use on their own, and a section that is collage-style. I'll break that down a bit for you. :)

1) The obvious first way to use this plate is to use the single images. 'Nuff said.

2) Full-nail images. This plate has four sections that can be very easily used for full-nail designs:


3) Use the architectural elements. There are some beautiful designs in the strips that make up the 'joints' of the building (outlined below). These would make really classy accent nails or for one or two nails in a skittle. Test them out! Give them a shot!


Don't forget the architectural elements


Okay, so for my sample mani, I used the middle 'full-nail' area to create a manicure celebrating Diwali (which, roughly speaking, is a New Year celebration). I used the colors in this picture for my inspiration:


 And I wanted to include Lakshmi, who is an important part of the Diwali celebration:


So I also used Explorer Collection 21 for that.


For my base polish I used Zoya Teigen, a cranberry shimmer with gold flecks:


Zoya Teigen
Zoya Teigen

Zoya Teigen
Zoya Teigen

Next I stamped my designs using Barry M Gold Foil; then I added silver and gold microbeads, along with an orange rhinestone to give some extra bling to the beautiful Lakshmi:


I am in love with how stunning the flower pattern looks in just a simple gold-over-red stamping manicure. Such an impact with so little effort. :)

So what do you think? Do you like the combo plates like these better than the 100% collage-style plates? Or do you prefer going all in?

Hugs,
M.