Showing posts with label Fauxnad. Show all posts

Sunday, November 4, 2012

Before & After: Millenium FAILcon

Hello!!

In my Adventures In Stamping group, we have a weekly challenge that posts on Sundays. This week's prompt was to stamp over glitter. Something I've done a bunch of times.

In my 'about me' section, I mention that sometimes I'm successful, and sometimes I'm not. Today is a NOT.

Let me say a little bit about that for a minute. There have been some questions circling the nail blogosphere about the level of professionalism that should be posted in nail blogs. Should cuticles be perfect, manicures be streamlined, etc.? My position is that every blogger should do what they feel on this issue. My personal feeling is, I'm not perfect, far from it, and so my blog content will not be perfect. I try to present good pictures, clean manicures, and respectable cuticles. But sometimes my cuticles are raggedy, sometimes in my rush to capture a manicure I love, I forget to clean my cuticles well, and sometimes the idea in my head doesn't come out right on my nails. That's all a part of my journey, and that's what this blog is documenting. Other blogs have other purposes, and that's okay, too! But if you've ever had a great idea for a manicure and when you executed it, it looked like crap...well, you can come here and take solace i knowing that you're not alone, lol.

Enough about that--count yourself warned! This mani will not be pretty.

So, I started out with Misa Date Night To The Twilight as my base polish, which *is* pretty. However, the problems began when I tried to get a picture of her true color. It turned out that the only way I could do it was inside in my light box, holding a blue background sheet, in weird, inelegant poses; everything else came out far too blue. But, the color is accurate, which is good because this is a very pretty, subtly sparkly purple:

Misa Date Night To The Twilight

The rest of the pictures don't capture the color very accurately, and sort of throw everything off. But you get the idea from above, hopefully...>.>

For my next step, I put on a coat of Whimsical Ideas By Pam Once Upon A Time (INDIE ALERT!!), which was recently added to her line-up as a Halloween glitter. For a Halloween glitter, it's very subtle and nice; it's also beautiful for a spring glitter, or any other darn thing you want. It has pretty hexes in sage green and muted lilac, plus a spray of micro glitter. The colors are muted, but do show a bit more than you see here--the purple base overwhelmed them in the camera a bit:

DNTTT + Whimsical Ideas By Pam Once Upon A Time


DNTTT + Whimsical Ideas By Pam Once Upon A Time

There's nothing wrong with that step--it was a beautiful addition to the base color. And I should have stopped there. Sigh...But, it was a stamp-over-glitter theme, and I thought I had the perfect idea for it. In my head, it looked beautiful and perfect. Ah, the best laid plans...


It looked better in mah head...

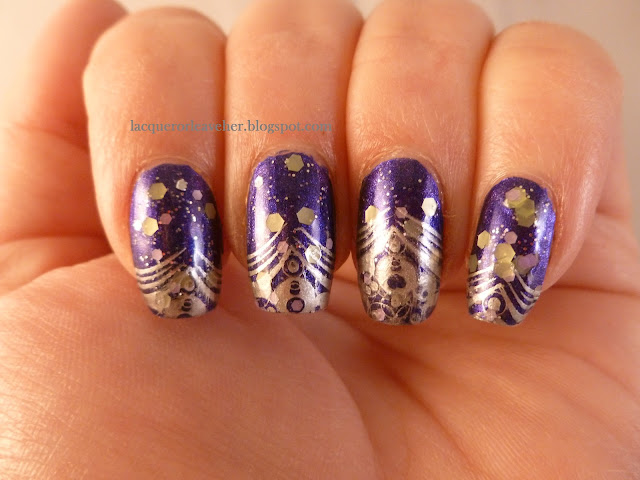
Millenium FAILcon
I stamped over the design with a fauxnad plate I got from Anna's, using Pure Ice Silver Mercedes. This was supposed to be a pretty Fierce French design, with the circles at the top going well with the hex glitter. It didnt' help that I messed up and blurred the stamping on the accent nail, but even if the stamping had been pristine, that wouldn't have saved it.

However, after looking at it for a bit, I decided it sort of looks like a spaceship (on each nail) flying through a sky filled with planets in stars. If they re-made Star Wars today, the front of the 2012 Millenium Falcon might look like this. Maybe. A little.

Ah well, I've done worse. Live and learn...live and learn.

Thanks for looking!

Xoxox,
M.

Monday, October 29, 2012

Before & After: Graveyard

Hello!!

Today's prompt in my 'This Is Halloween' challenge is 'graveyard'. I've been so excited about this one since I saw it on the list!

I started with a base of A'dor Beauty Supply Starry Night, to look like a dark blue night sky with stars in it:


I have to admit to wearing Starry Night for more than just a day...I really enjoyed it. It's the perfect sort of glitter for me--beautiful base color that holds its own, and glitter that peeks out at you. :) But I finally convinced myself to decorate it for this challenge:


Here's what I did. I free-handed the gravestone using China Glaze Elephant Walk, and then sponged The Nail Junkie Black Cat along the bottom to make the ground. Then I stamped the tree using LeaLaC plate LLB and China Glaze Call Of The Wild; I also used this color to free-hand the letters on the grave. I stamped the bats using Konad black and QA26; I finished up stamping the skull and bones with Sally Hansen White On and Bundle Monster plate BM225.

Thanks for looking, and please check out the other spooky graveyards, linked below! :)

Xoxox,
M.

Sunday, October 28, 2012

Before & After: Thing!!

Hello!

Today I was playing around a bit with some new colors and plates I got and did a simple little Halloween mani. It all started with a base of Pretty Serious Emma Louise:

Emma Louise indirect light

Emma Louise in the sunlight
Emma Louise is a purple polish with silver glass flecks, with purple and green-teal glitter hexes. This is one of those polishes that doesn't live up to how beautiful it looks in the bottle; on the nail, the glitter doesn't show up often or much, and most of what you get is the glass-flecked finish. This isn't necessarily bad news, however, if you like a more subtle glitter look; now and again some pretty glitter catches the light and gives the polish a bit of extra bling. These pictures actually show more glitter visible than you actually see with the naked eye; this is two coats of the polish. 

After I'd worn this for about a day, a new set of plates arrived in the mail and I had to get a Halloween manicure out of them quickly, since 5 out of 6 of the plates were Halloween plates! I decided to do an accent nail featuring 'Thing', the disembodied hand from The Addams Family.

First I did a gradient to give the nails a more creepy, fun, Halloween-y feel; I started with Cult Nails Hypnotize Me about 1/3 of the way up the nail. Then I put a tiny bit of Pretty Serious VT100 along the very bottom to make it a bit more green. Then I stamped the hand with plate HD04, using Sally Hansen Lickety-Split Lime. I used a dotting tool to accent the fingers and the top of the arm:

This one shows the full 'Thing' design, but the gradient doesn't show as well


This one shows the gradient accurately :) This also shows more how much the glitter is actually visible.


This show the design in direct sunlight
Thing was always my favorite -ahem- thing on the show; I just thought it was soooo cool to have this hand running around taking care of stuff for you, and I'd just watch it, fascinated. Okay, so it wasn't green. But still. :P

Thanks for taking a look! Please check out the other CNT Halloween manicures below. :)

Xoxox,

M.

Saturday, October 27, 2012

NOTD: Influenced by scary movie

Hello!!

Today's prompt in the CNT Halloween challenge is 'influenced by a scary movie'. As I was working on recreating a manicure I liked from earlier in the competition (the last prompt in each of the challenges is to recreate someone else's manicure), I was inspired to do Amityville Horror for this prompt. :)

To do this, I wanted an evil looking house, so I went with a blood red house under a spooky night sky. Then, of course, I had to represent all of the ghosts lurking around the house:


Horror House--are those ghosts flying away, or just circling?

Fly away ghosties! Fly away!

To create the manicure, I started with a base of China Glaze Smoke And Ashes, and added a layer of Max Factor Fantasy Fire to give the night sky a little mystery. I freehanded the moon with Pure Ice Silver Mercedes, and the house with Pure Ice siren and Sally Hansen Lightning. I stamped the ghosts using Anna plate W227, and Sally Hansen White On. And there you have it!

Thanks for looking, and please check out the other scary movie manicures linked below. :)

Xoxox,
M.


Friday, September 21, 2012

Review: LeaLaC Stamping Plate LLC-A

Hello!!

Recently, Llarowe introduced their own line of stamping plates. Because I am a stamp-a-holic, I had to give them a try, and I'm going to review one of their plates, plate LLC-A for you here today. I'll show you the images, give my opinions about the plate, and compare the size of the images with a standard Konad plate.

I've also made a video if you prefer to see the images that way, along with my excited pratter about them, lol:


On to the images!:


Love those raindrops and snowflakes

So many cute ones here

Love that quill and lily

Alt houndstooth FTW

Egyptian hieroglyphs!!

Pretty cherry blossom tree

Love the Hamsa

Love that cobblestone-like pattern


So, here are my thoughts on the plate. The quality of the engraving is excellent, and there is a nice variety of images to suit a variety of purposes; some are patterns that we've seen before (but this is good because of the larger size--see below) and many that are new. I tested this plate out and it stamped beautifully--you can see one of the images on my ring finger in this post here. So there are no worries about quality or usability to be concerned about.

The most important feature of these plates for many people will be the HUGE size of the images. Here I've compared them with a standard Konad plate, and you can see they are about twice as big:


This is great for anyone that has wide nails or long nails--especially people who have longer nails and don't want to have to double-stamp on them. I know that I keep my nails fairly short, and Konad-sized images still sometimes barely fit. So, those problems should be greatly minimized here. However, when looking at these, keep in mind that the entire image isn't going to fit on your nails (well, not human nails, at least). So you want to keep scale in mind when you're ordering these, and keep in mind that the raindrops, for example, are not teeny little raindrops, but larger raindrops. The circular mandala shape, for example, is not going to fit on your nail as a whole. It isn't meant to. And the good news about this is you can use different portions of the image, especially if you have shorter nails, and even vary the portion of the image you use for different nails in your manicure. Excellent for creativity! Of course, you're going to want to have an XL stamper to use with this plate if you want to use it for longer/wider nails, but if you have shorter nails, a regular stamper will work just fine to isolate portions of the images.

Overall, I'm very impressed with this plate. At the time of this posting, it sells for $20.00; you can find it on Llarowe's site by clicking here.

Thanks for looking, and happy stamping!

M.

(the product reviewed in this post was purchased with my own money.)

Saturday, September 8, 2012

Review: Cheeky Summer 2012 Nail Plates

Hello!

I got my Cheeky Summer 2012 Nail Plates 2 days ago, and I couldn't wait to show them to you. First, here is the video that I made which shows the plates and the packaging if you prefer to see them in video and hear my silly reactions, lol:


Next I'll show you pictures of the packaging and plates, and finally, I'll write my thoughts at the end. If you want to see the test manicure I did, you can find it by clicking here.

The plates came packaged in a cute little box that serves as storage for the plates, which is good, because they're a bit bigger than the standard size stamping plate. But that's good, because it means the full-nail designs are larger!


Outside of packaging

Inside view of box
 The set also comes with a plastic card, like a credit card, which can serve as an 'emergency scraper'. All of the plates come with blue protective film on them, which comes off easily, and with paper backing to keep the plates from being to sharp and to keep them from moving around too  much.

On to the images!


Cheeky 30: Musical instruments

Cheeky 31: Musical interlude continues

Cheeky 32: Itty Bitty Wittle Monsters!

Cheeky 33: Love the recycling image :)

Cheeky 34: Sports

Cheeky 35: More sports

Cheeky 36: some nautical stuff and some beach-type stuff

Cheeky 37: It's getting hot in heeeere

Cheeky 38: Under da sea!

Cheeky 39: Vegas, Baby!

Cheeky 40: Beauty stuff :)

Cheeky 41: Junk food, anybody?

Cheeky 42: Strawberries and bananas and hot dogs, oh my!

Cheeky 43: Love that snail and that sheep :)

Cheeky 44: Flower garden

Cheeky 45: Space Invaders!

Cheeky 46: Celestial

Cheeky 47: Comic book sounds

Cheeky 48: Love the lightning

Cheeky 49: Arrrrrr, matey!

Cheeky 50: Soft florals

Cheeky 51: Audio/Video

Cheeky 52: Swirls, stars and flames

Cheeky 53: Love is in the air

Cheeky 54: International shopping

Cheeky 55: Shopping

I mentioned earlier that these plates are a bit bigger than standard nail plates, and the images are bigger too. This definitely is a plus for anyone who has trouble with the smaller image sizes that some sets have. Here are two comparisons of a Konad plate and a Cheeky plate:

Cheeky vs. Konad

Cheeky vs. Konad
And finally, my thoughts. I like this set, there are enough images here that I'm excited about to definitely make it worth purchasing; there are many, though, that are a bit cutesy for my taste. Of course, that's my taste, and what's really more important for this review are issues of quality. I found these plates to be etched well, although just a bit deeper than plates like Konad and Mash; this meant I had to adjust a bit when using them. What it means for me is that I have to scrape a bit harder and more thoroughly, and to use a lighter hand when I stamp, to make sure that there is not an excess of polish that squishes outside of the lines. However, it took me about 2 minutes to make that adjustment, so I don't think it should deter you from buying them in the least. There is very fine detailing on some of the images, and this transfers well (see the sun image in my test manicure, linked above). And it bears repeating that the bigger images are nice so that you don't have to worry about fully covering your nails; I'm not sure why manufacturers didn't start making pates and images this size long ago. All in all, this is a good set of plates and well worth the price if there are enough images here that you like. :)

You can purchase the plates directly from Cheeky by clicking here. At posting time, they cost $24.99 for the set.

Thanks so much for taking the time to stop by! Have a great weekend. :)

M.

(the products reviewed in this post were purchased with my own money.)