Showing posts with label Eat Sleep Polish. Show all posts

Friday, January 8, 2016

Before & After: The Lady Varnishes Bio Exorcist + MoYou London Sci-Fi 04 (or, Alien Whales)

(Nothing to disclose)

Hello!

So, a while back I bought MoYou London Sci-Fi 04, made a video reviewing it, and set it aside until inspiration grabbed me with a great idea for a manicure using it. But, as much as I loved the plate, Nothing inspired me to use it, and it just sat, neglected, among my plates.

And then I met The Lady Varnishes Bio Exorcist, and I knew exactly what I had to do.

First of all, here's the video review of the plate, for your viewing pleasure:


And here is a still image:

MoYou London Sci-Fi 04


But, let's get back to The Lady Varnishes Bio Exorcist. Have you heard the phrase 'ugly pretty', used to describe a color or a combination of colors that really should be ugly, but somehow, someway are just amazing and pretty? For me, this polish is the ultimate version of that. Bio Exorcist is a lovely conconction of mint-green-to-bright-blue duochrome flakies that send out beams of luminescence from the depths of chocolate-sludge jelly squishiness. It looks like the sea on some dark alien planet:


The Lady Varnishes Bio Exorcist

The Lady Varnishes Bio Exorcist


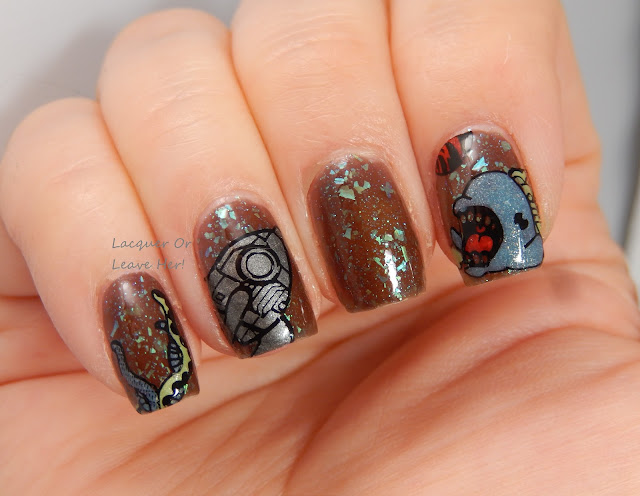
So that's exactly what I decided to do with it--make it into a story about a spaceship traveling through the beautifully sludgy depths of an alien planet's ocean:


The Lady Varnishes Bio Exorcist + MoYou London Sci-Fi 04
The Lady Varnishes Bio Exorcist + MoYou London Sci-Fi 04

The Lady Varnishes Bio Exorcist + MoYou London Sci-Fi 04
The Lady Varnishes Bio Exorcist + MoYou London Sci-Fi 04

The Lady Varnishes Bio Exorcist + MoYou London Sci-Fi 04
The Lady Varnishes Bio Exorcist + MoYou London Sci-Fi 04

The Lady Varnishes Bio Exorcist + MoYou London Sci-Fi 04


I decorated it using the reversed-stamping technique, stamped with Eat Sleep Polish Endless Sheets of Canvas, and filled in with Zoya Tracie, Zoya Zuza, Sally Hansen Red-io Active, and Orly Iron Butterfly.

I love how this came out--it's like one of those movies from the 1960s, like Voyage to the Bottom of the Sea or something. Fun, kitschy, and just a little bit scary!

Happy stamping,
M.

Sunday, November 29, 2015

Before & After: Tee Roses

(Includes press samples; affiliate links)


Hello!

Today I have a quick before-and-after that I actually wore on my birthday back in August; it was inspired by the shirt I wore that day:


I shifted the color scheme a little because I wanted to try something out, so I started with Zoya Charli, an olive-gray creme:


Then I sponged on a some Wet n Wild Tickled Pink and Lavender Creme (a name I find deeply confusing because the shade is hot pink, not lavender), along with a titch of Orly Mirrorball holo magic to capture the shimmer in the shirt. I finished by stamping some roses from Bunny Nails plate BuNa-A:


Here's how it turned out:


Tee roses manicure
Tee roses manicure
Tee roses manicure

Tee roses manicure

Tee roses manicure

I totally get that this combo of colors isn't for everyone, but I ADORE it. The olive gray with the bright pinks--edgy but feminine at the same time. Even if I didn't go exact, I think I captured the feel of the shirt, and to be honest--I wish I could make the background of the shirt the same color as Charli!

What do you think--nailed or no?

Happy stamping,
M.


Saturday, November 21, 2015

Before & After: Zoya Tris & UberChic Beauty 3-03 (or, Abstract Chains)

(Press sample; affiliate links)

Hello!!


Today I have a manicure inspired by a pattern on UberChic Beauty 3-03 which reminds me of a linked bracelet I used to have, and that I adored.

I started with a base of Zoya Tris, a gorgeous pewter metallic:


Zoya Tris


Then I stamped with UberChic Beauty 3:03, using Eat Sleep Polish Sheets Of Empty Canvas:


Here's how it turned out:


Abstract chains

That's the sound of the women

Workin' on the chain gang

What do you think? I think this is an elegant mani that also has a bit of edge to it. Great for fall or winter looks, but you know I'd rock it all year 'round.

Thanks for stopping by--happy stamping!
M.

Friday, November 13, 2015

NOTD: My Job (Messy Mansion 24)

(Nothing to disclose)

Hello!!

Today's theme in the Crumpet Nail Tarts challenge is "My Job". I have several things I do for my 'job', but all of them involve writing in some way or another, so Messy Mansion 24 was the obvious choice!

I started with a base of Barry M Almond, and then stamped using Messy Mansion 24:

Messy Mansion 24

I stamped the script and the inkspot using Eat Sleep Polish Endless Sheets of Canvas, Sally Hansen Rapid Red to stamp the quill (I added a silver accent with Barry M Silver foil) and the books with Hit The Bottle Polish Everyday I'm Truffling:


I think this would have been good except for one thing--my attempt to accent the spine of the quill with silver was an epic FAIL. Epic. I think that changed it from looking like a quill to a swiffer that someone used to clean up a crime scene. Funny how a little thing can do so much...Ah well, live and learn. I still like the manicure mostly, and I guess since I write murder mysteries, even a quill that looks like a blood-soaked swiffer represents.

Happy Stamping!!

M.


Friday, October 30, 2015

Before & After: Poisoned Apple

(Affiliate links)


Hello!

Halloween is about spooky scares, and one of the things that used to scare me the most when I was a little girl was...the witch from Snow White. So, for my contribution to the Crumpet's Nail Tarts Halloween collection, I decided to make a tribute to the Disney villain that terrified me the most.

To get an awesome night sky, I used Colors By Llarowe Rest In Pieces, an awesomely holographic blurple:


Colors By Llarowe Rest In Pieces

Colors By Llarowe Rest In Pieces

Colors By Llarowe Rest In Pieces


Colors By Llarowe Rest In Pieces


Love love love this holo, especially for a deep night-sky look...swoon.

Here's how the manicure came out (details afterward):


Come have an apple, little girl...


Poisoned Apple Snow White Manicure

Poisoned Apple Snow White Manicure


This manicure was a conglomeration of a bunch of different plates:
Tree: LeaLac LLC-B, stamped with Barry M Silver Foil
Apples: Bunny Nails old-school HD 06 (the octagonal ones), Winstonia W118, stamped with Barry M Silver Foil, Sally Hansen Rapid Red, and Sally Hansen Red-io Active
Witch: Decal made from My Online Shop JR-22, with Eat Sleep Polish Sheets of Empty Canvas, China Glaze Cha Cha Cha, and Sally Hansen Lively Lilac.

I used a double-stamping technique to make the apples stand out, and then to highlight the poisoned apple, I stamped it in silver with red accents. When I stamped the tree onto my nail, I messed up--the base of the tree should be solid--but I think the mistake makes the tree look creepier, like it has a creepy smile on it, so I decided to keep it (Halloween manicures are so flexible, lol!!). An even though I created it, that witch's face continues to creep me out...::shudders::

What do you think, good Halloween mani? Especially if you're dressing up like Snow White or your daughter is, I think this would be a fun mani.

If this one isn't your cup of tea, or even if it is, check out the other Crumpet Halloween manis below!!

Happy stamping,

M.


Thursday, October 22, 2015

Before & After: Monster Mash Bash (UberChic Beauty 5-01 + China Glaze Cha Cha Cha)

(press sample; affiliate links)

Hello!!

You know that song Monster Mash? The one where all the monsters are at some cool Halloween shindig, getting their party on? Have you ever wonder what goes on at a party like that? Well, I'm gonna show you.

There are a ton of gorgeous images on UberChic Beauty 5-01, and I bet your mind doesn't instantly go to Halloween when you look at it...But it's October and I have a serious Halloween addiction, so several instantly popped out at me as very cool background images for Halloween manis!

For this mani, I started with a base of China Glaze Cha Cha Cha, a sour-apple green with yellow shimmer that I love as a Halloween polish:


China Glaze Cha Cha Cha

Then I stamped the bottom right image from UberChic Beauty 5-01 with Sally Hansen Pronto Purple and Orange Impulse:

UberChic Beauty 5-01


Then I busted out my UberChic Beauty Halloween 01 plate, and did reverse stamping with several of the little totes adorbs characters I fell in love with on sight:

UberChic Halloween 01


I stamped with Eat Sleep Polish Endless Sheets of Canvas and colored with China Glaze Cha Cha Cha, China Glaze Out Like A Light, and Sally Hansen Pronto Purple, Orange Impulse & Brisk Blue,, and White On.

So let's take a look at what those crazy monsters get up to...:


They did the mash

Well, it sure looks like Mr. spider guy is hitting on Miss eyeball--love surely does conquer all, and I bet they'll have delightfully creepy looking babies! And in case you were wondering what happens when ghosts have a little too much to drink, take a gander at this:


They did the monster mash!

UberChic Beauty 5-01 + Halloween 01


It looks like Ghostie McGhosterson has had a little too much, and is annoying Grumpy McPunkinpants by trying to scare him. Will these ghosts never learn that drink just goes right through them? Hahahahahahahahaaaaa! Okay, I'll stop.

This is such a fun mani, it makes me giggle, and I love the bright colors. The bead string image is perfect with it--whimsical and silly.

You can find both of these awesome plates in UberChic Beauty's store, here.

Happy stamping!
M.

Tuesday, October 20, 2015

Review & Test: My Online Shop JR-22 (Or, these are my ghost adventures)

(Affiliate link)

Hello!!

Have you ever seen that show Ghost Adventures? Actually, there's a bunch of different ones out there when people go into old buildings at night and try to get evidence of paranormal activity. I don't really watch them too much, except at Halloween time, they're kinda fun...And I thought it would be cool to do a ghost manicure inspired by them.

Luckily, I have just the plate waiting for Halloween to be reviewed: My Online Shop JR-22. I bought this a while back in anticipation of Halloween, and am so happy to finally use it!


Here's the video I made reviewing the plate:


And here are the still shots of the plate (sorry, I forgot to take the pic before doing the stamping test, so there is some scraping):


My Online Shop JR-22


My Online Shop JR-22

My Online Shop JR-22


And here's a shot of the plate next to a standard Konad plate so you can get a feel for the size of the images:


My Online Shop JR-22 vs. Konad

How does it stamp? Let's take a look at my mani...

I wanted to create the look of the dark rooms they show in the TV shows, when they have the night vision cameras and everything looks all gray and indistinct. So I did a seriotype with Julep Ledi, Sally Hansen Gone Gray, and Sally Hansen White On. Then I did some reversed stamping with the little ghostie; I stamped him with Eat Sleep Polish Endless Sheets Of Canvas, and colored him in with White On:


A ghost in the dark of an abandoned prison...

Definitely not a dust particle or a light anomaly...

These are my ghost adventures!!

I love love love how this came out! The floaty ghost is all comin' right for ya with his spooky mouth in the scary dark room! This is one of my favorite Halloween manis I've done. :)

You can find this plate here, in My Online Shop's online shop!

Happy spooky stamping!
M.

Saturday, September 26, 2015

NOTD: Haunted Puniken Patch (Shinespark Jack O'Lantern + UberChic Beauty Halloween 01)

(Press sample)

Hello!

The moment I set eyes on the awesome orange juicy-ness that is Shinespark Jack O'Lantern, I knew I wanted to do a stamping sandwich with it--and that I wanted it to be Halloween themed. Yes, I know this is early to be showing you Halloween manis, but I promised when I reviewed UberChic Beauty Halloween 01 that I'd show you a mani using the plate soon. So here we go!

Here's another look at the plate:

UberChic Beauty Halloween 01


Before I applied my first coat of polish, I stamped a couple of little jack-o-lanterns and the scaredy cat from the plate, using Barry M Cotton (an awesome stamping polish, btw). I applied one coat of polish, and strategically placed my glitters. Then I stamped a few more punikens, and applied a second generous coat. Here's how it turned out:


Spooky pumpkin patch manicure

Spooky pumpkin patch manicure


Boy, that cat looks pretty darn scared...The jack-o-lanterns are spooky, but not that spooky--what can he be so scared of? Let's pull back and see:


Spooky pumpkin patch manicure

Spooky pumpkin patch thumb


OMG! It's a ghostie and it's coming right toward him! No wonder he's so scared!!!

Ahem. But seriously. Can I say how much I love the stamping sandwich effect? It always looks better in person than in pictures, but it adds so much dimension, really makes it look like some of the punikens are farther in the background. I love this--such a fun, playful look for the season.

Happy stamping!
M.

Wednesday, September 23, 2015

Review & mani: UberChic Beauty Zombie plate

(Press sample;affiliate links)

Hello!

Back when I showed you the new UberChic Beauty Halloween and Sugar Skull plates, I told you I was also excited about a new limited edition zombie plate they'd put out--and excited doesn't quite cover it. Obsessed. Over the moon. Amped. Stoked. Chuffed. All that rolled into one, and more.

If you want to hear exactly how excited I am, check out the video review I did of the plate:


And let's take a look at some stills:


UberChic Beauty Zombie Love 

UberChic Beauty Zombie Love

UberChic Beauty Zombie Love

Omg, omg, omg, omg, omg. If you are a zombie fan, this plate is super amazeballs. But if you are a Walking Dead fan, this plate is everything. EVERYTHING. I mean, just...just...just...images of Daryl. Images of Rick. Brains in every shape and size. Entrails. More zombies than you can shake a machete at--freshly dead zombies, advance decay zombies, zombie silhouettes, detailed zombie faces. There is even a girl zombie! And let's not even talk about the 'look at the flowers' image...the less said about that, the better, except for AWESOME.


The images vary in size, but here are shots of the plates next to a ruler so you can get a feel for what will fit on your nails--most of the smaller images should fit unless you have very small nails, and the full-nail images should fit unless you have very long nails:


So does the plate stamp well?


Dude. Seriously. Look at the detail on those images. Even those little brains have all the sulci intact (yes, that's right, I am a trained brain scientist).

You know I had to do a mani with this as soon as I got my little paws on it!


I started with Zoya Dree on all of my nail except my pinkie--I used Sally Hansen Mellow Yellow there so I could make myself some biohazard tape. I stamped that with Eat Sleep Polish Sheets Of Empty Canvas, and I messed up my pressure at the very top--but I didn't redo it, because I figured in a zombie apocalypse, the biohazard tape would get frayed and icky.

Next  made a decal with the zombie head and the zombie hand; I stamped with ESOC again, and then using the reversed-stamping technique, filled in with a mix of China Glaze Cha Cha Cha and Finger Paints Hue Brighten My Day, a green-gray glitter (did you know you can do reversed stamping with glitter?).  For the hand, I stamped with Julep Ledi and filled in with HBMD alone. When I applied my zombie head to my nails, the edge stuck up a little; normally I'd just press down and cover with topcoat and it would be fine. But I thought it would look cool to have some texture on a grody zombie head, so I let the edge stay bumpy.Finally, I stamped the words with Sally Hansen Rapid Red.

What do you think? Is it creepily, grodily, zombie-licious??

You can buy the limited edition Zombie Love plate now in UberChic Beauty's store. If you want it, grab it fast, not only before it sells out, but because The Walking Dead premiere is Oct. 11th...

Happy stamping,
M.