Friday, April 29, 2016

Review: Born Pretty Store rhinestone sorting tray

(Press sample)

Hello!!


I have a neat little gadget to show you today, sent to me for review by Born Pretty Store! It's a little tray designed to help you keep track of your rhinestones or other bitty ditties, and it comes with a little pen-type thing to help you pick them up and place them.

I made a video to show it to you in action:


Now let's take a look at it up close and personal like.  Here's everything in the package:

Born Pretty Store rhinestone sorting tray


There's a little lip around the edge of the tray to keep the rhinestones from going everywhere, and there are little ridges to help you sort everything out and keep them straight:


Born Pretty Store rhinestone sorting tray


On the back side the ridges are a little wider, for bigger rhinestones and other decorations:


Born Pretty Store rhinestone sorting tray


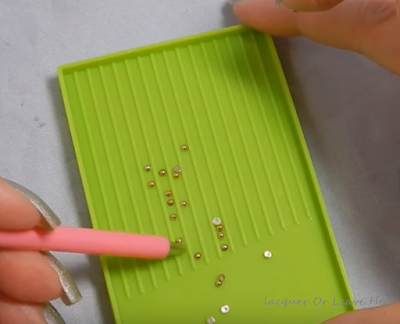
So here I've poured out some half microbeads; you can see that the tray is small enough to not get in the way of everything on your work space, but big enough to sort out what you need:


Born Pretty Store rhinestone sorting tray


I like to use it to count out the right number and turn them over so they're all ready to go when I want to apply them, since I usually have to work fast before my topcoat dries:

Born Pretty Store rhinestone sorting tray


The set comes with a pink stylus and some soft pink wax; you put the wax on the top of the sylus, and it allows you to pick up your decorations (these are stills from the video):


Born Pretty Store rhinestone pick-up stylus

Born Pretty Store rhinestone pick-up stylus


One of the things I love best about this is how easily it helps you put everything away:


Easy clean-up with the Born Pretty Store rhinestone sorting tray

Easy clean-up with the Born Pretty Store rhinestone sorting tray


So much easier than trying to round them all up with your fingers or a scraper!


All in all, I love this little device, and I'm glad I have it. It's a simple thing, but sometimes the simplest things are exactly what you need to get the job done.


Now...you know I wouldn't leave you hanging with no sample mani, right??


I started with Sally Hansen Lava, one of my favorite multichromes ever, which shifts from bright pink through burnt coral:

Sally Hansen Lava
Sally Hansen Lava


I stamped it using Messy Mansion Symetrika 04, with Messy Mansion Carbon:


Messy Mansion Symetrika 04


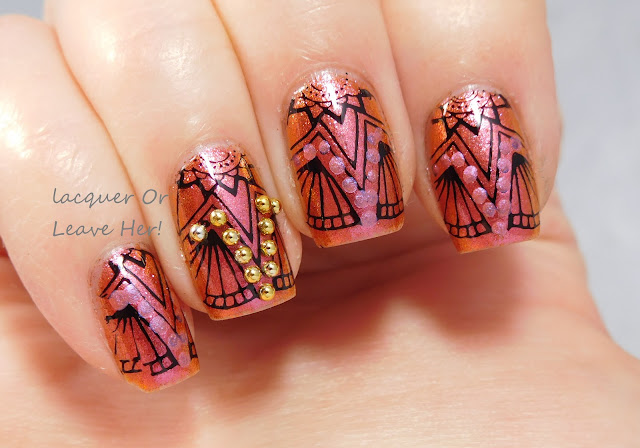
Then I put pink duochrome dots on with Hit The Bottle Polish Peach Blow, and then added my half gold beads:

Happy Henna with Sally Hansen Lava and Messy Mansion Symetrika 04

Happy Henna with Sally Hansen Lava and Messy Mansion Symetrika 04


What do you think! I love the way the colors work together, and I love how the edge of the star pattern makes such a pretty fan-like pattern. Very warm and pretty!

You can find the rhinestone sorting tray here on Born Pretty Store's site, and don't forget to use my code to get 10% off your purchase:


Happy stamping!
M.

Thursday, April 28, 2016

Before & After: Mesh neon gradient

(Press samples and affiliate links ahead!)

Hello!


Why, why, why do neons freak out cameras? Why is it so difficult to get full neon awesomeness recorded for posterity?? Sigh...

For today's manicure I wanted to do something bright and fun and happy...summer neons will be on their way out soon, and form some reason I just felt that bite from the neon bug.

I pulled out some of my old standby China Glaze Neons, Surfin' For Boys, Beach Cruise-R, and Surreal Appeal (not a neon), and made a gradient with them:


Neon gradient with China Glaze Neons


Then I picked a fun pattern from Messy Mansion's Symetrika 05 to stamp them with, and used Sally Hansen Lightning for my stamping polish:


Meshy neon gradient with China Glaze Neons and Messy Mansion Symetrika 05

Meshy neon gradient with China Glaze Neons and Messy Mansion Symetrika 05


This is pretty in the pics, but so much more bright and neon-y in person! I love how the pinks and oranges and yellows all play off of each other--I totally want a bikini like this. Oh, and, the sexy body to go in that bikini...;-)


Happy stamping!
M.

Friday, April 22, 2016

Review: UberChic Beauty collection 8 (plus sample mani with 8-01!)

(Press samples and affiliate links ahead!)

Hello!

Today I have another set of really awesome plates from UberChic Beauty to show you today! Also, just a heads up, I'm usually able to post my videos up on YouTube a little before I can get them into the queue for the blog, so if you want to see them as soon as they come out, check out my YouTube channel here.


And now, here's the video!


Let's take a look at the plates!


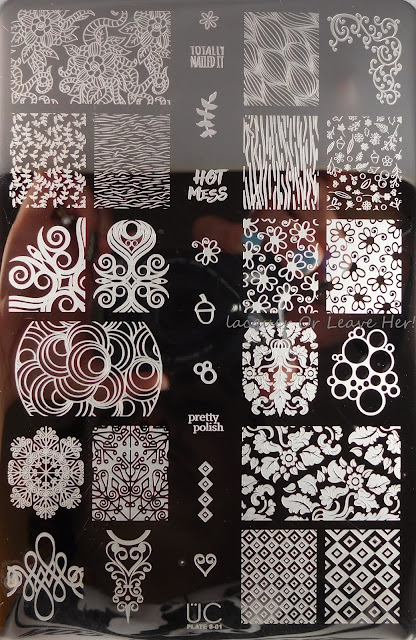
UberChic Beauty plate 8-01


UberChic Beauty plate 8-01

UberChic Beauty plate 8-01


As always, these plates have a great mix of flowers, geometrics, flourishy stuff, elegance, and fun images. My personal favorites on this plate are the googly-eye circles (note the circular border on that image which lets you cover just part of your nail, should you want that), the brass-knuckle bubble rings, and the one that looks like a stylized peacock feather.


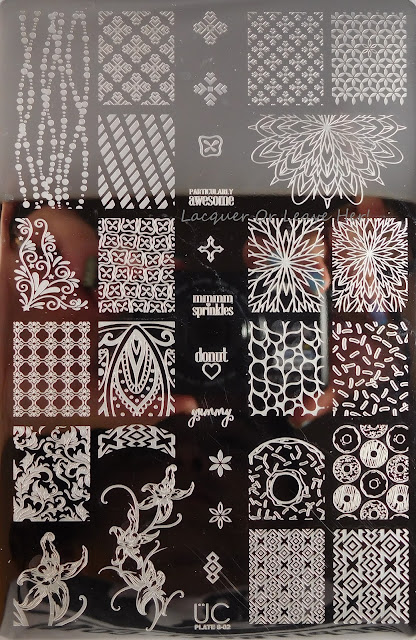
UberChic Beauty plate 8-02


UberChic Beauty plate 8-02

UberChic Beauty plate 8-02


Another feature I love on the UberChic plates is that they give you smaller isolated images that match the full-nail images, so you can mix-n-match and design away! My favorites on this plate are the double-sized flower (with matching inset images), the orchids, and the strings of beads.


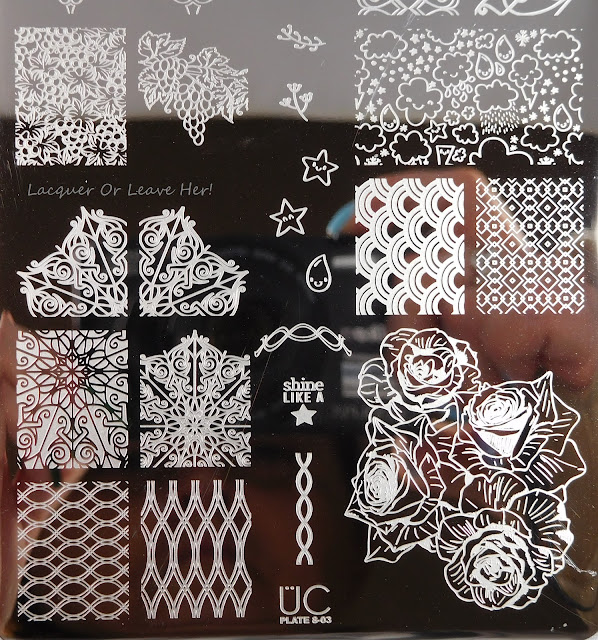
UberChic Beauty plate 8-03

UberChic Beauty plate 8-03

UberChic Beauty plate 8-03


Did I mention how much I love it when these plates have parts of the same images in different sizes and sections? Look at the flowers and leaves at the top of this plate. Notice how the image second from the right is an inset of the one on the farthest left? There are images like this on almost every place that do this, and they make your design choices so much more flexible and fun. I adore all of the lacy images on this plate, and omg those roses!


Let's take a look at how bit these images are!


 And, most important of all--how do they stamp? Pretty darn well, thank you very much:


So let's take a look at my sample mani...I started with a base of Zoya Aster, from the spring 2016 Petals collection: 


Zoya Aster

Then I stamped with Sally Hansen Brisk Blue; I dotted with Sally Hansen I-rush Luck and Grape Going: 


Half-moon peacocks with Zoya Aster and UberChic Beauty 8-01

Half-moon peacocks with Zoya Aster and UberChic Beauty 8-01

Half-moon peacocks with Zoya Aster and UberChic Beauty 8-01


I'm so happy with how these came out! They're like art deco peacock feathers, and these colors look so good with the background. I adore it. :)

You can find these gorgeous plates in the UberChic Beauty shop; don't forget to follow them on Facebook for updates about products and sales.

Happy stamping!
M.

Thursday, April 21, 2016

Before & After (sorta): Sticky Popsicle skittle (with Lorelei Lacquer Sticky Popsicle Fingers + Messy Mansion Symetrika 05)

(Press samples and affiliate link ahead!)

Hello!


Today I have a quick, fun, happy little skittle mani for you, with a teensy bit of a before-and-after element...

I started with a skittle of Lorelei Lacquer Sticky Popsicle Fingers, a sweet springy/summery glitter, Color Club Endless Summer, a blue jelly-like polish with a wax finish, and Zoya Hudson, a frosty lilac:


Sticky Popsicle Skittle


The I stamped the two accent nails with an image from Messy Mansion Symetrika 05, using Hit The Bottle Polish Pool Party:


Stamped Sticky Popsicle Skittle

Stamped Sticky Popsicle Skittle

I love how easy clear stampers make it to get your image exactly where you want it, so my flowers look centered and not all janky hanging off the sides (lol). I think this crosses the boundaries between spring and summer and has a light, happy feel to it. :)

Happy stamping!
M.

Tuesday, April 19, 2016

NOTD: Thermal Gradient with Mid West Lacquer Solstice and Messy Mansion's Symetrika 02

(Press samples and affiliate links ahead!)

Hello!

Okay, so. I was playing around with some nail art, and discovered a couple of things. First of all, I discovered that thermal polishes can make quick-and-clean gradient looks when you stamp over them. Second, I learned how not to do a stamping sandwich accent nail.


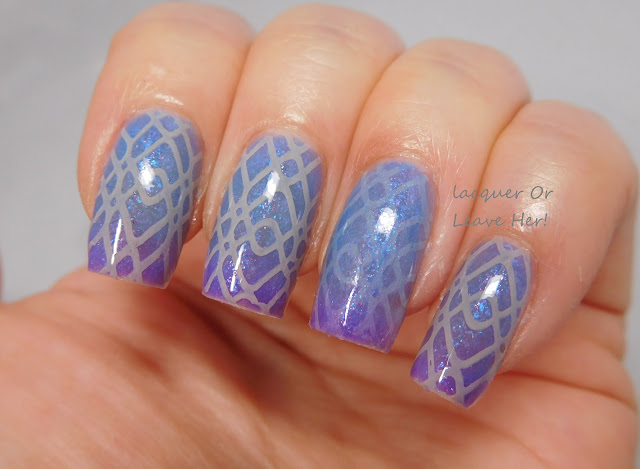
Let's take a look at what I mean. I started with Mid West Lacquer Solstice, a thermal polish that looks purple with blue flecks in the bottle, but when on is predominantly periwinkle with gorgeous blue flakie flecks where your fingers are warm. After one coat, I stamped on the accent nail with Messy Mansion's Symetrika 02, using Sally Hansen Sand Storm:


Messy Mansion's Symetrika 02


Then I finished my polishing, and stamped over the top of the rest of the fingers with the same image:


Mid West Lacquer Solstice + Messy Mansion Symetrika 02
Mid West Lacquer Solstice + Messy Mansion Symetrika 02

Mid West Lacquer Solstice + Messy Mansion Symetrika 02
Mid West Lacquer Solstice + Messy Mansion Symetrika 02


So, I LOVE the way that the thermal polish makes it look like I took forever doing a messy gradient manicure--very cool effect in nothing flat.

However, in my mind, I thought that having the accent nail stamped on a lower level of polish than the other nails would look cool, it sort of looks like I just messed up somehow, forgot a nail or something. Or maybe I'm just my own worst critic, I don't know. I do know that I love the way Sand Storm stamped over these colors to give a more subtle effect than standard stark white.

Hope you're having a great day, and happy stamping!
M.

Monday, April 18, 2016

Review: UberChic Beauty The Far East 02

(Press sample; affiliate links)

Hello! Today we're gonna talk about another new plate from UberChic Beauty, their Far East 02 plate. Unlike many sequels, this one is just as awesome as the original, and if you like Asian art, you're gonna love it.

Here's the video I made reviewing the plate:


And let's get into checking out the images:

UberChic Beauty The Far East 02


UberChic Beauty The Far East 02


UberChic Beauty The Far East 02

There's so much cool stuff here--I've been thinking about gettting a new tattoo and have been looking at all kinds and I love the images here that make me think of Japanese-style tattooing, like the dragon's head and the waves and the clouds. I love all the cool patterns you can use on their own or use as background for double stamping. I adore the little pagoda scene elements you can build the way you want. But my absolute favorite are the geishas--from the little cutie to the sophisticated elegance of the performing geisha, they're just beautiful.

How big are the images?


And how does it stamp? Well, check out this little lady:


Oh yeah, I'd say that stamps pretty darn well!

So let's take a look at my sample mani. I starte out with Zoya Tulip, from their spring 2016 Petals collection (review here):


Zoya Tulip
Zoya Tulip


Then I made a decal by stamping with Barry M Cotton and Zoya Zahara for my accent nails:


Zoya Tulip + UberChic Beauty The Far East 02
Zoya Tulip + UberChic Beauty The Far East 02


That was pretty, but I felt like I wanted just a little something more to sent it over the moon, so I added a layer of Zoya Leia over the other nails:


Zoya Tulip + Zoya Leia + UberChic Beauty The Far East 02
Zoya Tulip + Zoya Leia + UberChic Beauty The Far East 02


Which do you like better? With the topper or without?

You can find this gorgeous plate in UberChic Beauty's shop, and you can follow them on Facebook for updates, news, and sales info. :)

Happy stamping!
M.