Showing posts with label Pueen. Show all posts

Friday, February 23, 2018

The Digit-al Dozen Mythical Creatures Day 5: A Mani of Dragons and Zombies

(Press samples and affiliate links ahead!)

Hello!


I have to admit, I'm a little sad this is the last day of this month's Digit-al Dozen theme. I had sooo many mythical creatures I wanted to do, it was hard to narrow it down...maybe I'll do a few extras later in the month. ;-)


First of all--if you aren't caught up on Game of Thrones, here's your warning: MAJOR SPOILERS AHEAD! Stop reading if you don't want to be spoiled. 


To end the theme, I decided to go out with a bang. Here's my logic. Dragons are epic. Zombies are epic. So a zombie dragon = epic x epic = VISERION!


If you're a Game of Thrones fan, this needs no explanation. If you're not, here's a quickie. In the Game of Thrones world, there's a Queen (Daenerys) who is also the mother of dragons--she 'birthed' three dragons from fire. There are also these things called White Walkers, which are pretty much albino zombies, with the power to resurrect dead corpses as more White Walkers. White Walkers and Dragons are both super powerful, and they're enemies.  In the second most heart-wrenching moment of Game of Thrones, the White Walkers killed one of Daenerys' dragons, Viserion. In the absolute most heart-wrenching and dramatic moment of Game of Thrones, Viserion was resurrected as a White Walker dragon zombe--and that was revealed when Viserion opened his eye--and it was blue, like those of the White Walkers. Here's what I did to recreate that moment: 


Viserion! Pueen 10 and BM-224 over Zoya Hadley, with freehand

Viserion! Pueen 10 and BM-224 over Zoya Hadley, with freehand


For this mani, I used a combination of stamping and freehand. I started with a base of Zoya Hadley, a smokey navy blue. I used Pueen 10 and Bundle Monster BM-224 to stamp some subtle scales with Sally Hansen Slick Slate. I used acrylic paints to freehand the eye and some spiky areas, and I stamped a chain with Marianne Nails n. 20 to represent the chains that the White Walkers used to pull Viserion out of the frozen lake (how handy that they happened to have a crap-ton of chain and suddenly got over their fear of water enough to go down into the lake and attach it to him--ahem--don't get me started!). 


I didn't quite capture the emotion in the eye I wanted to capture, and the index nail looks more like a rhino than a dragon's face ridge, but otherwise, I'm pretty happy with how it turned out. :)


So what do you think? Are there any mystical creatures that you hoped to see that we forgot? Let me know and I might try to make a mani of it for you...;-)


Big Hugs,
M. xoxo

Follow me! 


Tuesday, July 21, 2015

Before & After: String me up v 2.0

(Polish sent for review; affiliate links)

Hello!!

I recently showed you a matted manicure that I just adored--I loved it so much, in fact, that I wanted to try it a second time with different colors.

This time I started with Zoya Isa, a blurple flecked duochrome from Zoya's Paradise Sun collection (you can see my full review here); the finishes on these polishes just cry out to be matted:

Zoya Isa
 
Zoya Isa

Then I stamped the heck out of it with Pueen 45:


Using Hit The Bottle stamping polishes in A Rose By Any Other Name and Pool Party:


I chose these colors because the blue goes so well with the flecks in the base polish, and the pink complements the purple flash in the duochrome. This isn't a combination I'd normally wear, but I love love love it. :)

So what do you think? Do you like these colors, or do you prefer the green and blue version I did before?

Happy stamping,
M.

Thursday, July 16, 2015

Before & After: Abstract Oceane

(Polishes sent for review; affiliate links)

Hello!

I love ocean-inspired manicures during the summertime, and I love abstract-y art stuff, so I decided it was time to do myself an abstract ocean look!

I started with Zoya Oceane, from their Paradise Sun collection (see my full review here):


Zoya Oceane

Zoya Oceane


Next I stamped with two images from Pueen 45 (see my review of the set here), using Hit The Bottle stamping polishes in Absinthe Minded, Purple Reign, and Pool Party; then I and added some dots:


Abstract Oceane

Abstract Oceane

I love this manicure, I think it's fun and colorful, but still relaxing. Hope you do, too! :)


Happy stamping!
M.

Sunday, July 5, 2015

Before & After: String me up

(Polishes sent for review; affiliate links)

Hello!

When I was swatching Zoya Selene from Zoya's Paradise Sun collection, I couldn't help but wonder how the flake finish would look matted...so I decided to do a manicure today to find out.


I started wtih Zoya Selene, a green-leaning teal flecked wonder:


Zoya Selene

Zoya Selene


Then I stamped it with Pueen 45:


Using Hit The Bottle Polishes Absinthe-Minded and Pool Party:

Mardi Gras beads!

Mardi Gras beads


And finally, I matted with with China Glaze Matte Magic:


Matted Mardi Gras

So which do you like better, the matted or the shiny?

Happy polishing!
M. 

Thursday, May 21, 2015

Before & After: Sand Chandelier

(The products in this post were purchased by me.)
(Contains affiliate links.)

Hello!

Oh yes oh yes, it's time for Throwback Thursday again, where I show you a manicure that I did back in the day, but never showed you for some reason!

For this manicure, I started with a gradient of Jessica Touch It and Dance Legend Amethyst:

Gradient with Jessica Touch It and Dance Legend Amethyst

Gradient with Jessica Touch It and Dance Legend Amethyst

Gradient with Jessica Touch It and Dance Legend Amethyst

Gradient with Jessica Touch It and Dance Legend Amethyst


Then I stamped with Pueen Love Elements plate 26 (you can see my review of this set here), with Konad black. Then I added some teardrop rhinestones for a chandelier effect:


Gradient with Jessica Touch It and Dance Legend Amethyst, stamped with Pueen 26

Gradient with Jessica Touch It and Dance Legend Amethyst, stamped with Pueen 26

Gradient with Jessica Touch It and Dance Legend Amethyst, stamped with Pueen 26


I think this mani originally got overlooked because my cuticles were struggling a bit more than I thought was okay...also, I felt that the black stamping was a bit too harsh. Looking at it now, though, I really like it. What do you think?

Happy stamping,
M.


Thursday, April 30, 2015

NOTD: Urban Jungle

(Affiliate links)

Hello!

This month's theme in The Nail Challenge Collaborative is 'recreate another member's manicure'. The one I chose is from a person no longer in the group, so I can't link the original, sadly. So my version will have to stand on its own! I will say that what I did ended up very different and no really like the original anyway.

The idea was to sponge some bright colors and stamp a bold pattern in black over them; here's what I came up with:

Urban Jungle

Lizards and cheetahs and leopards, oh my!


I used Sally Hansen White On for my base, and Then sponged over that with Sally Hansen Rapid Red, Brisk Blue, Melloy Yellow, and Lacey Lilac.  Then I stamped on top with Konad Black using Pueen 10 (you can see my original review of this set by clicking here).

What do you think? I'm not quite sure how I feel about it...it's a little bold for what I normally wear. It certainly makes a statement!

Check out the other ladies' recreations below. :)

Happy stamping,
M.

Saturday, March 21, 2015

Inspired by fashion: Skull skittle NOTD

(Nothing to disclose)

Hello hello hello!

Today I have a manicure for this month's theme in the Nail Challenge Collaborative: Inspired by fashion. My inspiration came from a shirt I recently bought that I adore:


Inspirational skull shirt!

For my manicure, I painted my nails as follows: 

Pinkie & Index: Sally Hansen White On
Ring: Julep Cleopatra
Middle & Thumb: Zoya Imogen (which, btw, OMG)

Then I stamped as follows:

Pinkie & Index: Pueen 27 with Konad Black (let sit 1-2 minutes before applying topcoat to prevent smudging)
Ring: BM-413 with Konad White


Here's how it came out:


What do you think, did I capture the shirt? I'll tell you what, wearing them together I totally felt like a boss! :)

And, once again for the record--OMG, Zoya Imogen. Seriously.

Happy stamping,

M.

Wednesday, February 4, 2015

Tutorial: Stamping vertical lines over a gradient

(Press Sample)

Hello!

I'm back with that nail art I promised you, using Barielles Gentle Breeze collection (click here to see my review if you missed it). I'm thought I'd do something a little different today; I'm going to show you the manicure first, and then explain it in the form of a tutorial this time, since it's a combination of techniques I love and use on the blog together often.

Here's the mani, which I'm calling Starflash:

Starflash
Starflash! (Does anyone else hear the theme song from Flash Gordon?)

Now let's talk about how I did it...

1) Choose two complementary colors to make a gradient. For mine, I chose Heaven Sent, the light blue creme from the collection, and Under The Sea, the teal shimmer:


Barielle Heaven Sent

Barielle Under The Sea

2) Paint your base polish as the lighter color, in this case, Heaven Sent. Some people start off with bare nails for their gradients, but I find when I do that, I get too much random pulling, which results in bald spots.

3) Put each shade together on a non-porous surface next to each other, and swirl the edges together with a dotting tool or orange stick like this:


Layout for your polishes


I learned this technique from The Nailasaurus back in the day. This is certainly not a trick I originated! :)


4) Using a bit of make-up sponge, apply the polish to your nails. Move the sponge up and down in the direction of the gradient; lift your sponge of the nail when you move it, don't try to slide it up and down the nail. In other words, you're going to do this: dab-move up-dab-move down-dab-move up, etc.

Dab on your polish, moving the sponge up and down in between dabs.

(Hey Michelle! What is that purple stuff you have on your cuticles there? Is it Liquid Palisade? No, but it's something very similar. You put it on to mask off your skin when you're doing messy nail art, then just peel it (and the excess polish) off when you're done. I will review it for you next time. In the meantime you can always just clean up with a brush and acetone, or try putting scotch tape around your nails before you do your gradient. :) )


5) Clean up your cuticles, and you'll have a gradient that looks something like this: 


6) Stamp your image on top of your gradient. For my mani, I used the lower-right portion of Pueen 61, and stamped with Barielle Gray Sky:


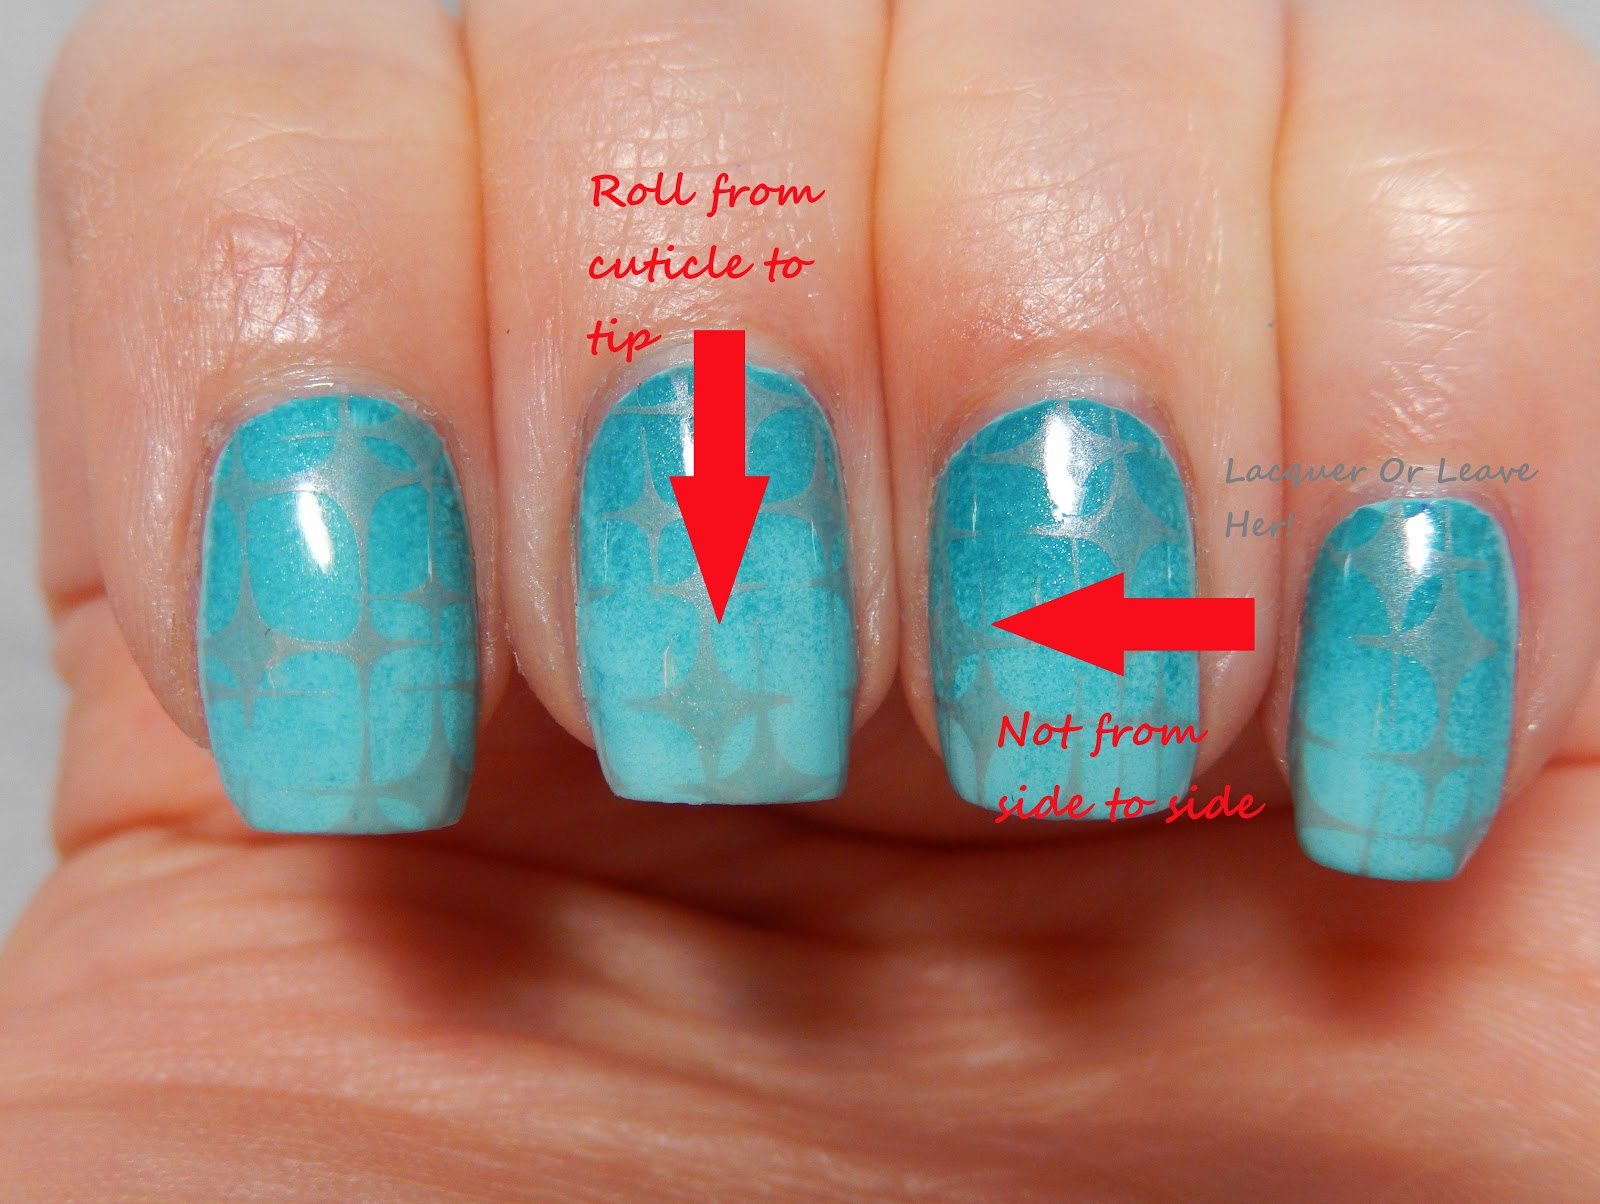
So here's where things get tricky. the design I've chosen is the kind that, if not stamped perfectly straight, is going to look all crooked and weird. How do you stamp stripes, or stripe-like things like this, so that the lines don't warp? Excellent question! The trick is, rather than stamp across you nail from side-to-side like you normally would, stamp down your nail, from cuticle to tip, like this:


Stamping vertical lines/stripes

I place the stamper at the base of my cuticles, and look to make sure the lines are running the direction I want them to run. Then, I roll the stamp down my nail to the tip. Now, you may have to practice it a time or two, but it will come to you quickly.

Here again is the finished mani, for your viewing pleasure:


Starflash, the sequel

Starflash claw


And here is a pin-able tutorial graphic, should you want one. :)


Hope you're having a great week!

M.


Thursday, January 29, 2015

Throwback Thursday Before & After: If Art Deco Pleases You

(Affiliate links)

Hello!

In honor of Throwback Thursday, I have another Before & After from back in the day that didn't make it into the rotation because I wasn't fully happy with the pictures. But in honor of the Fifty Shades of Grey movie coming out, I figured I should bust it out.

I started with Literary Lacquers If It Pleases You, one of the polishes that Amy made that were inspired by Fifty Shades of Grey. It's a mind-blowing purple holo with an intense blue-dominant rainbow flash:


Literary Lacquers If It Pleases You

Literary Lacquers If It Pleases You


Then I stamped with Nfu-Oh 61, my go-to polish for silver holo stamping goodness; I used the art deco design from Pueen 15 (you can find my review of the full set by clicking here). For a finishing touch, I added two tear-drop rhinestones:


If Art Deco Pleases You

If Art Deco Pleases You

This is a wonderful type of design for stamping over holos; the open areas allow the beauty of the holo flash to still shine through. And of course leaving two of the nails as negative space allows the holo to shine through as well.

Thanks for hopping into the way-back machine with me!

Hugs,
M.


Saturday, January 10, 2015

Before & After: Ice Princess

Hello!!

Today's theme in the Crumpet's Nail Tarts 31 Day Challenge is to do nail art over a glitter base. This is something I struggle with--both because I hate covering up gorgeous glitter polishes, and because it can be difficult to find a pattern or set of patterns that work with the beauty of the glitter and also show up well.

But every once in a while, something comes out the way you hope it would.

I started out with Windestine's Peacekeeper, a shimmery, glimmery, frostily delicious milky-based polish with silver and purple glitters:


Windestine Peacekeeper
 
Windestine Peacekeeper

Windestine Peacekeeper


Then I stamped my heart out with Pueen 49, using Finger Paints It's An Original!. Finally, I added some diamond-shaped glitters to the design:


What do you think? I think this is a beautiful winter look, and I love the way the art plays off the polish and comes together. If I had it to do over again, I think I'd put the diamond glitters on each of the nails. I love it, it has a mosiac-y, kaleidoscope-y feel, and made me feel like a beautiful snow princess!

Hope you're having a great weekend!
M.