Showing posts with label Clear Jelly Stamper. Show all posts

Thursday, October 31, 2019

My Halloween Costume Nails!

(Press samples and affiliate links ahead!)

Hello!


Since today is Halloween, I thought I'd show you the nails I'm doing with my Halloween costume. I actually already did this once, for a party I went to, so I have all the pics ready to go!


I went (and am handing out candy) as a voodoo priestess:


I wanted a manicure that played up the feathers and the animal skulls in the costume, and of course included a voodoo doll...


Voodoo Priestess Nails


Base Polish(es): Zoya Chantal, Kinsley, and Foster
Stamping Plate(s): Clear Jelly Stamper H-39, Dixie Plates Halloween 2019, and UberChic Beauty Fabulous Feathers
Stamping Polish(es): Kaleidoscope Black and White, Girly Bits Fire-Engine Red and Silver Bells, Moonflower Polish Cavernos del Rio Camuy


I love how it came out--the feathers add a gorgeous texture and the skulls are just creepy! I also love the little pop of red. This is when I love nail art the most--when you can create something truly original to make a cool day even cooler.


Happy Halloween!!
M. xoxo

Follow me all the places! 

Tuesday, August 21, 2018

Beautometry's My Mani Box: Unboxing And Review!

(Press samples and affiliate links ahead!)

Hello!


So, I have to admit...I love subscription box services. I've belonged to a few, and I love getting a little box of surprises each month that makes me feel like I have a little piece of Christmas all year long.


If you haven't heard of it, Beautometry has a monthly subscription box they call "My Mani Box", designed for nail stampers that gathers goodies from all around the world according to a different theme every month. And, they recently sent me two boxes to evaluate. So today we're going to take a look at the May box, which has a dinosaur theme, and see what we see.


Beautometry's May My Mani Box

First up--a gorgeous multichrome magnetic flakie polish, Ms. Sparkle Fallen Kingdom:

Ms. Sparkle Fallen Kingdom

Ms. Sparkle Fallen Kingdom

Here's what it looks like on--I applied the magnet at the top of my nails, diagonally:


Ms. Sparkle Fallen Kingdom


Ms. Sparkle Fallen Kingdom

Oh, my, gosh--this polish is amazing! Even without using the magnet on it, it's stunning, but then when you add the magnet--just wow.


The box also included a pot of dried flowers and leaves:


Dried flowers/leaves from Beautometry's May Mani Box

And this box came with THREE plates!


MoYou London Mother Nature Collection 18

MoYou London Mother Nature Collection 19

Clear Jelly Stamper LC-36

So, to sum up, here's what you get:


Beautometry's May My Mani Box


Okay, before I show you the manis I did with this, let's talk about whether or not I think this is a good value. If you buy only a single box, the cost is $35, plus $5 shipping. If you sign up for more than one box, the price goes down depending on how many months you sign up for. So, let's assume that we're looking at the most expensive version of this, $35. I'm not going to count the shipping, because you'd have to pay the shipping if you bought the items anywhere. So, let's do a tally:

2 MoYou London plates = $19.98
Clear Jelly Stamper plate = $14.50
Ms. Sparkle magnetic polish = $9.75 (Probably more than this because it's a specialty polish)
Magnet = $8.00
Dried flowers = $0.50 (I couldn't find single pots, but I found 12 pots for $10, so I rounded down)
Total value: $52.73

So, yes, I'd say this is a very good value for the money--especially since the products, like MoYou London plates, are top-notch quality. Of course, you don't get to pick your items, so you risk getting something that you don't like. But, I think what that comes down to is whether the experience of getting a box full of surprises is something you enjoy--if so, that more than makes up for the risk. If you're not, these sorts of curated boxes probably aren't the best way to go. :)


So, on to the manis! For my first mani, I started with Ms. Sparkle Fallen Kingdom, and stamped images from MoYou London Mother Nature 19. I stamped with Messy Mansion Soft Gold:


Mani made with Beautometry's May "My Mani Box"

Mani made with Beautometry's May "My Mani Box"


For my second mani, I wanted something simple. I started with a base of Zoya Alyssa, and then stamped an image from MoYou London Mother Nature 18 with Hit The Bottle Polish Holo There Beautiful:

MoYou London Mother Nature 18 over Zoya Alyssa, stamped with Hit The Bottle Holo There Beautiful

MoYou London Mother Nature 18 over Zoya Alyssa, stamped with Hit The Bottle Holo There Beautiful


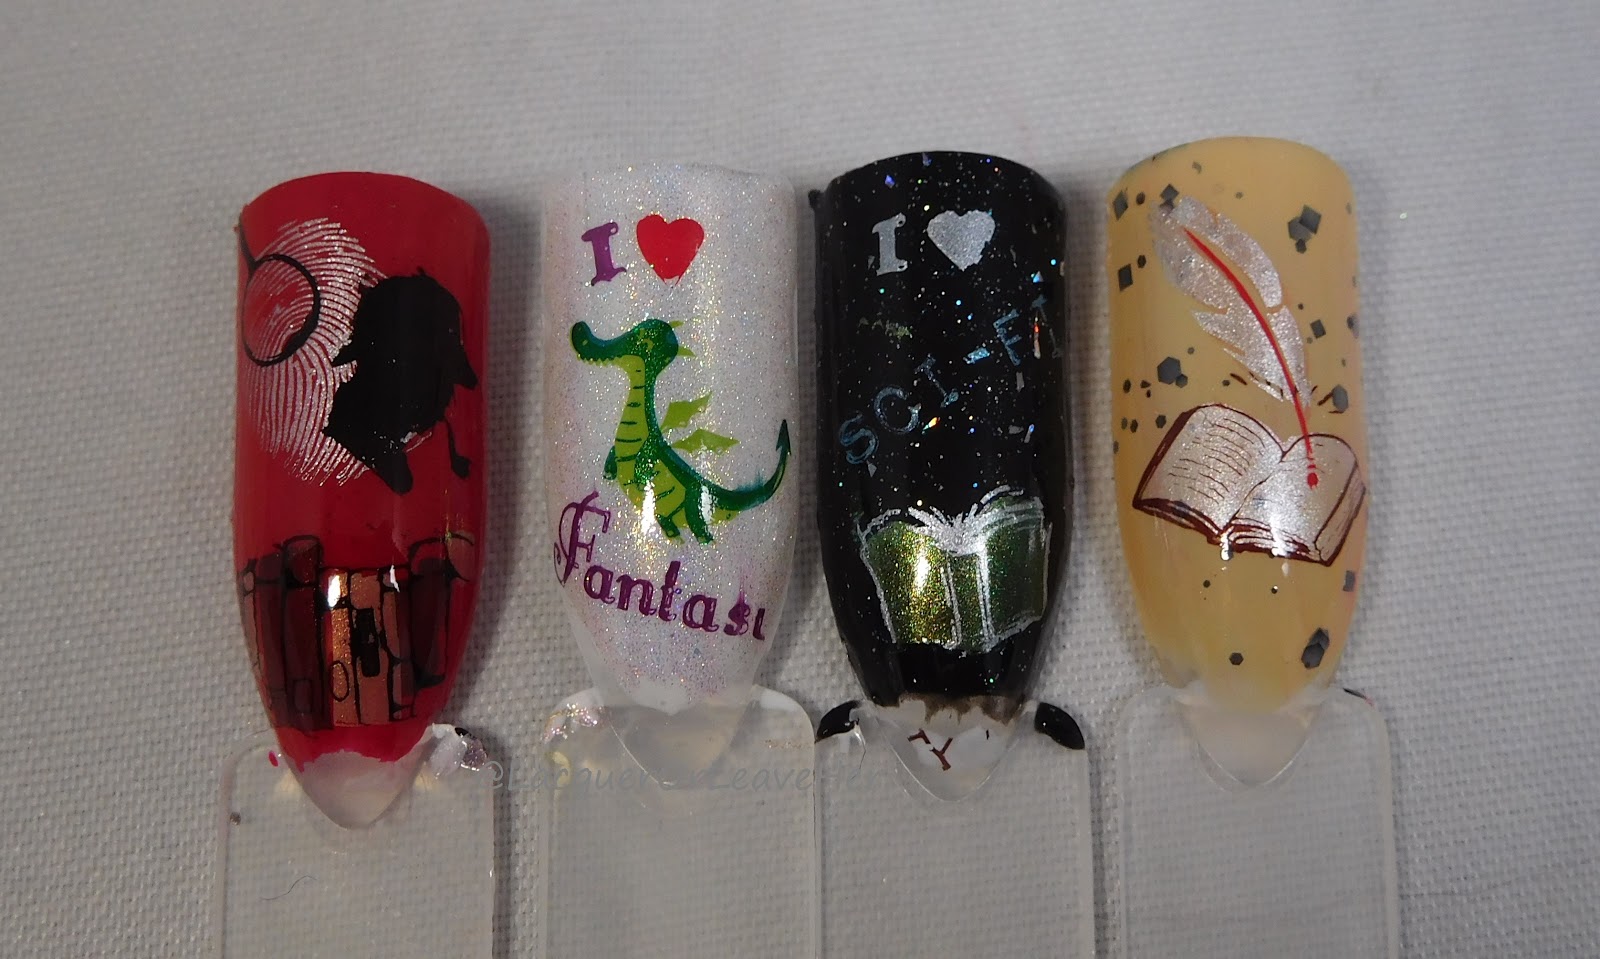
For my final mani, I started again with Ms. Sparkle Fallen Kingdom. Then I used Clear Jelly Stamper LC-36 to stamp images, with Messy Mansion Sterling and Hit The Bottle Polish It Mossed Be Love:


Mani made with Beautometry's May "My Mani Box"


Mani made with Beautometry's May "My Mani Box"

I have to admit...I've been admiring that dinosaur plate for a while, so I had a blast making a pterodactyl manicure. :)

You can find Beautometry's My Mani Box here, and you can follow Beautometry around the interwebs here:


Big hugs,
M. xoxo

Follow me! 

Friday, July 13, 2018

The Digit-al Dozen Does "White", Day 5: Featuring Dixie Plates Marbled 01 & CJS-45

(Press samples and affiliate links ahead!)

Hello!


Today's the final day of The Digit-al Dozen's "White" theme, and I saved my favorite for last!


A long time ago I saw a modern art exhibit that featured a study of the color white, which basically looked at how different shades of white looked against different other shades of white. I couldn't recreate that because the differences were pretty subtle, but I wanted to do something that played with white against white, with the help of black, grey and silver.


For this I started with a base of Sally Hansen White On Time. Then I stamped with Moyra Silver and Sally Hansen Grease Lightning, with Dixie Plates Marbled 01 plate:


Dixie Plates Marbled 01


Here's how that first layer turned out, because I think it's super pretty on its own:


Dixie Plates Marbled 01 over Sally Hansen White On Time

Dixie Plates Marbled 01 over Sally Hansen White On Time


Next I wanted to add some flourishes with Clear Jelly Stamper's CJS-45 plate:

Clear Jelly Stamper CJS-45

For most of the flourishes, I stamped the first layer with Kaleidoscope Black first, then again with Kaleidoscope White, than did the second layering image with Kaleidoscope Black. For one of them, I layered Hit The Bottle Polish Moonshine under Kaleidoscope white. I did this to change the appearance of the white depending on what it was layered over. Here's how it turned out:


Clear Jelly Stamper CJS-45 and Dixie Plates Marbled 01 over Sally Hansen White On Time

Clear Jelly Stamper CJS-45 and Dixie Plates Marbled 01 over Sally Hansen White On Time


And here's how it looks matted:


Clear Jelly Stamper CJS-45 and Dixie Plates Marbled 01 over Sally Hansen White On Time

Clear Jelly Stamper CJS-45 and Dixie Plates Marbled 01 over Sally Hansen White On Time


Okay, it's not a great work of art, but you can tell the difference between the shades of white. Can you tell which flourish doesn't have black underneath? Spoiler alert: it's the ring finger. So, there's my little attempt at an artistic approach to 'White'.


I hope you've enjoyed all of the different takes on 'White' manis this week--don't forget to check out what the other ladies did for the last day!


Big hugs,
M. xoxo

Follow me! 

Thursday, June 7, 2018

Mani for NaNoWriMo's Young Writers Program

(Press samples and affiliate links ahead!)

Hello!


So, have you ever wanted to have a nail blogger to a create a manicure based on something you love? Well, read on--'cause I'm offering up a chance to make me dance like a manicure marionette!


So, I've mentioned before that I'm a writer. And, every November, I participate in National Novel Writing Month (or, NaNoWriMo), where writers all over the world try to write 50,000 words during in 30 days. By coordinating that each year and providing tools that help novelists be successful for FREE, NaNoWriMo.Org does a tremendous amount of good every year.


BUT they also have a Young Writers Program that encourages children and teens to write.


As a research psychologist who has studied and taught child development, I can assure you the benefits of writing for these kids are many, and valuable to all: not only will encouraging children to write provide the books, TV shows, and movies you'll enjoy in the future, encouraging them to write also increases their overall academic success, their future job skills, helps them channel their emotions, and encourages them to think creatively. I saw a year-end report last year for all the good this program does, and was so impressed, I decided to join their fundraising efforts this year.


But, let's face it, donating is always a little more fun when you get something in return, right? So, if you donate to the program through my fundraising page, I will do the following:


  • For a $20 donation, I will create a manicure inspired by your favorite book*, or
  • For a $20 donation, I will write a bad poem on the topic of your choice*, or
  • For a $30 donation, I will write you a flash fiction piece on the topic of your choice*

(*in all cases, I reserve the write to veto topics I find offensive--but I'm pretty hard to offend!)


I am extending this offer to the first 10 people who take me up on it. Two slots have already been filled! 


In the meantime, I created a manicure inspired by the wonders of reading and writing, in honor of the good work that NaNoWriMo does:


Clear Jelly Stamper CJS LC-30 over Spellbound Nails Beauxbatons

I wanted to show all of the cool adventures you can take coming up out of a book...I started with a base of Spellbound Nails Beauxbatons, which is inspired by the Harry Potter books, one of my favorite series ever, and used Clear Jelly Stamper CJS LC-30 to stamp my images. For my stamping polishes I used Sally Hansen Taupe To Go, and Messy Mansion Lilac, Red-y Or Not, Carbon, Sterling, Pudding, and Forest.


I hope you'll consider donating--even a dollar helps--and I hope I get to create a manicure or write a piece for you soon!


Big hugs,
M. xoxo

Follow me! 

Friday, May 25, 2018

Clear Jelly Stamper plate CJS LC-30--(or, books, books, books!!!)

(Press samples and affiliate links ahead!)

Hello!


Don't you love it when a plate feels like it was made just for you? That's how I feel about the plate we're gonna look at today, Clear Jelly Stamper CJS LC-30, their collaboration plate with Lantern & Wren! I'm a reader, a writer, a teacher and an academic, so pretty much every part of my life has involved books since I first learned how to read.


First, here's the video review I made of the plate:


And here's a still shot of the plate:


I love that you can use a different color for the cover of the book and your pages, and I love all of the three-part layering images. And how cool are all the little images for the different genres?! Love.


Here's a shot with a ruler, so you can judge the size of the images:


And here are three sample looks I did using the plate:


The Sherlock Holmes image just makes me happy, and that dragon! So adorable!


For my first manicure, I started with a base of Zoya Jack. Then I stamped with Hit The Bottle Polish Moonshine, Taupe-lessly Devoted, and Make Mine a Mudslide (which I reviewed last time):


Clear Jelly Stamper CJS LC-30 over Zoya Jack, stamped with Hit The Bottle Polish Moonshine, Taupe-lessly Devoted and Make Mine a Mudslide

Clear Jelly Stamper CJS LC-30 over Zoya Jack, stamped with Hit The Bottle Polish Moonshine, Taupe-lessly Devoted and Make Mine a Mudslide

There's nothing I enjoy more than curling up with a good book and a cup of coffee and while I don't need glasses to do that yet, they're so adorable I had to include them!


For my second manicure, I wanted to celebrate my bookworm status. I eyeballed the layering so I could get a comic-book-style look--I'm going to do a video tutorial to show you how to layer three-part images perfectly if you want a more precise look. I started with a base of Spellbound Nails Marauder's Map and stamped with Messy Mansion Red-y Or Not, Gingerbread, Chalk and Carbon:


Clear Jelly Stamper CJS LC-30 over Spellbound Nails Marauder's Map, stamped with Messy Mansion polishes


Clear Jelly Stamper CJS LC-30 over Spellbound Nails Marauder's Map, stamped with Messy Mansion polishes
That little bookworm is so adorable with his little glasses! I just can't with him. And I love the messy bookshelves so much. :)


You can find this plate on sale now at Lantern & Wren! And follow Lantern & Wren around the interwebs here:


Big hugs,
M. xoxo

Follow me! 

Friday, May 6, 2016

Review: Messy Mansion XL Crystal stamper

(Press sample)

Hello!

Guess what! Messy Mansion has come up with an XL version of their crystal stamper for those of us who prefer to work in the XL size, and I'm gonna review it for you! If you want to see it in action, take a look at it here:


Let's take a look at the little (or, not so little) magical wonder:


Messy Mansion XL Crystal Stamper


That's right, my friend--a clear handle, a lid, and a scraper. What more can a stamper ask for?

Here's how it stacks up in size compared to the crystal stamper 2.0:

With lids on:
Messy Mansion XL Crystal Stamper vs. Crystal Stamper 2.0, with lids on

With lids off:
Messy Mansion XL Crystal Stamper vs. Crystal Stamper 2.0, with lids off

Side view:

Messy Mansion XL Crystal Stamper vs. Crystal Stamper 2.0, side view

Messy Mansion XL Crystal Stamper vs. Crystal Stamper 2.0, side view


And most important, the XL is 1.5 inches in diameter, while the smaller 2.0 is only 1 inch in diameter:

Messy Mansion XL Crystal Stamper diameter

Messy Mansion Crystal Stamper 2.0 diameter

Messy Mansion XL Crystal Stamper vs. Crystal Stamper 2.0, front view


So what makes it so awesome? First of all, the excellent visibility from every angle, for your alignment pleasure:


Messy Mansion XL Crystal Stamper's excellent visibility

Messy Mansion XL Crystal Stamper's excellent visibility

And, the head is squishy enough that you can push into it, so if you're a curvy nail girl like me, you don't have to worry about warping when you roll:


Messy Mansion XL Crystal Stamper's squishy squishy

Messy Mansion XL Crystal Stamper's squishy squishy

Messy Mansion XL Crystal Stamper's squishy squishy

But most important of all--does it stamp? Oh, you bet it does, and allows you to place your image just where you want it while you're at it:


Messy Mansion XL Crystal Stamper's stamping quality

Yes, this little baby is pretty darn awesome. No need to prime it--in fact, keep acetone away from it just like with any other clear stamper, or you risk clouding it up. To clean it, I use tape, but be gentle to avoid surface tears. You can also wash it in soapy dish water and let it air dry if you need to. Messy Mansion also recommends that you be gentle with the head--so no shrinking images with it or anything like that.

If you prefer XL stampers and you like having the control of a clear barrel, this is the stamper for you! You can find it on Messy Mansion's website, along with a host of other goodies, like Messy Mansion plate MM75, the source of my awesome grape image. And don't forget to follow them on Facebook for updates!

Happy stamping,
M.