Sunday, November 30, 2014

NOTDs: Inspired by my novels

(Barielle polishes sent for review)

Hello!

Today I'm doing something a little different, and I hope you'll bear with me...This month's theme in the Nail Challenge Collaborative is 'Inspired by a book'. I did two manicures based on Pillars of the Earth and Time Traveler's Wife, and then I had a thought for something a little different...

Some of you know that I'm a writer, and I am in various stages of finishing three novels (you can read more about these and my other writing on my writing blog, The Michelle/Mishka Project.). My first, Hazel-Green is one final edit away from being sent out to agents in January (I hope, anyway!). My second, MMORPG, is currently being revised like crazy. And during National Novel Writing Month this month, I started my third, called Accidental Divination.

So I thought, I should do my last two manis based on my own novels!

 Since Hazel-Green is about to go out and brave the world of publishing, let's start with that. Here's the tag line for what it's about:

"A 17th-century woman's tragedy sets in motion a legacy of secrets and lies that compounds through the generations to modern day, where her descendant must pick up the pieces in order to break the family cycle of dysfunction for herself and  her daughter. "

As you can tell, it's an historical novel that follows a family from the 17th century to modern day. The family immigrates from France to the Americas, first to what is modern-day Canada, and then to Massachusetts; it's primarily a story about mother-daughter relationships. So here's the manicure I made for it:


Manicure inspired by Hazel-Green

Manicure inspired by Hazel-Green


There are two colors that play an important role in the book, red and hazel-green, so for the base of the manicure, I chose to do a skittle with an olive green (China Glaze Tribe And True) and red (Zoya Oswin), along with one nail in an off-setting brown (Julep Chloe).

For the stamping, I put a fleur de lis on the pinky, a map of North America on the ring finger, and stars on the thumb to represent the immigration from France to Canada to the US.  On the middle finger I stamped eyes; the name 'Hazel-Green' refers to the eye color of the characters, that's passed from one generation to the next. Finally on the index finger, I stamped a mother and child image to represent the mother-daughter relationships that are central to the book. I stamped with Barielle Kiss Me Kate and Gondola Ride, using the following plates: MoYou London Scholar 07, MoYou London Artist 02, Mash 35, Bundle Monster H25, and Shany SH16


For the second mani, I couldn't resist making a manicure inspired by MMORPG, which is a thriller about a serial killer who finds his victims in online games:


Manicure inspired by MMORPG

Manicure inspired by MMORPG


The binary code and the circuit board make reference to the computer, which is the killer's hunting ground; he kills his victims by strangling them with his tie, so I stamped a body and ties to represent that. :)

The base colors here are Barielle Kiss Me Kate and Zoya Envy; I stamped with Konad White, Konad Black, and Barry M Silver Foil, using MoYou London Comics 03, Sci-Fi 05 and Sci-Fi 06, along with Cheeky 55.

Hope you enjoyed hearing a little bit about my novels, and I hope you enjoyed the manis!

Hugs,
M.


Wednesday, November 26, 2014

Before & After: Happy Thanksgiving!!

(Nothing to disclose)

Hello!

As I'm finishing up my prep for tomorrow, I'm trying desperately to get this post out for you, to show you my Thanksgiving mani.

I'm thankful for many things, not the least of which is every one of you reading this post now. Sure, I'd do my nails even if I didn't post them to the blog. But what makes blogging fun and worth  it is the people you meet along the way, and the hope that you're doing something that someone finds inspiration in and enjoys seeing. So thank you for supporting my blog, and for coming to check out my nail art. :)

On to the manicure!

I started out with a fall colors gradient:


Fall colors gradient


Here are the colors I used:

Index: Zoya Darcy/China Glaze Stoked To Be Soaked
Middle: China Glaze Stoked To Be Soaked/Barielle Miami Heat
Ring: Barielle Miami Heat/China Glaze Brownstone
Pinkie: China Glaze Brownstone/China Glaze Call Of The Wild

Left thumb: China Glaze Stoked To Be Soaked/Barielle Miami Heat
Right thumb: Middle: China Glaze Stoked To Be Soaked/Barielle Miami Heat/China Brownstone (I did a three-color gradient on this one,)


Then I stamped some fall leaves on both hands with Bunny Nails HD06, and then stamped a cornucopia on my left hand with Bundle Monster BM H-13, using Sally Hansen Lightning, Orange Impulse, and Barry M Gold Foil:

Fall leaves gradient

Fall leaves gradient


Fall leaves gradient with cornucopia


Which do you like better, with the cornucopia, or without? I think I like it without better, just a little simpler. and I love the play of the colors.  Either way, I love the way the gradient came out!


Happy Thanksgiving to you and yours,
M.

Saturday, November 22, 2014

Tutorial: Shrinking stamping images

(Nothing to disclose)

Hello!

Last time I showed you this manicure, and told you that I shrank the angel's head so that it would fit onto my nail:


I'm back with the tutorial I promised on how to do this; to be clear, this is not my idea, it's been going around the blogosphere and YouTube, and I'm not sure who originated it iIf you know, please say in the comments). So I didn't originate it, I just want to show you how I do it for minimum distortion and give you a tutorial pin for it. :)

The basic idea here is simple: you stretch your stamper head before picking up your image. Then, you release the stamper head back to its original shape before stamping the image; when you release, the image will contract, and be smaller. But it can be tricky to do it without distorting the image. So let me walk you through it, with my little tip.

First, apply your polish and scrape as you normally would.

Next, take your stamper head, and stretch it. You'll need a squishy stamper head for this, and the squishier the better:


Stretch your stamper head with two fingers and your thumb

What I've found is that the people I've seen use two fingers with this technique end up with an image that is fairly distorted--it shrinks more in one direction (how tall it is, say) than the other (how wide it is). That's fine for a lot of images, or if a bit of distortion doesn't bother you. But for things like faces, it can make a big difference. I found that when I use three fingers (well, two fingers and my thumb) to make a sort of triangle shape like above, I can get rid of the distortion to the point that it's barely noticeable.

Once you have picked up your image with the stamp, release it from the stretch, and take a look at it to be sure it looks acceptable:


Release your image and check it.

You can see there is almost no distortion here; there is a little bit though, so you might decide you want to do it again.


Once you get an image you like, stamp it onto your nail as you normally would; don't bother about putting it back into the holder:


Stamp image onto your nail.

And there you have it! As you can see, I have almost no distortion at all, and the image is about 2/3rds the size of the original image.--This will make lots of images on collage-style plates that are just a liiiiittle bit too big useable for you. :)

Here's the technique in one picture for you so you can grab it:


Tutorial on how to shrink stamping images


Play around with it--practice a few times, and you'll get the hang of it in no time. :)

Hugs and happy Sunday!
M.

Thursday, November 20, 2014

Review & How-To-Use: MoYou London Gothic 10

(Nothing to disclose)

Hello!

Today's post does all sorts of things--review, how-to-use, before & after, test of the shrink technique, and even satisfies one of my challenge manis! It's all based on MoYou London Gothic collection, and the plate I'll be focusing on today is Gothic 10.


First, here's the video:


And then we have the stills:


MoYou London Gothic Collection 10


MoYou London Gothic Collection 10

MoYou London Gothic Collection 10


And to give you an idea of the relative sizes of the images:


MoYou London Gothic Collection 10 vs. Konad


Okay, let's talk about how to use this plate:


1) Full-nail designs. This plate definitely has a few full nail image designs you can use:


Full-nail images


2) Architectural elements. There are lots of architectural church-like elements you can use from this plate--spires, arches, rosettes, windows, peaks. And don't forget the bottom of the plate; the architectural elements there are clearer if you turn the plate upside-down. My sample mani today uses these strengths of the plate.


Architectural elements


3) Stained-glass elements. Possibly the strongest part of this plate is the stained-glass elements (if you like those, check out plate 09, which I will also be reviewing shortly). If you aren't Christian, you can still use the edges of the circle, you'll still get beautiful designs. And, by the way, all of these areas would be beautiful with the lead-lighting technique. :)


Stained-glass elements


4) Single elements. This plate's strength is not individual designs that you can isolate and use on their own, but there are still a few images you can focus on: the birds, the peacock, and Jesus. If Jesus's face is too big to put on your nails, try the shrinking technique; you'll see it on my nails below and I'll show you a tutorial next time.


And don't forget, especially on a plate like this that has intricate designs that blend into one another, to use Chit Chat Nail's technique to look at all the possibilities of the plate; cut a nail-sized hole out of a piece of paper and move it around the plate to see what different parts look like on your nail:


This looks almost like a family crest

This looks like a beautiful sunrise to me. 


So let's take a look at my sample manicure. This month's theme in my Nail Challenge Collaborative group is manicures inspired by a book; for this manicure, the book I chose is Pillars of the Earth by Ken Follett.  The book revolves around a cathedral, as several people try to get it built, and several others try to kill it, during the middle ages. That might sound boring, but it's not; the interesting part is the lives of the families that are all entwined in the future of the cathedral

I used several elements from this plate, plus the latin script from Gothic 04a and the angel face from Gothic 09, because I felt like it captured the medieval feel of the book. I used the shrink technique on it, to get enough of it to fit on my nail; I'll have a pin-able tutorial of that for you next time.


For my base polish I used Barielle Autumn In Seoul:


Barielle Autumn In Seoul


For my stamping polishes I used Konad Black and Barielle Kiss Me Kate:


For me, this captures the feel of the cathedral, and the importance it plays for the characters in the books, who include stone-masons and stained-glass lead-lighters. If you haven't read it, I highly recommend it.

Hope you're having a great week--one more day 'til the weekend!

Hugs and loves,
M.


Tuesday, November 18, 2014

Before & After: Muted stamping with Barielle polishes

(Polishes sent for review)

Hello!

Lately I've been discovering how amazing Barielle polishes are for stamping, and I told you I be back with a manicure using two from the last collection...so let's take a look!

I started with Barielle Irish Eyes from the Jetsetter collection (you can find my review here), a beautiful muted Kelly green creme:


Barielle Irish Eyes
Barielle Irish Eyes


Then I stamped over it with Barielle Gondola Ride, using Cici&Sisi 21:


Barielle Irish Eyes, Gondola Ride, Cici&Sisi 21

Barielle Irish Eyes, Gondola Ride, Cici&Sisi 21

I adore how beautifully these two polishes go together, and I love how subtle and fall this look is. :)

Also this is such a fast, easy manicure. Here's a tip if you're worried about getting each nail centered: use a big squishy stamper and press your nail down into the design from above it, so you can see exactly where you're putting the design.  I find when it comes to anything like stripes that have a habit to get wonky when you stamp by rolling, this is the way to go. :)

Hope you're having a wonderful week!

Hugs and loves,
M.

Friday, November 14, 2014

Review & stamping test: Barielle Jetsetter Fall 2014 Collection

(Press sample)

Hello!

Today I have the second 2014 Fall collection from Barielle: The Jetsetter Collection (I showed you the Me Couture Collection here). I love both collections for two reasons; in this case, I think this has a more classic fall feel to it, and it has colors that work really well together, making nail art with this collection a no-brainer. I'll have a manicure for you tomorrow showing you what I mean by that...

But first, of course, we need to see the beauties by themselves! So let's dive in with Autumn In Seoul, a ginger brown with a golden shimmer:

Barielle Autumn in Seoul

Barielle Autumn in Seoul

This is two coats, and application was flawless. Full coverage was easy, and I got a beautiful shimmer without streaks. This is a great brown for fall--a good neutral with a sassy red undertone, a perfect compliment to all fall colors. Versatile and elegant.


The next is Gondola Ride, a sage creme:

Barielle Gondola Ride


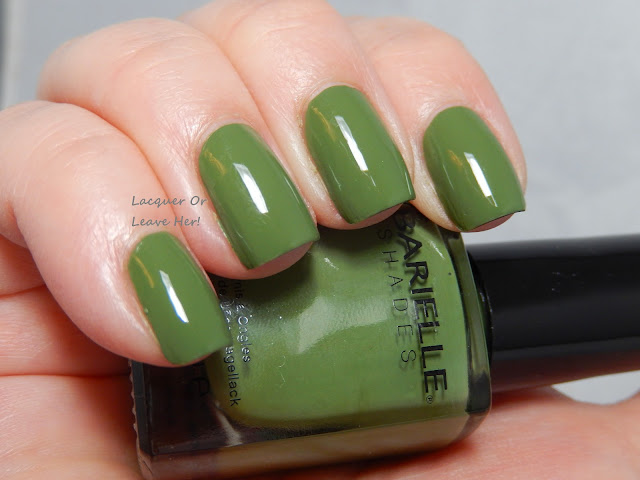
This is also two colors, and I had no application issues; it went on easily and covered well.  I love this shade, it's a wonderful green for fall--there is a soft smokiness to it that feels like the perfect polish to have on at the Thanksgiving dinner table. It's a very adult green that looks chic and sophisticated.


Next up we have Irish Eyes, a smoky version of a Kelly green creme:


Barielle Irish Eyes
Barielle Irish Eyes

Barielle Irish Eyes
Barielle Irish Eyes

Two coats, perfect coverage. I love what they did with this; a good Irish Kelly green is one of my favorite shades, and they added the right amount of smoke here to give it a polished fall feel.  This is just fun--I think of fall plaids and tweeds when I see this.


And here is Kiss Me Kate, a beige neutral creme with a strong hint of pink:


Barielle Kiss Me Kate

Barielle Kiss Me Kate

Two coats, easy application. If you like a nude look, this is going to be a great color for you; if you are a nail artist who likes to do leadlighting but wants to stay away from white, this would be a great alternative. A good go-with-anything polish that is a must-have for any polish collection.


Next we have a Midnight In Paris, a shimmery blue that has a little purple flash at the edges:


Barielle Midnight In Paris

Barielle Midnight In Paris
 
This deep, vampy beauty will take care of all your fall evening needs. It's an endless night sky, or the deepest deep of the ocean. You can get lost staring into it, and I love that. Two coats, very easy application.


And to round things up, we have Rain In Spain, a blue-leaning lavendar creme:


Barielle Rain In Spain

Barielle Rain In Spain

This is the bright flower of the collection, a the pop of color from those late-bloomers as they peek out from the fallen leaves in your yard. It performed well--excellent coverage and application in the two coats you see here.


As you know, one of the happiest discoveries I've made in a long time is that more and more of the polishes in these collections work as stamping polishes. Every one of these stamps beautifully, and one in particular is an answer to my prayers:


Barielle Autumn in Seoul

Barielle Gondola Ride

(I'll show you another example of this one tomorrow, since this wasn't the most attractive color pairing!)


Barielle Irish Eyes

Barielle Kiss Me Kate
 
(I've wanted a reliable cream to stamp with for ages, and this one is it. I'll have a manicure using this as a stamping polish to show you coming up soon...)

Barielle Midnight In Paris

Barielle Rain In Spain


This collection is subtle, elegant, sexy, sophisticated. It captures the soft beauty of the season, and celebrates it. I hope you love it as much as I do. :)


Thanks for stopping by! I hope your fall has been full of delightful seasonal pleasures.
M.

Sunday, November 9, 2014

Review and How-to-use: Tourist 20

(Nothing to disclose)

Hello!

Are you ready to go on a trip? Today I have a plate from MoYou London's Tourist collection, and it takes us on a fun trip to India!

Here is my video:


And here are the stills:


MoYou London Tourist 20


MoYou London Tourist 20

MoYou London Tourist 20

MoYou London Tourist 20


How-to-use!

This is a combination plate; it has a selection of single images you can easily use on their own, and a section that is collage-style. I'll break that down a bit for you. :)

1) The obvious first way to use this plate is to use the single images. 'Nuff said.

2) Full-nail images. This plate has four sections that can be very easily used for full-nail designs:


3) Use the architectural elements. There are some beautiful designs in the strips that make up the 'joints' of the building (outlined below). These would make really classy accent nails or for one or two nails in a skittle. Test them out! Give them a shot!


Don't forget the architectural elements


Okay, so for my sample mani, I used the middle 'full-nail' area to create a manicure celebrating Diwali (which, roughly speaking, is a New Year celebration). I used the colors in this picture for my inspiration:


 And I wanted to include Lakshmi, who is an important part of the Diwali celebration:


So I also used Explorer Collection 21 for that.


For my base polish I used Zoya Teigen, a cranberry shimmer with gold flecks:


Zoya Teigen
Zoya Teigen

Zoya Teigen
Zoya Teigen

Next I stamped my designs using Barry M Gold Foil; then I added silver and gold microbeads, along with an orange rhinestone to give some extra bling to the beautiful Lakshmi:


I am in love with how stunning the flower pattern looks in just a simple gold-over-red stamping manicure. Such an impact with so little effort. :)

So what do you think? Do you like the combo plates like these better than the 100% collage-style plates? Or do you prefer going all in?

Hugs,
M.