Showing posts with label Indigo Bananas. Show all posts

Thursday, November 23, 2017

Marianne Nails N. 25!

(Press samples and affiliate links ahead!)

Hello!


Today we're going to take a look at another Marianne Nails plate, this time N. 25, with a fall theme. Here's the video review I did of the plate:


And here's a closer look:

Marianne Nails N. 25

I love all the fall options on this plate, but also love how many images will work well for other seasons, too--very versatile!


Marianne Nail's full-nail images are 1.5 cm x 2.1 cm, and here's a look with my handy-dandy ruler so you can judge the size of the smaller stuff at the bottom:


How about quality? These swatches are done with Sally Hansen Insta-Dri Plummet and my clear stamper:


Gorgeous quality. :)


For my first manicure, I started with a base of Zoya McKenna, then put dots of Hit The Bottle Polish Everyday I'm Truffling, Copper-Haired Girl, Drop Red Gorgeous, and It Mossed Be Love (also available at Beautometry) onto my images. Here's how it turned out:


Marianne Nails N. 25 over Zoya Mckenna, stamped with Hit The Bottle Polishes

Marianne Nails N. 25 over Zoya Mckenna, stamped with Hit The Bottle Polishes


For my second manicure, I started with a base of Indigo Bananas Enchanted Lake, and stamped with MoYou London Ginger Rust:


Marianne Nails N. 25 over Indigo Bananas Enchanted Lake

Marianne Nails N. 25 over Indigo Bananas Enchanted Lake


You can find this plate in Marianne Nails' store, and also at Lantern & Wren. And you can follow Marianne Nails around the interwebs here:


Happy Thanksgiving!
M. xoxo

Monday, June 27, 2016

Tutorial: Stamping Sandwich

(Plate is press sample)

Hello!

A while back I  reviewed three flakies from Indigo Bananas including Perfect Night (For Mystery & Horror):

Indigo Bananas Perfect Night (For Mystery & Horror)

Indigo Bananas Perfect Night (For Mystery & Horror)


The awesome layered flakies in this polish inspired me to try out a stamping sandwich with it, and I figured since I was doing it, I might as well walk you through the process. I think the key to a successful stamping sammich is the placement of the stamps that are going to be buried under layers of polish relative to the ones that will show more clearly.


For my stamping I chose Born Pretty Store plate BP-L014 and Hit The Bottle Polish Pool Party:

Born Pretty Store plate BP-L014


Step one: Put on a base layer of your polish.

Coat one of polish


Step two: place the stamp that you want to be the least visible. For my mani, I want the standard accent nails (ring and thumb) to be the center of the manicure, so I want those images to be the brightest. I want the images around them to pull the eye toward the accent nails rather than compete for attention, so I want the images to be less visible as they are farther from the ring finger (the thumb is naturally farther away from the other aspects of the design, so I don't have to worry about that. So, I want the two fingers next to the ring finger to be under only one layer of polish, and the image on my index finger to be under two layers of polish. To accomplish that, I stamp the index finger image first (the one I want to be the most buried):


Stamp the image you want to be least visible.


Step 3: Add another coat of polish.


Add that next coat of polish

Step 4: Stamp the images you want to have medium visibility. For my mani, I want the two fingers that are next to my main accent nail to have medium visibility:


Stamp the images you want to have medium visibility


Step 5: Add your next coat of polish.


Apply another coat of polish.

Notice how the index finger image is less bright than the images on the middle and pinkie?


Step 6: Stamp your final images, the ones that won't be covered with more base polish. Then add topcoat, clean up, and you're done!


Final stamping sandwich

Final stamping sandwich

Final stamping sandwich


Notice I also chose size and placement of the images that would frame the accent nail and pull the eye toward it as well.

What do you think? I love how the jelly turns the image more purple when it's under two coats of polish, but does a blurple thing under only one coat of polish. I love the way the flakies play with the image, and reflects the lacy-ness of it. Very happy with how it came out!

What do you think--are stamping sandwiches awesome?

Happy stamping,
M.


Friday, December 4, 2015

Before & After: Perfect swirls

(Affiliate links)

Hello!


Today I have a fun manicure for you filled with flakies and swirls!

I started with Indigo Bananas Perfect Night (For Mystery & Horror):


Indigo Bananas Perfect Night (For Mystery & Horror)

Indigo Bananas Perfect Night (For Mystery & Horror)


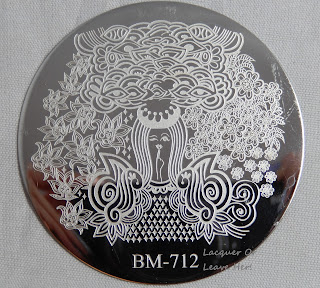
Then I stamped with Bundle Monster 712:


Using Hit The Bottle Polish Pool Party; I wanted the flakies to shine, so I just did an accent nail. This is how it came out:


Flakes and swirls

Flakes and swirls

Flakes and swirls

I love how this color plays up the flakies, and I love the fluidity of the swirls. :)

Happy stamping!
M.


Tuesday, December 1, 2015

Before & After: You're a mean one (Indigo Bananas Enchanted Lake + Sugar Bubbles SBS08)

(Affiliate Links)

Hello!

I have a super fun plate to review for you today! A while back I bought Sugar Bubbles plate SBS 08 in anticipation of Halloween and Christmas, because it's totes totes adorbs!

Here's the video I made reviewing it, along with one other plate which is definitely more Halloween focused:


But for now we're looking at the awesome Christmas/Winter-themed plate:


Sugar Bubbles SBS 08


Sugar Bubbles SBS 08

Sugar Bubbles SBS 08


The Grinch?? Jack Skellington?? A skull on candy-cane crossbones?? Are you flippin' kidding me?? How did I not own this before now??!?!?!!!! And oh, wait, there are some very sweet other seasonal images, too--that little girl enjoying the snow and the snowman and the holly leaves, and...this plate packs quite a punch.


Hey, there are a lot of little fine lines in there! How do they come out when you stamp them?


Sugar Bubbles SBS 08 stamping test

Pretty darn good. At first I thought the line on the top of Jack's had didn't stamp, and then I realized it's not present on the image, so it's meant to come out like that.


Alright, let's check out a mani! I started this one with Indigo Bananas Enchanted Lake, an awesome green jelly base with a multichrome flakie:

Indigo Bananas Enchanted Lake

Then I stamped the hanging decorations image with stripes of Barry M Silver Foil and Gold Foil on all nails except for my ring finger; for that, I stamped the Grinch image using Konad white, and colored it in with the reversed-stamping technique, using Sally Hansen Rapid Red and Lickety-Split Lime, two of my go-to stamping and coloring polishes:


I love that Grinch-a-licious smile on his face, and I love how the vibe of the show is captured perfectly by these stamps! I think the flakie adds to the retro feel and throws back to the show, too. Overall, I adore it, even if my coloring-in wasn't so great (psst, here's a secret...I actually did this mani way back in July because I couldn't wait to use this plate, and it was only my second or third time trying reversed stamping!).

This is such an adorable plate that captures so many things I hold close to my heart about the season...I purchased mine from Beautometry, here.

Happy stamping!
M.

Tuesday, November 3, 2015

Before & After: Welcome fall

(Affiliate links)

Hello!

Fall has fully fallen, and I can't wait to show you this manicure celebrating the colors and textures of the season...

I started with Indigo Bananas Gods & Monsters, an exceptional brown jelly packed with multichrome flakes:


Indigo Bananas Gods & Monsters


Indigo Bananas Gods & Monsters


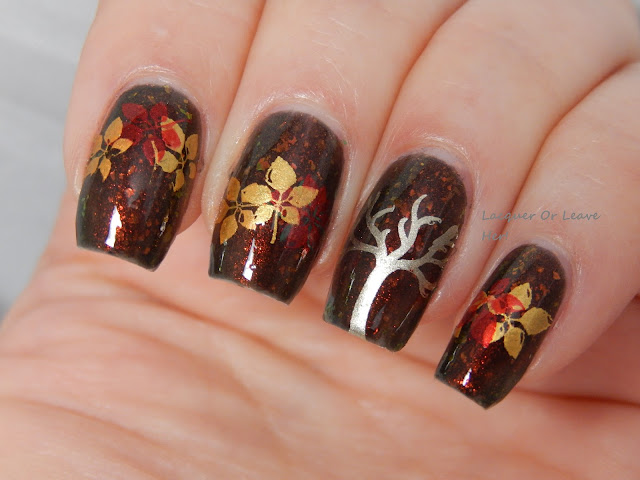
Next I stamped leaves using Bundle Monster 608:


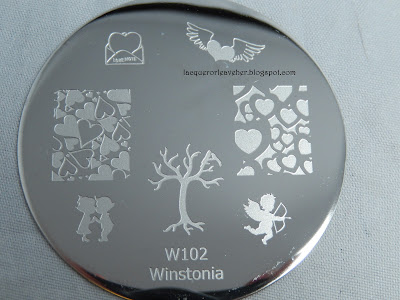
and the tree using Winstonia 102:


I stamped with Hit The Bottle Stamping Polishes To Have Or To Gold and Sally Hansen Red-ioactive and Silver Sweep:


Welcome fall

Welcome fall

Welcome fall

Welcome fall

Welcome fall


So. Much. Awesomeness. This is one of my favorite manis of all time--if I had a way to keep it for chipping for weeks and weeks, I'd wear it all season. Absolutely love, and hope you do too!

Happy stamping,
M.

Sunday, November 1, 2015

Review: Indigo Bananas flakies

(Nothing to disclose)

Hello!

As you probably know, the indie polish world has had a bit of a shake-up lately, and as a result, a number of bloggers are banding together to give a little extra support to indie polish makers, in the form of 'Indies I trust' posts, more indie reviews, etc. I'll both be putting up a few extra indie polish reviews in the coming days , and will be building an 'Indies I trust' page on the blog. And today, I'm starting off with Indigo Bananas, an indie I've neglected for far too long.

Back in the day, way back when I started nail blogging in early 2012, Nfu-Oh flakies were the shiznits (yeah, we used to talk that way back then). There were very few flakies out there, and Nfu-Oh had these amazing flakie jellies with multichrome flakes that looked like someone had captured a mystical fairy and crushed its wings mercilessly into a bottle of polish. Okay, that got dark, but you know what I mean.

Point is, when I heard Indigo Bananas had some flakies that were like those old-school flakies only better, I had to see for myself. So I snatched some up to show you today.


Let's start out with Perfect Night (For Mystery & Horror), a purple-jelly with blue-green iridescent flakies:


Indigo Bananas Perfect Night (For Mystery & Horror)


Indigo Bananas Perfect Night (For Mystery & Horror)

Indigo Bananas Perfect Night (For Mystery & Horror)

Indigo Bananas Perfect Night (For Mystery & Horror)


This is the most old-school of the bunch, with improvement in formula. This is three coats to get this level of squishy awesomeness, with the amazing spray of flakies and shimmer. Application was easy, formula was excellent--I don't think you want a jelly like this to be too thick, otherwise you won't get the right depth with the flakies. This is just totes gorg, end of story.


And then there's Enchanted Lake, a forest green jelly with yellow-gold-brown flakies:


Indigo Bananas Enchanted Lake

Indigo Bananas Enchanted Lake

Indigo Bananas Enchanted Lake

This is just amazing...Like a mystical forest with leaves of gold with moss everywhere and light breaking through in tiny rays from the canopy above. I love it for fall, I love it for winter, I just flippin' love it. I did three thin coats here to get full coverage, but you might be able to get away with two.


And finally, we have the entire season of fall crushed in a mortar and pestle and sprinkled into a bottle: Gods & Monsters, a brown jelly with multichrome brown-gold-green-yellow flakies:


Indigo Bananas Gods & Monsters


Indigo Bananas Gods & Monsters

Indigo Bananas Gods & Monsters

Indigo Bananas Gods & Monsters

Indigo Bananas Gods & Monsters

Indigo Bananas Gods & Monsters

Indigo Bananas Gods & Monsters

This is two coats, with excellent coverage because this was packed with flakies. I love how the colors shift with this--when I move my fingers, it feels like fall leaves are swirling through the air. This polish is just exquisite--it is on my list of top indie polishes ever, without a doubt.

Of course Indigo Bananas does a lot more than flakies--In fact, they do pretty much everything, and they do it very well. They've been around for a while and have an excellent reputation for quality and customer service. If you haven't checked them out before, there's no time like the present. :)

Happy polishing!
M.