Showing posts with label Tips. Show all posts

Monday, July 29, 2013

Nail Stamping 102: Basics and a bit beyond

Hello nail lovelies!!

As you know, I've been working hard to put together a post about stamping tips for you for a couple of weeks now. This has turned out to be more of an undertaking than I initially thought it would be, so I hope you'll forgive me for the delay! This is going to be a LONG post, but after trying to divide it up, I think having it all in one post is the best way.

I'm going to start off with a with a brief overview of the basic steps of stamping, and then go into detail about some tips and tricks for each step. Then I'll answer some questions you submitted to me about particular issues you struggle with, if they haven't already been covered. Please keep in mind that there isn't just one right way to do things! What I'll write here is what works for me, or what I've been told by other people who love to stamp. And if you have another way that works for you, I'd love to hear about it, so please share it with me and my readers! And if my way doesn't work, vary it a bit before giving up. :)

One final word that covers everything I'm going to say...Practice makes perfect. This is cliche and nobody wants to hear it, but it's absolutely true. When I first began stamping, I spent several sessions (5-6) just playing around with the stamps and stamping--I'd paint my nails all a good base color, usually white or something dark, and I'd stamp. Then I'd remove the stamping with a swipe of remover, and stamp again. When the swiping took off too much polish, I'd repaint. And then while it was drying, I'd practice with fake nails. And while I've never done this myself, another great way to practice is by using the semi-flattened marbles you can get at craft stores (I saw this tip first in a video by Ginasoguesswhat on YouTube). I guarantee you that no tip I can give will completely remove the need to practice, but hopefully I can help cut down the learning curve for you. :)


Okay, so let's have at it!!

For orientation purposes, nail stamping involves the following 4 main steps:
1) Put the nail polish onto your nail plate.
2) Scrape the nail polish off of your nail plate.
3) Pick up the image from your plate with your stamper.
4) Place the image onto your nail with your stamper.

Sounds easy, doesn't it? But as you know, many things can go wrong along the way...::cue dramatic music::...


Step 1) Put your nail polish onto your nail plate.
There are two important components here, picking the right polish and putting the correct amount on the plate. Picking the right polish can be tricky, because very few polishes look good over all other polishes (except maybe Konad black and white and similar blacks and whites).

  • One way to get a first guess about whether a polish will be opaque enough to stamp with is to look at it on the brush. If you can't see the brush through the polish, it's a good candidate to stamp well.
  • Test your polish before stamping. You can do this on a sheet of paper, a piece tape, a real or false nail, or flattened marble (see above--you can get these for about $1 a bag at craft or floral stores). First paint your base paint, wait for it to dry, and then try stamping over it with your target polish.
  • Inky Whiskers constantly tests out different polishes over black and white; check out her blog for tons of polish tests. 
  • Metallic and foil polishes as a general rule stamp well.
  • I have great luck stamping with China Glaze cremes
  • Sally Hansen Insta-Dry polishes are almost all wonderful for stamping.
  • Pure Ice metallics and cremes are generally good for stamping.
  • Most strongly linear holos (Nfu-Oh, for example) stamp very well. 

Putting the correct amount of polish on your plate is also important, but is fairly forgiving. If you put on too much, you can always scrape it off by scraping twice or scraping more firmly; but of course you want to avoid this if you can, and practice will help here. As you're learning, the main issue is you don't want to put on too little polish, or it won't cover your whole image.

  • Err on the side of too much rather than too little polish. If you use too little polish you'll either get a patchy image or your image won't pick up. One of the tricks experienced stampers use to save polish is to only put polish on half of the image, and then scrape that polish over the rest of the image. This is a great tip, but if you're just starting out or having problems getting a good image, don't do this--wait until you get a bit more comfortable with stamping. Figure 3 below shows an image with bald spots because it didn't have enough polish.
  • Here is what your plate should look like with the proper amount of polish (see figure 1). Notice that it's fully covered, but you can still see the indentations; if you have so much glopped on that you can't see them anymore, you probably have too much:


Figure 1. Notice that the image is fully covered, but you can still see the indentations of the image.

  • How fast should I move during this step? You have a fair amount of lee-way here. Your polish is going to dry more slowly until you scrape it, so you have a few extra seconds here. Not enough to go make a cup of tea or anything, but a bit more time. :)


Step 2) Scrape off the nail polish from your plate.
This is where things start getting a bit trickier. Lots of things can go wrong here, and you might not even realize it until later on in the process. What I mean by this is, if you're having problems picking up your image onto your stamper, most likely it's because you did something wrong here.

In theory, you've put your polish onto your plate, and now you're using a scraper to remove the polish from the plate. Let's talk about issues that crop up here:


  • What sort of scraper should I use? This is largely a matter of personal preference, and the answer is, use whatever works for you. Try a metal scraper, a plastic scraper like a credit card, a paper scraper like an index card. If it works, don't question it! My own personal preference is a metal scraper. I feel like I get the most even control with a metal scraper; I don't get any gaps between the surfaces, and I can 'feel' when it's scraping effectively and when it isn't. But doesn't it scrape up your metal plates? No, not in the important sense. The plates don't look pristine and new, it's true. But it doesn't damage them or make them less effective in any way. And I bought the plates to use them, not to display them looking pretty, so it doesn't bother me if they get cosmetically scraped. If you feel differently, of course, definitely try out other scrapers! But if you find nothing else is giving you a clean image, you might want to rethink that metal scraper. :)
  • How hard should I scrape? You should scrape fairly hard; too light tends to leave too much polish, and it's hard to scrape *too* hard (but yes, it can be done, lol). That said, it depends on the person and the plate. I've had some plates where I had to use a lighter hand to get a good image. If you're having a hard time picking up your image, it's possible you scraped too hard or too gently. If too hard, you'll get no image or only bits of the image. If too gently, you'll just get a blob of polish. This is part of where the practice comes in; try it, and adjust the pressure you're using as needed. Most importantly, you want to make sure you're applying even pressure to the whole image.
  • Angle matters. As strange as it seems, I've found that the angle I scrape at makes a big difference, because it has a big impact on my control. Generally speaking, I find that about a 45 degree angle works for me (see figure 2). If I'm too up-and-down or too flat, my scraping is uneven and I get big missed spots (or lines) of polish.  

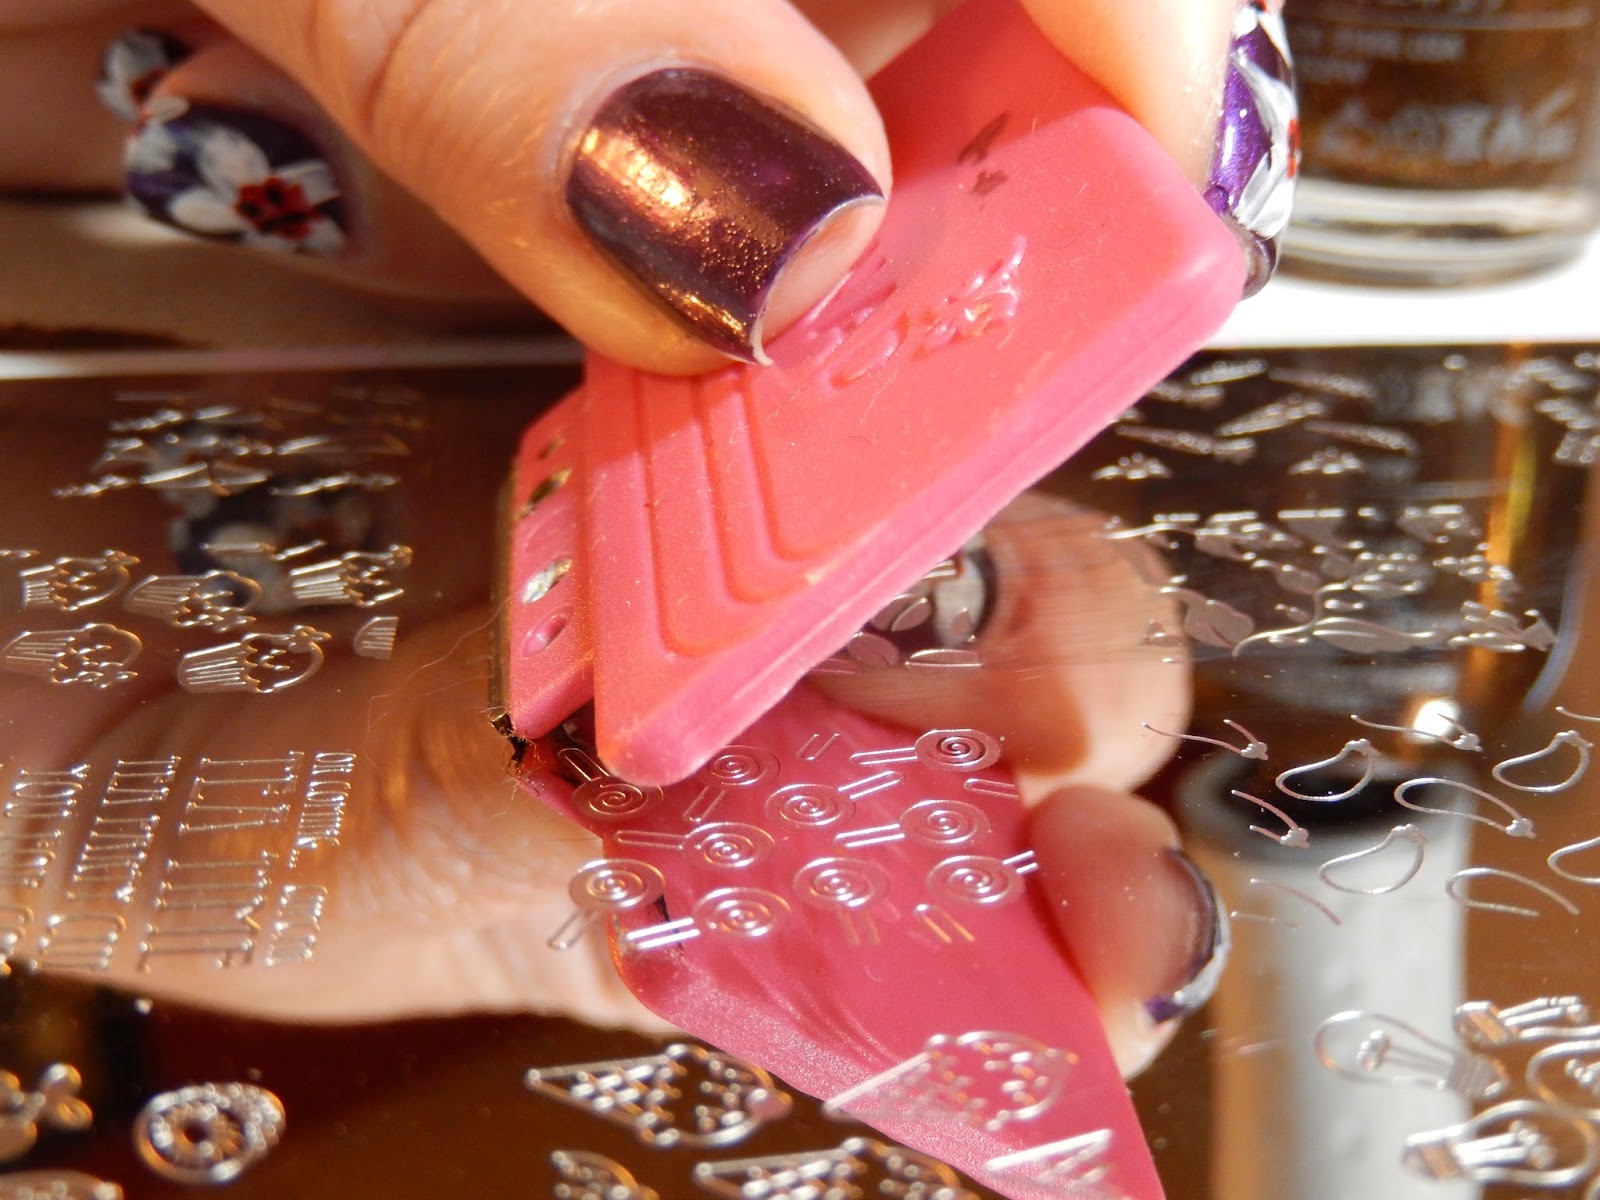
Figure 2. This 45 degree angle is what I favor for my scraping. It gives me good control and good contact with the plate.

  • Can I scrape twice? Yes, you can, but be careful. If you scrape twice, you're taking off more polish and taking more time, and both will make your image dry faster. So if you have a big blob and scrape a second time, just make sure you pick up the image fairly quickly afterward. I will often scrape twice if I've missed an area.
  • Don't worry too much about small lines. Believe it or not, in most cases, if you have small lines from scraping when you pick up your image, they won't even show up. Bigger lines or splotches will show up, however (see figure 3 and caption below). 
  • How fast should I move during this step? Pretty fast. If you take too long, and scrape too much, the polish will dry and it won't pick up. Now, I'm not saying you have to do your impression of The Flash--you don't have to go so fast that you're just a blur to the people around you or anything, and you don't need to go so fast that you get flustered--but you should be picking up your image pretty much right after you scrape. Scrape, wipe off scraper, pick up stamper, pick up image. Normal movements, but no big pauses in between. 
  • Here is what your image should look like when improperly (figure 3.) and properly (figure 4) scraped:

Figure 3. Improperly scraped plate. First, it has too little polish to start with (see the bald spots at the top) and my uneven pressure left a big splotch on the bottom left. The smaller lines on the right won't matter to your image.


Figure 4. Properly scraped image. 


Step 3) Pick up the image from your plate with your stamper.
For this step, you place your stamper on the plate, and pick up the image. You can do this by coming directly down on to the image (figure 5), or by rolling your stamper over it (figure 6).


Figure 5. The direct-pressure-down method of picking up your image

Figure 6. The roll-over-the image method of picking up your image

I prefer the direct-pressure-down method shown in figure 5. I've never been able to get good results by rolling over the image--it just gooshes and squooshes and I get a really bad image. So I personally strongly recommend the first method over the second. 


  • Should I file my stamper? I have never found this to be necessary. I have 5 stampers of different types, and I've never needed to file any of them; I know many other people that haven't had to file theirs, either. Of course, plenty of people swear by this, so if you want to do it, do it! But if you're asking my opinion, I don't see any reason for it. If you suspect your stamper has residue on it, try swiping it with acetone or rubbing it with an eraser, and that should be enough. 
  • How much pressure should I use? You need to use a medium pressure. If you push too lightly, if won't pick up or won't pick up evenly. If you push too hard, you are gonna get smoosh and distortion. If you're not getting an image you like, and you're applying and scraping so your images look like the steps above, try varying the pressure you're using until you get a result you like. Figures 7, 8, and 9 show good and bad images: 


Figure 7. Good image!


Figure 8. Bad, bad image! This either had too little polish, wasn't picked up fast enough, or had too little pressure on the stamper when picked up.

Figure 9. Bad, bad image! This either had too much polish, wasn't scraped with enough pressure, or had too much pressure on it when picked up.

  • Will I get better results if I use an XL 'squishy' stamper rather than a regular stamper? In my opinion, I think you should be able to do any basic stamping with a regular stamper with a little practice. I don't believe that the squishy stampers are easier to use--they are just better for certain things; squishy stampers are better for picking up really large images, and are better for dealing with certain types of alignment issues (I'll talk more about this in the next section). However! If a squishy stamper works better for you, then use it! More power to ya!! Just don't rush out to buy a squishy stamper thinking it will solve your stamping problems, because it probably won't. You can have all of the same problems we've talked about already if you aren't applying, scraping, and picking up correctly, whether it's a squishy stamper or not.
  • How fast should I move during this step? You're gonna want to move pretty fast here. Once the polish is scraped, it's thin, and will dry quickly. So don't let it sit too long, or you'll get something that looks like figure 8, or worse, doesn't pick up at all.
  • Make sure to check your image before moving on to the next step. If you don't have a solid, smooth image to start with, you aren't going to get good image transfer. It's much easier to wipe this off and start again than to put a bad image on your nail.


Step 4) Place the image onto your nail with your stamper.
Oh boy, now we're into the big issues. This is where things get trickiest of all, because you're trying to put your image right where you want it, but you don't have all day to do it. It's easy to get flustered because you're worried that your polish will dry, and then move too quickly and mess everything up. And nobody wants to have to start all over again!


  • Resign yourself to the fact that sometimes you're going to have to start all over again. The most experienced stampers, who have tons of tricks they use and tons of manicures under their belts, sometimes have to start over, and so will you. Hopefully it will happen less and less with the more experience you get. 
  • Always put on topcoat between your base polish and your stamping. If you make a mistake and you have topcoat on, you can sometimes swipe your stamp off with polish remover or acetone without damaging your base. If you don't have topcoat on, you'll be starting over. 
  • Straight-down vs. Rolling-over methods: There are two ways you can transfer your image from your stamper, just like there were two ways to pick it up. You can either push the stamper straight down onto the nail, or roll it over the nail. In this case, I vastly prefer the rolling-over method, largely because I have very curved nails. If I try to stamp straight down onto my nail with a full-nail image, I'll get a janky stripe down the middle and nothing else! So, I start on one side of my nail and roll across to the other (see figures 10-12 to see what I mean). This should work no matter how flat or curvy your nails are. If you use the rolling method do not use a pushing motion; roll the stamper, don't push it into the nail. Gentle pressure works best here. 
  • How fast do I need to work with this step? You have a little more time here than you did with your previous step, and can take a few extra seconds to get things lined up the way you want them to. But, if you wait too long, your image will dry out and either won't transfer at all, or will only partially transfer. If that happens, swipe off (you had topcoat on, right?) and try again. 'Cause if you don't get it lined up right you're going to have to start over again anyway, right? 


My method for transferring my image and aligning where I want the image to be: 

A) I start with the stamper placed on one side of the nail, and push the stamper right up to the edge of the nail; I line it up with the edge of the image if it is a full-nail image. Working with a full-nail image is the easiest alignment to execute--just make sure that you have your stamp initially positioned so as you roll it over, it covers the whole nail from top to bottom. Note in figures 10-12 how I have both the top (near my nail bed) and the bottom (near my nail tip) positioned so I can see that there is enough stamper to cover my whole nail (if it had a full-nail image on it). Once I see that is safely the case, I can begin rolling.

B) If I'm trying to line up a smaller image, I line up the edge of the image with the location on the nail where I want the image to be. To demonstrate this, I show in the picture how I'm lining up an image of a coffee pot with an image I've previously stamped (and filled in) of that same coffee pot; I'm using the silver coffee pot as my 'anchor' for where I want to place my image. Looking at myy fingers, my eyes would be right where yours are now; I do this right up in front of my face. You can see over the three pictures how I bring the image closer and closer to the anchor point, pressing my nail into the bare part of the stamper as needed, until I am fairly sure it's going to match up. Then, I roll it over:  


Figure 10. Demonstration of rolling.


Figure 11. Demonstration of rolling, part 2.


Figure 12. Demonstration of rolling part 3, and demonstration of aligning.
In this case, this is a pretty darn hard alignment to do, to get an outline placed perfectly over a previously stamped image; in most cases you aren't going to need to be that perfectly precise. Let's say I didn't have the silver image on the stamp, and wanted to use one of the coffee beans as an anchor to line up the image where I wanted it to go--that would work just as well (and be a lot easier, lol). You could even use one of the flecks of glitter in the glitter polish as your anchor, to help you position correctly. Or, if you have just a plain polish underneath so you can't find an anchor point, you can take your smallest dotting tool or toothpick and put a teeeeny dot of polish right where you want to line the image up (and stamp over it so it doesn't show). Just don't forget to pay attention to both the top and the bottom of the image--it can be easy to get the top (spout in this case) matched up where you want it, but have the bottom of the pot all out at an angle. So do a spot check before you start rolling that both the top and the bottom of the stamper are where you want them to be. :)

C) Now that you're all lined up, roll your image over your nail. Use a gentle, even pressure as you roll--this is very important. If you stutter or hesitate or try to adjust the stamper while you're rolling, you'll get smudged or misaligned parts of your stamp. If you push instead of roll, you will smudge--the polish only needs to come in contact with the nail to adhere, it doesn't need to be steam-rolled. :) Also, when you reach the end of the nail, do not lift off! Keep your rolling motion going until the stamp is all the way off the nail (even keep it rolling over part of the finger rather than lift it up). If you lift off too soon, you can get part of your image that lifts back off of the nail or that doubles back on itself on the nail. Once you see the stamper has rolled completely off of the nail (see figure 13), you can lift it off your finger:

Figure 13. Your stamper should be completely rolled off of your nail before you lift it up.

D) This method works well except in one case...if you want stripes (or something similar) down the length of your nail. Then, it can be easy to get a small warp that wouldn't normally show up on another design, but makes your stripes look really messed up. In this case, you want to use the same roll method, but from the top to the bottom of the nail, rather than from side to side (see figure 14 below). You do want to spot-check that the line of your stamp is pointed in the right direction after you've placed your stamp near your cuticle, then roll away!:


Figure 14. How to vertically align your stamped image. 


  • Doesn't this take too long to get good image transfer? When you're first trying to get it down, now and then you may find that by the time you go to transfer your image, it has dried out and doesn't transfer, but this shouldn't happen often, especially after your first couple of tries with it. 


  • What about French tip images? Ugh. These are tough, but they can be done. Remember above I said that squishy stampers are better for some types of stamp alignment? This is one of them. With a squishy stamper, you can get your image onto your stamper, and then push your nail directly down into it wherever you want. Because it is squishy, it will collapse around your nail and put the image directly where you're pushing into it. I talk more about this in a video I made about using the squishy stamper, but if you want me to take pictures of this, let me know. :)


Reader Questions! 

I think I've covered the basics above...so now I'm going to turn to the specific reader questions I got.

Q: One question I got (not sure if this person wants to be anonymous) was about overlap stamping on longer nails. For people with longer nails, the Konad image isn't long enough to cover from cuticle to nail tip, and in theory, it should be possible to stamp the image twice, lining it up in the process. 

A: In theory, this is possible. In practice, it's pretty darn hard. The best tips I have for aligning the two stamps would be the ones I shared above; these should get you pretty close to having a well-aligned image, although even people who are pros at this don't get it 100% perfect. So, I have two other suggestions for you. The first is, choose images that are forgiving when it comes to overlap; either very busy images like leopard prints where it doesn't matter if things are lined up well, or more open images that have plenty of room to look fluid if not stamped perfectly. You can see an example of this by clicking here.

But personally, I think the best choice is to use plates that have larger images; there are a lot of these now, and you don't have to fuss with those alignment issues. You can see one of these plates in the same video I linked above, and I have several others on my YouTube channel as well. Another brand that I think has larger images is Dashica, but I don't own any of those (yet!) so I can't say for sure. If you do use one of these larger image plate, be sure to get yourself an XL stamper, otherwise you're not going to be able to get the whole image, and then what's the point!

Q: Nathalie asks about problems getting her image to transfer: "I can't pick up the full image, or when I do it doesn't transfer to the nail...I also used the squishy stamper for the first time, and couldn't position it right. It came out with the image half-transferred and the rest was just a trace of the image."

A: If you're having a hard time picking up the image, this is usually because your polish dried out before you picked it up, either because you took too long or you scraped too hard or too many times. If it's not transferring to the nail off of the stamper, first make sure you got a good image--if you did, and it's not transferring, you probably took too long from the time you put it onto the stamper to the time you tried to get it on the nail. If you don't have a good image, check the pictures of bad images above and see if those help figure out your problem. As for the squishy stamper, you can have all of the same issues with that type, too, and if it half-transferred, I think you're having the same basic issue (taking too long or scraping too hard). With respect to the positioning issue, let me know if what I wrote about aligning your image helps solve the problem. If none of this works, let me know and I'll see if I can help you troubleshoot from there. :)

Q: Rach asked: I sometimes smudge the picture when stamping...what am I doing wrong? Pressing too hard? 

A: That's one possibility. Another is if rather than rolling your image onto your nail, you're doing more of a pushing motion onto the nail. Either way, try to be gentler and that will probably help. Also, you are probably doing this, but check your image before you transfer it to make sure the smudging didn't happen when you picked the image up. :)

Q: Hooked On Varnish asked: I'd like tips on getting placement right, especially with the French tip and full nail images!

A: Did my tips above help? If not, let me know what happens when you try to stamp and I'll see if I can add something more. :)

Q: Lisa N asked: How do you get the stamping design placed on your nails perfectly? I always struggle with getting the whole image transferred on my nails. 

A: Did the tips above help out at all? Usually the rolling method should help you get the whole image across your nail, especially if you make sure you have it aligned correctly before you start your roll. But if not, let me know what's going wrong in the comments, and I'll try to help further. :)

Q: Manis By Moore asked: I struggle with double-stamping. Like picking good images to stamp over other and stuff like that. Maybe also some tips for when the whole image doesn't transfer. Ideas to fix it without redoing the whole image. 

A: Okay, let me start with ideas for fixing a problem if you don't want to start over. Of course you can always try to stamp the image again, matching it up to the part that stamped correctly. That's actually not a bad thing to try if only a small part of the image went wrong, and I often do that myself. If one little bit didn't transfer and is still on the stamper, I'll just line it up and try again; or I'll restamp just that area and try again. Even if it doesn't come out perfectly, if it's a small area, you often can't tell.

Another fix is to do something else over the boo-boo. Some of the most amazing manis start out as a mess-up that someone tried to fix! For example, you could use the saran-wrap technique to put color around the edges of your nails and cover any bald spots, but still have it look random. You could do the same thing with bits of nail foil. You could find another solid stamp and stamp over your bald spot, and then incorporate that stamp onto your other nails, like you meant to do it the whole time. If only half of your nail got stamped and the other half didn't, you can turn it into a color-blocked mani by taping off and painting one half of your nail on each nail (or just on an accent nail). Great creative! There have been plenty of times when a well-placed rhinestone or stud has hidden a slip or a splotch here and there on my manis, lol.

 You also asked about double-stamping. Funny how this is much harder than it seems like it should be, isn't it? The simple answer is that it's always a good idea to test out your combinations on a sheet of paper or tape before you ruin a full base mani. But, I've noticed a few rules of thumb that help me here (this still isn't my strongest area!). The polish you choose for your top layer of stamping should be very opaque, and the stamp you choose should be solid, for best results. If you try to stamp a white flower over black stripes, you're probably going to be able to see the stripes through the flower, but if you stamp a dark flower over light lines, you'll probably be okay. Also, the most effective manis I've done of this kind have less of a contrast between my base coat and my first layer of stamping, and more of a contrast between my top layer of stamping. So, for example, I might choose a medium blue base, a light blue stripe background stamp, and a dark purple flower to stamp over it. Finally, you don't want your second layer of stamping to disappear into your first layer. Vary the sizes to make sure your second stamp doesn't visually get lost in your first. :)


Q: Cin O. asked: I have the hardest time with scraping. I always seem to miss a part or it leaves a trail or line. Timing is a huge issue for me with polish drying before I get it scraped, etc...I also have trouble with 'seeing' how the image should be laid on and get a lot of my designs backwards of how I want them.

A: With respect to the scraping, I hope what I mentioned before helps a bit. As for timing, that should come with a little bit of practice...once you get used to how to scrape confidently, etc., it will take less and less time. In terms of 'seeing' how the image should be laid out, I hope that my positioning tips above help with this? Let me know if these don't help, and we'll troubleshoot. :)


Q: Miss Intensity Nails asked: I find alignment to be a big issue for me? How do you get every finger to look the same!? Also, my designs fold over on its own while transferring on the nail creating a blob. Almost as if the design is sticking to the stamper then finally releases like a stretched rubber band. 

[NOTE: I am going to do a follow-up tutorial to illustrate this answer.]To get every finger to look the same, try using the alignment method above, and add in this. Let's say you're using a full-nail image. Look on the edge of the image and pick a flower (or whatever) that you want to be on the center of the edge of your nail. Line it up. Then, for the next nail, use that same anchor point to line up your stamper. Same for the rest of the nails. Now let's say you want to put just one flower at the center of each of your nails. Try putting a teeeeeeny dot of the polish you're using to stamp with right at the center of each nail, and then use that to line up your stamp. Even if it's not 100% perfect, I bet you won't be able to tell much difference. And before you know it, you'll know your nails well enough to know where center is when you align it without that help. :)

The folding design is probably due to uneven pressure when you're stamping, or lifting off too soon. Try to make sure you're using a very even, gentle pressure when rolling your image. If that's too light, try again with a little more pressure, and a little more as needed. :)

Q: Nunya Beezwax asks about a kit she bought that doesn't work well, and results in an image that's either a blob, or only part of a transferred image, or gets no transfer at all. 

A: Try the tips I talk about above for scraping and stamping, I think those will probably solve your problem. If that doesn't work, try a different (but reputable!) inexpensive set, and see how that works. I have one of those TV kits and it works fine, but that's because I didn't start with it--I was an experienced stamper by the time I got it, and could adjust my scraping/stamping to it. If it continues to give you trouble, it may just be that the quality is too poor in the set you got (sometimes plates from even highly reputable brands are defective and have to be returned). Try buying a reputable scraper/stamper and a single reputable plate or reputable set, and see how that goes. You can get the XL Cheeky plates for around $10, and can get scraper/stamper sets for about $5 now, both on Amazon. But, you might as well play with the one you have again, and see if you can get it to work!

Wow, that was a lot of writing!! Let me know if there are things that don't make sense, or things you'd like more clarity on. I know this is fairly bare-bones, so feel free to ask away so I can clarify or expand on different areas according to your needs. I have already written way too much for one post, so I'd rather follow your lead on what more you'd like to know! And if anyone has any other tips, please do let me know! I don't claim to know anything but the tip of the iceberg when it comes to stamping expertise. :)

Thanks for stopping by, particularly if you made it all the way through! Please excuse any typos, I don't think I'm going to be able to do a final proof until tomorrow, lol. :)

Hugs and stamping love,
M.


Thursday, July 25, 2013

Bargain tips: Reader's suggestions

Hello!

Back when I posted my tips for how I find polish at bargain prices, I asked readers to add any tips they have, particularly for countries I don't know much about. Some posted them in the comments, some e-mailed me, so I'm going to compile them here for quick reference. :)

1) Discount/overstock stores: This is one I haven't tried, because I don't have one super convenient to where I am, but as soon as I get a chance, I'm going to try it. The particular stores I've had mentioned are Ross, TJ Maxx, Big Lots, and Marshall's. Apparently you can get a lot of brands at these stores, including Orly, SpaRitual (which I'm extremely excited about), Color Club, Revlon, and even some higher-end polishes. These stores also have no-name polishes which are of good quality. 

2) Dollar stores: I completely forgot to mention this one, thanks for reminding me! Not only can you find a variety of polishes here (depending on what they get in), but you can also get nail art supplies and manicure supplies. I tend to avoid no-name brands at these stores when it comes to some things, but if you're buying something like make-up sponges for nail art, who cares what the brand name is? The down-side to these stores is that they are hit-and-miss, depending on what stock other stores didn't want, and the selection can be very limited (and can vary widely from store-to-store). 

3) Sephora's clearance section: I got a tip on Sephora's clearance section and drove out to my nearest location to check it out (there's not one super close to me). I was really impressed by what I saw...The report I received featured $4 Illamasquas, and while I didn't get quite that lucky, I did get one for $8 (down from $17), and considered that absolutely amazing. They also had a ton of Nails Inc. polishes on clearance, in a wide variety of colors. I'd definitely advise checking these out, even if normally Sephora is out of your price range (it's normally out of mine!). If your location is like mine, they put the clearance sections on tricky little end-cap sections, so be sure to ask if you can't find them.

4) Group deal sites: Possibly the most brilliant tip I received was to check Groupon, Living Social, Google Offers, Amazon Local etc., not just for nail polish tips (although I did score crazy good on the Julie G offer a couple of months ago), but also for other types of beauty stores/sites. The specific deal that Aleksandra mentioned to me was a $40 for $20 deal to Fragrance Net; while you wouldn't think it from the name, they also carry polish, and she was able to combine this deal with a sale the site was having on Dior polishes to get them on an incredible site. I could smack myself, because I saw that deal, but didn't think to check the store for polish! So it's worth taking a moment just to double-check any offer like that for potential hidden polish values. :)

5) Ideas for Ireland and/or the U.K (and to some degree, other countries)
  • With respect to discount stores, try Dealz or Poundland for cheap polishes like Sally Hansen and Sinful Colors. 
  • Check out Essence and Catrice, which are budget brands there (MissGreenEyes, can you let us know where you find these?)--and don't forget that while they're budget brands there, they are not budget brands elsewhere, like the U.S. (we also can't get our hands on W7 or Top Shop here). I mention this because you may be able to swap colors from brands that we can't get in order to get access to other brands you want here. :)
  • Try eBay for items you can't find and for lower prices.
  • Try nailsupplies.us for bulk orders, as they ship abroad. 
  • Don't forget that stores like Ninja Polish and Llarowe ship worldwide. 
  • Some independent polish makers will make exceptions to US-only shipping rules if your order is large enough--especially if you have other friends IRL or in polish groups in your area that want to combine orders, it's worth asking. 
6) Ideas for Europe: 
  • Natalia in Switzerland blew my mind with the prices she has to pay for things like OPI and China Glaze. Her solution is to buy from US e-retailers to get around this. If they ship to Switzerland, I'd guess they ship to other countries in the EU as well...Natalia, if you see this, can you share which are your favorite sources?
  • Don't forget that stores like Ninja Polish and Llarowe ship worldwide. 
  • Some independent polish makers will make exceptions to US-only shipping rules if your order is large enough--especially if you have other friends IRL or in polish groups in your area that want to combine orders, it's worth asking. 
Okay, I think that's it! If I missed your tip, please let me know, and I'll update this list. Also, thanks to everyone who commented or sent me a tip. If I received it from more than one person I didn't say who it was from, just because I didn't want it to get into tons of names, but that doesn't mean I don't appreciate your help!!! I absolutely do, and I would love to add any other tips you come up with. :)

Big hugs,
M.

Friday, July 5, 2013

My haul from the Sally Beauty Red Tag Clearance sale. :)

Hello!

I promised to report back what I managed to score at today's Sally Beauty Red Tag Clearance sale as a demonstration of one of my favorite budget-saving polish-hoarding tips. I have two Sally's near me, and I visited them both. Here is what I scored:


Color Clubs, Finger Paints, and mini Orlys

China Glazes

And my favorite: 2 polishes and a little picture frame for $1.50

There were a ton more Orlys and China Glazes that I already have, including the Hologlam collection. :)

So how much did this all cost me?

Grand total: $27.25. 

Hey Montell! Hit it! "This is how we do it...It's Friday night and I feel alright, the party is here on the Sally side..." ::does happy polish dance::

Hope you scored mounds of polish awesomeness...:)
M.


Tuesday, July 2, 2013

Bargain Tips: A quick guide to couponing for polish :)

Hello!

Earlier today I posted my list of tricks/strategies for saving money on nail polish (if you missed it, you can find it here). I mentioned that later today I'd post a separate post on using coupons effectively, because this is one of the main ways I save money on polish. Many of you may be asking why I'd need a whole post on using coupons? You just clip them and use them, right? Wrong.

Don't get me wrong, couponing is very easy, but it can seem a bit complicated at first. I promise it isn't! Coupons are your friends, especially at the drugstore and superstores like Target. Bear with me and I'll walk you through my three favorite coupon tricks. Before I do, I must pay homage to The Krazy Coupon Lady site; this site and their book taught me much of what I know about couponing. If you're interested in learning more, particularly for more than just polish, take a look at their site and consider their book. Nope, I'm not affiliated in any way, I just love them 'cause they've saved me literally thousands of dollars on my grocery and drugstore shopping, including my polish. :)

Which brings me to a final quick introductory point. I know a lot of people don't like to use coupons, but I've never understood why. It takes only a second or two to hand a cashier a coupon, and who cares if that loser guy behind you--you know, the one who's only buying gin, tv dinners and hand lotion-- wants to judge you? Judge you for what, not throwing money away? Psh. Unless he's gonna pony up and pay for my stuff, I don't care what he thinks. But hey, that's just me. :P

Okay, let's get on to couponing for polish fiends! There are three main strategies I use for my polish purchases, and they build on each other, so I'll walk you through it all one step at a time. :)


1) Sale + Manufacturer's coupon
I already mentioned that you don't want to just clip your coupon and buy your item. The key principle that couponing is build on is this: wait to buy your item until you have both a coupon and it's on sale. Yes, both. That's how you get items for very cheap, or even free. Especially in the case of nail polish, most brands go on sale at one store or another every other week or so. It's very rare that your coupon will expire while you're waiting for a sale.

Let me walk you through the relative scenarios here. Let's say you don't wait for the sale, and just use the coupon. For example, Wet n Wild often has $1.00 off coupons in the paper. At my drugstores, these polishes go for $1.99 each. It's tempting to say Wow, with the coupon, that takes them from $1.99 to only $0.99, 50% off! Score, right?

Sure. But you can do better. My drugstores regularly have sales where Wet n Wild goes for BOGO (Buy-One-Get-One free)or BOGOne-half-off. If I wait for the BOGO sale, this is how my transaction is going to go:

First WnW: $1.99.
Second WnW: $0.00 (yes, you can use a coupon on an item even if it's free)
Minus two $1.00 off coupons = Two free polishes = 100% savings.

Of course, the BOGO-half-off sales are much more common, and often you won't get a regular BOGO sale before your coupon expires. But even then, your total looks like this:

First WnW: $1.99
Second WnW: $1.00
Minus two $1.00 off coupons = $1.00 total = $0.50 per polish = 75% savings.

The same principle applies to other drugstore polishes, which regularly go on sale (seriously, usually every couple of weeks). The two most common coupons after WnW are Sally Hansen and Revlon (which I may have to stop buying if it's confirmed that they have started testing on animals). It's rare to get these mid-range polishes for free (although I have managed it several times with Revlon), but you can still get some great deals, regardless. Revlon often goes on sale extremely cheap--I got all of my Moon Candy collection for $1.99 each; normal price for these polishes in my area is $8.99.  So clip a coupon. Wait for a sale. And worse case scenario, if your coupon is about to expire and you haven't seen a sale, use it by itself. But that really should never have to happen. :)


2) Sale + Manufacturer's coupon + Store coupon
That wasn't so tricky, was it? So let's take the next step. The bestest case scenario of all is when you can do what you did in (1)...and use a store coupon, too. Yes, that's right: you are allowed to use one manufacturer coupon AND one store coupon per item. Sweet, huh?!

Let's first talk about the difference between a manufacturer's coupon and a store coupon. To figure out what type of coupon you have, look at the top of the coupon:


Here is what you'll see if it's a store coupon:


Where do you find these coupons? 
--The newspaper: The vast majority of the coupons you get in the newspaper (the glossy ones in the inserts) are manufacturer's coupons, but you can find some store coupons in there too (most often Target coupons, I've found).
--Websites: There are a ton of websites where you can print out coupons. It would take me a whole post just to tell you about all of them, so let me again refer you to The Krazy Coupon Lady site.  They have a button that says 'Print Coupons' that takes you to a page that lists alphabetically all of the coupons currently available to print. And if it's listed there, they've vetted that it is a real coupon that won't give you a virus, and it's safe for you to download and print.
--Facebook: Lots of Facebook pages for companies will give you a coupon if you 'like' their page. The Krazy Coupon Lady lists all of the ones available on that same page. (Didn't I tell you they're awesome?)
--From stores websites: This is the most reliable way to get store coupons. Some have websites where you can download coupons; the most impressive in this respect is Target, but other stores do this as well. Again, KCL has all of these listed. :)
--In the stores themselves: CVS has a red coupon machine that, when you scan your card, will issue you coupons. Walgreens has a new booklet every month filled with store coupons. Rite Aid and Walgreens also put store coupons directly into their weekly circulars. KCL again usually does an excellent job of tracking when these are available for you.

Now that you know how to tell the difference between a store coupon and a manufacturer's coupon, what do you do with them? You 'stack' them together on top of a sale price.

For example, let's say you have a Sally Hansen manufacturer's coupon for $1.00 off any bottle of polish, and a target coupon for $1.00 off any Sally Hansen product. Then, Sally Hansen Insta-Dry goes on sale for $2.50 each this week. Here's what you do:

Sale price: $2.50
Manufacturer's coupon: -$1.00
Target coupon: -$1.00
Final Price: $0.50 for a polish normally priced at $3.99:  87% savings. 

Here's another scenario, from CVS:
Let's say All Revlon polishes are on sale for $2.50. You have printed 4 manufacturer's coupons for $1.00 off each, and have received a CVS coupon from the magic red machine for : $4.00 off of any $10 cosmetics purchase. Here's what you do:

--Pick 4 Moon Candy polishes, normally $8.99 each. Sale price will come to $10 (4X$2.50)
--Use 4 Revlon manufacturer's coupons for -$1.00 X 4 = -$4.00
--Use your CVS coupon for $4.00 off any $10.00 cosmetics purchase = -$4.00 (they use the price of the item before any of your coupons are applied)
Final price: $2.00 for 4 Moon Candy polishes, regularly priced at  $35.96. This is 94% savings, and suddenly your stash just got a lot bigger. 

Seriously, every time I get one of those CVS coupons for $4 off of $10 (or whatever, they vary a bit), I do a dance of joy and look to see what deals I can put together, while singing happy songs. :)

Okay, pat yourself on the back, because you just mastered the hardest part of couponing, and you're ready to go. :)


3) Don't forget to do all of that with clearance items.
The last trick is to use the above strategies with clearance/close-out items at drugstores. These are usually not advertised, and they can be tricky to find. Stores usually mark the individual items, and sometimes put them in clearance sections, but sometimes leave them in with the other items in the main display. Sometimes they forget to mark them at all, but that's okay; Nouveau Cheap does an amazing job of tracking current clearance items at drugstores. Here are two examples of deals I've scored this way.

Milani has/had some awesome scattered holo glitters that I wanted, but wasn't willing to pay full price for (I rarely am). A few months ago, CVS put them on clearance 75% off (I noticed this on Nouveau Cheap's list--these were not marked at my CVS), and I combined this with coupons I had, and got them all for about $1.00 each (Normally $6 at my store).

Target has dedicated clearance sections in different departments in their store, at least the ones by me do. I've found several Sally Hansen Insta-Dry polishes (top-notch for nail stamping) in my Target's clearance section for $1.79...Slap a $1.00 off coupon on top of that, and you're getting a $4-6 polish for $0.79.

One last tip: CVS has a 'Beauty Club' that pays you back $5 for every $50 you spend; that means you're getting 10% back on all of your beauty purchases. And that is based on the price of the item before coupons, and includes clearance items. So if you buy a polish on sale for $2.50 and work your coupon magic to get it for $0.50, you still get a $2.50 credit to your beauty club total. And 10% of $2.50 is $0.25...so actually, rather than having paid $0.50 for that polish, you only paid $0.25. Not too shabby, eh?!

I hope this hasn't been too confusing, I know couponing can be intimidating, but give it a shot, it really is easier than it looks! Start small, monitoring one store for sales and coupons, and then branch out as you feel comfortable. And please let me know if you have any questions or if I haven't been clear. :)

Hugs and coupon abundance,
M.

Tips for building a polish stash on a budget :)

Hello!

Having a nail blog that features swatches and nail art involves buying polish, and a fair amount of it.  Let's face it, if I used the same 10 polishes over and over, you'd probably get bored with my offerings pretty darn quickly no matter how creative I was with my designs. Plus, that wouldn't be any fun at all for me--I love playing with polishes!! However, I am not wealthy, and I can't afford to drop hundreds of dollars on polish each month. So how do I manage to have a fairly large stash without going bankrupt?

I've mentioned in passing a couple of times on the blog that I'm a couponer/bargain hunter, and that I use these skills to help build my stash. I thought maybe a few people might be interested in the details of my tricks, so I figured I'd put together a post outlining my strategies for supporting my polish habit needs without breaking the bank (and while staying cruelty-free).

To start, let me define some terms here. In my personal world (I know others feel differently), there are roughly four pricing tiers that I put polish into, and this is how I will refer to them in this post. This breakdown reflects their retail price, not the price I usually pay for them:

'Cheap': Under $3 (normal price)
'Mid-range': Between $3-$10 approximately (most polishes I own fall here)
'Higher-end': Between $11-$15
'Now-you're-just-being-silly' (NYJBS): Over $15 per bottle

I'm going to take you through how I try to find the best bargain I can.  Because I'm in the US, I do my shopping in the US, in California specifically. So some of these tips might not be specifically applicable for other countries or even other states in the US; but the general principles still apply. For example, I've been told by friends in the UK that coupons are not as common as they are here, but I do know that certain stores do have vouchers that they give out from time to time that can help you save a ton of money on polishes. So if you know of something that's the equivalent to one of my tips in your country, please let us know in the comments! And if you have any other tips that I don't know about, please do tell us those, too! :)

Let's get started...I'll move from the 'Cheap' brands on up.


1) Give cheap brands a chance.
This may seem obvious, but don't turn your back on a brand just because they're 'Cheap'.  While some 'Cheap' brands are definitely of the you-get-what-you-pay-for ilk, there are really good cheap brands out there that are better than they should be for the price. One line the exemplifies this is Sinful Colors; so many of their polishes have excellent formula and amazing colors. One of my favorite polishes ever, of all times, is Sinful Colors Ciao Bella. Pure Ice is another brand that has excellent polishes for the money, although they are a bit more hit-and-miss. The same goes for other brands; just because a brand is inexpensive, doesn't mean it's not good. Give it a shot. If it sucks, you aren't out much anyway. :)

However, even the you-get-what-you-pay-for brands have their place in my collection, and you should think twice before rejecting them. Maybe it's just me, but I haven't had great luck with LA Colors, in terms of wearing them as a base polish (many are too sheer for my tastes); but I love them for other uses. I use them like crazy for nail art, and the ones that are super sheer get put aside for glitter/stamping sandwiches. Why should I use a gorgeous $10-a-bottle polish for the base of a glitter sandwich or for nail art when a $1-a-bottle polish will do just as well?


2) Coupons are your friends, especially at the drugstore/superstore.
Coupons are an amazing way to get incredibly cheap polish. However, I'm going to talk about this in a separate post which I'll put up later today; both because there is a lot to say about this topic (and this post will already be long!), and this is the strategy most likely to apply only to the US (I only know the US rules). [UPDATE: This is now posted, and you can find it by clicking here.]


3) Get on the mailing lists for Sally Beauty Red Tag sales.
This is probably my number one trick for mid-range major-brand polishes, particularly China Glaze, Orly, Finger Paints, and Color Club. If you don't know, periodically Sally Beauty cleans house and puts their already-clearance-priced red tag items on sale for an additional 50% off or more. Usually 1-2 months after a collection hits the store, you can find most if not all of that collection in their red tag bins. I routinely get China Glaze polishes for around $1.50, and have gotten all of my Orly glitter polishes for $2-3 dollars (rather than $8-10). Same for their other brands, and not just their polishes--lots of their treatments go on sale this way, too. The big trick for the red-tag sales is this: try to go the first day, which is usually Friday, because they will often only have one or two of certain polishes from a collection. Go on your lunch break if you have to. This greatly increases your chance of getting pick of the litter and ending up with an incredible haul for next to nothing. :) How do you sign up? You can get to the site by clicking here.


4) Zoya loves to have sales through their website, flash and otherwise. Subscribe to one of their feeds immediately.
With the exception of Pixies I own, I don't think I've ever paid more than $4 for a Zoya polish (normally $8-9). Because I know that they regularly have sales, I keep track of the polishes I like, and wait until I can get them on sale. And if you spend over a certain amount, you often get free shipping, and usually sweet bonus freebies. The more you spend, the better the freebie; so rather than buy 4 bottles of polish on 4 separate occasions, I'll wait, save up, and buy 16 at once during the next sale. I have two full-sized bottles of hand and cuticle scrub I got completely free when shopping Zoya sales...That bears repeating, so let me repeat it: I got freebies, and free shipping, when buying merchandise that was already 50% off. Yes, I assure you, that feels good. And even with small orders, I think I've always at least gotten a travel size of their amazing nail polish remover with every order I've placed. So why would I pay $8 for a bottle of Zoya at a retail outlet, when I can buy directly from the Zoya site during sales and get bonuses for it?


5) Shop around for on-line retailers. 
Sites like Transdesign and Head2ToeBeauty have excellent prices on mid-range polishes. Most of their China Glazes are around $3; Orlys go for around $4. You can find Color Club, Barielle, Misa, Sation, LeChat, and other brands for similar prices. Don't forget to factor in the price of shipping however, because this is where they get you--I find I need to purchase around 10 bottles minimum to make it worth the price of the shipping. So, I wait and save up until I have enough to buy at once to make it worth doing. But believe me, it's waaay cheaper that retail price for these brands.


6) Troll the 'sale' section on sites like Llarowe.
Now that we've talked a bit about major brands, you're probably thinking: "Hey Michelle!What about all of them indies! I want me some indie polishes! Can you help me get them for cheap??!!"

Believe it or not...oh yes, it's very possible. Not easy, but certainly possible. The next few strategies are designed to target indie polishes.

First up, take a look at those sites that carry indie polishes, and see if they have anything equivalent to a sale section. Llarowe's sale page is the first one I hit when I visit their site. I've found beautiful polishes there, some that normally go for $15-$20, on sale for half-price and even less (most are less discounted than this, but there are treasures to be found). It takes me a few minutes a week to take a quick glance through, and while I don't find them every day or even every week, the things I do find are definitely worth the search. My best score was a $17 Glitter Gal duochrome on sale for $5. That's the only thing more awesome than the awesome polish itself. :)

And, one of the great things about Llarowe is that they ship to most of the world. :) So does Harlow & Co., which also has items on sale periodically. :)


7) Speaking of Llarowe: Scratch 'n' Dent. 
Llarowe does this fun thing with Mystery Grab Bags. There are a couple of kinds, but the one I've tried is the Scratch N Dent, so that's the one I can recommend. For $15 dollars you get a mystery bag of polishes that are perfectly fine, but that they can't sell for some reason--maybe a polish broke in the box and got on the other polishes, so the bottle in your mystery bag is perfectly okay, but has a splotch of some other polish on it. In the case of the one I recently got, the polishes couldn't be sold because the manufacturer changed to new labels; as a result, I got three indie polishes, $32 worth of polish, for $15.

I must admit, I've always been a sucker for a mystery grab bag. I love the thrill of wondering what I'm going to get almost as much as actually getting it. Also in my case, there is really only one polish color I don't like, so the risk that I'll get something I truly hate is minimal. Point is, if you're very picky about your polishes, this might not be the best gamble for you. But if you're up for it, it's a fun way to build your collection at a really good price--not easy to do when it comes to indie polishes.


8) Use your Etsy cart wisely.
Pay attention now, 'cause this might be my trickiest trick of all my tricks...Ssshhhh...don't tell anyone...>.>...I put polishes I want but can't afford to get right now into my cart on Etsy, and keep track of them there (don't worry, this doesn't keep other people from buying them or anything, so you're not causing problems). Here's why: when the price of a polish in your stored cart changes, it shows up differently in your list, and tells you that 'the price of this polish has changed'. So, I can quickly scroll down my list of Etsy lemmings and see which of the prices have changed--because this often means that polish has gone on sale.  :)


9) Follow blogs/Facebook sites/Twitter feeds designed to alert you to deals.
There are entire blogs, Facebook pages and groups, etc. set up just to track deals--some focus on drugstores, some on indie polishes, some on anything that comes down the pike. My favorite is Nouveau Cheap, because very little gets by her when it comes to beauty products, particularly drugstore sales.

Your Facebook news feed can work miracles with respect to indie sales especially. When you 'like' a page, you can choose to receive notifications in your news feed from that page (hover over the 'like' button). Usually when you like a page, this turns on automatically--the problem then is having so much stuff in your feed that you miss the important information, like the sales! So clean up your feed if you need to, and lend an eye to that feed.

Also, if you don't have time to monitor these all the time, at least have a look at your favorites around major holidays. This past Memorial Day I found a 50% off sale that nearly made me weep with joy. A few mintues with google before a three-day weekend can make you a very happy polish hoarder collector. :)


10) Ulta Savvy
I've gone back and forth about including this here because it can be hard to get good deals at Ulta; you do have to really work for it. But, they have a wide range of mid-range and higher-end polishes (and even some NYJBS polishes) that can be hard to find deals for elsewhere. I have 4 Butter Londons, three of which were gifts, and one that I bought for myself--and that one I bought at Ulta. I ended up paying $8 for instead of $14--but I had to wait 6 months to get that deal. Ulta has good sales and good coupons--there's pretty much always a coupon available--and they also have a decent reward points program, if you shop there often enough to make it worthwhile. So, if you wait for a sale and use a coupon (but be careful, Ulta is the Queen of 'sorry, we can't combine that when it involves X brand of polish'), you can get some good deals.  But you do have to learn their system and be patient. This is not my favorite tip for this reason, but it is worth mentioning. They also have a clearance section where you can find some pretty great deals, so don't forget to check that when you go. :)


11) My one and only tip for NYJBS polishes other than an occasional score at Ulta...
Look for dupes. Since you're blog savvy, you probably already know this, so it's probably not much of a tip. But still, on the off-chance you hadn't thought of it--plug the polish you love into Google along with the word 'dupe' and save, save, save. If there is a cheaper version out there, chances are some blogger has found it and is trying to help you save money. :)


12) Franken basic polishes instead of buying something you might only want to use once or twice.
Now don't get all scared on me here. Contrary to what you might think, simple frankening isn't that hard at all. I'm not talking about complex glitters and duochromes here (although if you can do that, great! And can you teach me??). Here's an example of what I mean. I recently wanted to wear a glitter topper with a shade of gray that I thought I owned, but didn't own. So, I pulled out the two grays I did, and in an empty mini polish bottle, put some of the dark gray, then mixed in some of the light gray, until I got the shade I wanted. I know I'm not going to wear that shade of gray often--probably just for this glitter topper--so why go out and pay for a new polish? In another case, I took a polish that was more pink that I had thought it was and added in some purple from another polish until I got a shade I liked much better. So rather than letting that polish languish on my shelf unused and unloved, I turned it into something I can use. :)

Maybe you're thinking "What about those of us who don't happen to have extra bottles of polish lying around??!!111"

Excellent point. First, stop throwing away your bottles when you finish off a bottle of basecoat or whatever. Set it aside for future use. But, here's another cheap way to get bottles you can use...


13) Shop clearance sections, particularly after holidays, even for polishes you don't like.
Wait, polishes you don't like?

Yep. This is good for a few tricks. Last halloween I found a few sets of no-name halloween polish sets that were on clearance for $1.00 for 5 half-sized bottles of polish. These were glitters and neons that I wasn't super excited about, they each only had one polish that I actually wanted, but I grabbed them anyway. Why? Bottles and mixing beads. For $2 I got myself 10 bottles that are perfect for frankening (twenty cents each). As I'm ready to use them, I dump out the polish, give them a rinse with acetone, and voila. (If you know of a source for empty polish bottles cheaper than that, please, please let me know). Oh, and, in the meantime, when one of my nail art groups chose 'neons' as a nail art theme--I was oh-so-glad I had bought those no-names, since I don't have many neons in my collection. Double win.

Another thing to think about when in the clearance section is...you might not wear a polish on its own, but it might be the perfect ingredient for frankening with something else you have. Now, I'm not saying BUY ALL DA POLISHEZ on the off chance you might use them for frankening. But, if you have a shade of coral that's just a bit too light, and you've been wanting to try to franken it into a darker, more reddish shade, and there's a red polish on sale for $0.50...well, you might have just found yourself that magic franken ingredient, rather than using a red you paid more for and actually like in its own right. No way is my a-England Perceval being used in some frankening experiment, I can promise you that--but a cheap metallic red from the clearance section might be just the thing.

Finally, if you have a network of polish-loving friends, you can sometimes find things in the clearance section that you know they want. And the only thing better than finding a great bargain on a polish is being able to surprise your friend with a polish because you found a great bargain on it. It's always nice to be thought of. :)


14) Resell or swap polishes you don't like. 
You'll notice that I haven't listed blog sales here as a way to find bargains on polish. They're a great way to find polishes you can't find elsewhere, but I haven't run into many of them that were offering great deals in terms of savings. When I started my journey into polish obsession, I was surprised to find that nail polish is not like cars--it doesn't depreciate the second you take it out of the store. In fact, it doesn't depreciate much at all, especially if you've only done one swatch/manicure from it and decided you hate the way it looks on you. You can probably sell it for close to what you paid for it, or swap it for something equivalent. In fact, that indie you paid $8 for, that is now discontinued? You can probably even get back all the money you paid for it. Thanks to the internet, the world is a small place these days, and there are plenty of people who would love to get their hands on that orange Barielle that gives you lobster-claw hands; even if it's readily available in your country, it probably isn't somewhere else. Blog sales and polish swaps (there are tons of swap groups on Facebook) are viable ways to 'trade-in' your polish, and you can fairly easily recoup most of your outlay to buy new polishes that you actually do like. So don't let those polishes you don't like sit around gathering dust. Sell it and get something you like better. Or swap it with someone and get something better. You may even make some cool friends in the process, and you can't put a price on that. :)

Wow, that was a lot of information! I hope you found something in there that was helpful. :)

Hugs and much luck with bargain hunting!
M.