(Press samples and affiliate links ahead!)
Hello!
I started off The Digit-al Dozen's stamping week yesterday with a super-simple-but-super-chic manicure to show you how easy it can be to get great results with stamping. Today I'm gonna show you some simple, more intermediate ways to add color to your stamping.
Along the way, I'll be featuring UberChic Beauty's Welcome Spring plate, hot off the stamping presses! Here's the video I did reviewing this plate:
And here's a look at the plate:
 |
| UberChic Beauty Welcome Spring |
As always, UberChic's stamping quality is top-notch:
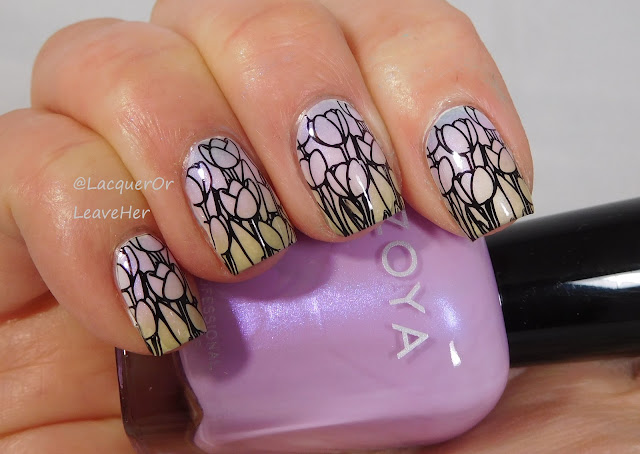
Now on to the manicures! One of the easiest ways to get color into your stamping is to create a gradient, and the stamp over it. For this manicure, I used a gradient of Zoya Darby, Haruko, and Ireland, and then stamped with Messy Mansion Carbon:
 |
| UberChic Beauty Welcome Spring over Zoya Darby, Haruko, and Ireland |
 |
| UberChic Beauty Welcome Spring over Zoya Darby, Haruko, and Ireland |
A second way to incorporate color into your stamping is to stamp it directly using layering images. To do this, you'll need a clear stamper so you can see where you're laying down your different layers of color. If you're a beginner, start with an image like this one below, where it doesn't matter so much if you get the layers precisely placed--practice with those and when you get the hang of it, move on to more difficult images.
For this mani, I started with a base of Zoya Lacey, and stamped my branches with Messy Mansion Pudding, my blossoms with Messy Mansion Chalk and Hydrangea Pink, and dotted the flowers with Hydrangea Pink and Petal:
 |
| UberChic Beauty Welcome Spring over Zoya Lacey |
 |
| UberChic Beauty Welcome Spring over Zoya Lacey |
When you're feeling a little more comfortable with placing those images, you can play around with combining all sort of images and colors. For the mani below, I wanted to get the placement of the negative space oval as similar as possible over all of the nails (you'll notice it was nearly impossible on the pinkie because of the length of my nail!), and make sure the chick was placed in the same position on each nail. I started with a base of Zoya Snow White, and then stamped with Messy Mansion polishes in Amalfi Coast, Spring Green, Happy Now, Banana Bender, and Petal
I love how each of these manis came out, for such different reasons! I love how well the gradient came out on the first, pastel and spring but still vibrant; I love the lacy feel of the cherry blossoms, and the pop-art chick-lets just make me smile. :)
You can find this plate on sale now in UberChic Beauty's store, and you can follow them around the interwebs here:
Facebook: https://www.facebook.com/uberchicbeauty/
Instagram: https://www.instagram.com/uberchicbeauty/
I'll be back tomorrow with more stamping, and in the meantime, check out what the other Digit-al Dozen ladies did, linked below. :)
Big hugs,
M. xoxo
Follow me!


These all look great! I really like the gradient with the floral stamping. You picked the perfect colors.
ReplyDeleteThank you so much. I was really happy with how that gradient turned out. :)
DeleteAll of your stamping looks are great. I love the gradient one. I always try to do gradients but they end up looking terrible. I'll have to keep trying because it can look so pretty under stamping.
ReplyDeleteYes, keep trying! What method do you use? I use a make-up sponge, but you can also stamp them if the sponge version doesn't work for you. Also, I've found I tend to pick colors that are too similar, and have to remind myself not to...
DeleteI just got this plate and actually used it in tomorrows mani. I love it.
ReplyDeleteIsn't it awesome! So many ideas poured out the instant I saw it. :)
Deletethese are all so cute! i especially love the cherry blossoms!
ReplyDeleteThank you! Cherry blossoms are just the epitome of spring to me. :)
DeleteI just love the little chickies!! 🐥🐥
ReplyDeleteThank you!! <3
DeleteAll of these looks are fantastic, but I am SO in love with that chick look! The colors are so bold and I love how it contrasts against the white base. Great work!!
ReplyDeleteThank you! I agree, I love how the colors turned out, I think it's so bright and happy and just fun!
DeleteCherry blossoms are perfect. That mani is amazing.
ReplyDeleteThank you so much!
DeleteI love all manicures but especially the cherry blossoms, they're so romantic!
ReplyDeleteThank you so much! I was going for something soft and pretty with that one. :)
DeleteAhh, spring is (almost) here.
ReplyDeleteThese are all sooo great; yes, the chicks bring a smile to a face, but I really love the gradient one.
P.S.: this theme is heaven for you, huh :)
Hang in there, it's coming, you can make it...;-) Thank you, and yes, stamping week is great for me! Except it's almost overwhelming because there's so many different directions to take it, lol!
DeleteYour gradient for the first look is perfection!
ReplyDeleteThank you so much!
DeleteYou created some lovely manis with this plate. I'm curious if that one creature in the middles area is a platypus?
ReplyDeleteThat's what I thought, too!!! Go, platypus!!!
DeleteThe gradient....the floral branch, those adorable chicks - loving all of these!
ReplyDeleteThank you so much!!
DeleteI feel ya. My pennies seem to be far more sparse than they used to be, lolol...
ReplyDeleteThat tulip stamping is so beautiful.
ReplyDelete