Well...it's that time of week again. Monday. Time to try to get past those Monday Blues...and here's my contribution to that cause, something you can grab a peek at during your morning break (of course you'd never be looking at nail blogs when you're on the clock...ahem.). ;-)
Today we're gonna take a look at the subtly radiant InDecisive Nail Lacquer Denim, a navy blue scattered holo that looks like the prettiest jeans you'd ever want to own:
InDecisive Nail Lacquer Denim, outside light
InDecisive Nail Lacquer Denim, outside light
InDecisive Nail Lacquer Denim, outside light
InDecisive Nail Lacquer Denim, artificial light
InDecisive Nail Lacquer Denim, artificial light
Ah...there's nothing like a beautiful holo...And this one is nearly a one-coater, you'll certainly get full opacity in two. :)
For my decoration, well...you know those jeans that have the cool bling on the tush or down one leg? Pretty rhinestones or appliques or studwork? I have a deep love of that look, and I wanted to put together a manicure that would match.
I drew stitches with my white Mash nail art pen, and then I stamped on the accent nail using Konad White polish, and Bunny Nails plate BuNa-A. Then I added decorative touches with some studs and dots of Barry M Silver Foil:
Every pair of jeans and every manicure deserves a little bling. :)
On my right hand, I decided to go for an acid-wash look. So before I did my stamping, I added a coat of InDecisive Nail Lacquer White Speckled:
InDecisive Nail Lacquer White Speckled over Denim
InDecisive Nail Lacquer White Speckled over Denim
And then I decorated again as I had the other hand:
Retro acid wash 80s FTW!
Retro acid wash 80s FTW!
So which look do you like better, the regular or the 'acid-wash'? Either way the holo is gorgeous and that's what's most important. :)
Hugs to you, and I hope your Monday's done before you know it!
M.
I mentioned briefly before that this month marks two years that I've been blogging about nail polish and nail art, and of course I have to mark that occasion with a giveaway to thank you for supporting me for these past two years! In fact, I will be having two giveaways, one *US only*, and one *Outside of the US* only.
I have met a lot of wonderful people on this journey, and Aleksandra of InDecisive Nail Lacquer is one of the wonderfullest for many reasons, and right in line with that wonderfulness, she has offered to sponsor the giveaway!
Here are two swatches of the polishes you will be winning:
InDecisive Nail Lacquer Bloodstone
InDecisie Nail Lacquer Snowstorm
And here are the deets:
1) This is open to people in the US only, due to the mail weirdness that surrounds shipping nail polish internationally. If you aren't a US resident, don't worry--I'll be back with a separate giveaway for you which is for people living outside of the US only. :)
2) The giveaway ends on 30 April 2014.
3) We'll notify the winner, who has 48 hours to reply. If the winner doesn't reply in 48 hours, another winner will be selected.
Here's the widget, so you can get your contest groove on:
I'm back with a second plate from MoYou London's Greek Mythology collection, plate 02. This is another of the collage-style plates that I adore, so I'm going to show it to you and walk you through some of the ways you can use it.
To start things off with a bang, here is my video of the plate:
And then we move on to the still shots of the plate:
MoYou London Greek Mythology Collection 02
MoYou London Greek Mythology Collection 02 Left Side
MoYou London Greek Mythology Collection 02 Right Side
And, of course, the size comparison with a standard Konad plate:
And now, on the the fun part! Here are my ideas on how to use this particular plate:
1) Full-nail images. This plate has plenty of areas that you can use for full-nail images, in a variety of styles:
There's Italianate flowered patterns. Swirling orchids. Diamond mosaics. Retro geometric shapes (above the lion's face in the picture). French flourishes. Mazes. Surreal swirls. You can get at least 10 very different manis just from those patterns alone. :)
2) Individual images. This plate is based on the labor of Hercules, so there are a number of animals, some in coin-like circles, on the plate. These can be used with the circles, to look like coins, or you can pull just part of them from the center of the circles to do a manicure with the snakes (you could even separate the snakes and use different ones on different nails), the horse, the crane, the bull heads, etc.:
You can do this with stamping techniques, or you can use...
3) Nail decals! This is a great plate to use for making nail decals. The diamond pattern mosaic-like area would be great for this; so would the curved patterns at the far left of the plate. This would be great for making the 'coins' in a different color than the base polish on your nails.
4) Patchwork and/or transitioning nails. I've combined these here because there are a couple of manicures you can do here that combine both. Normally I define a patchwork manicure as a manicure that has two patterns on the same nail divided by one or more lines, and a transitioning manicure is one where the pattern turns from one pattern into another. There are a number of very interesting possibilities for these with this plate; the first picture pulls out the patchwork areas, and the second shows some transition possibilities, and ways to combine patchwork and transitioning patterns:
Straight patchwork or transition possibilities
Areas where you can easily combine patchwork and transition manis
So, let me explain. Look at the labyrinth portion of the plate, lower left. You could do a combination transition + patchwork manicure with this by putting the maze pattern completely on one or two nails, the area where the maze is bordered with the rectangular pattern (to the left of the maze) on the next nail, and then just the rectangular pattern on your last nail (your pinky might be best for that, since it's a smaller area); this would result in a manicure that transitions from one pattern into another, via a patchwork nail. You could do something similar with the area I have circled just above that, where the patteren goes from maze to floret to square-snowflake pattern, each separated by a diagonal line.
Or, you can just do standard patchwork manicures, and there are a few areas that are perfect for manicures that gently transition from one pattern to another (like the flower-to-flourish area in the lower right). And don't forget that you can put that cool lion face over 2 or more nails!
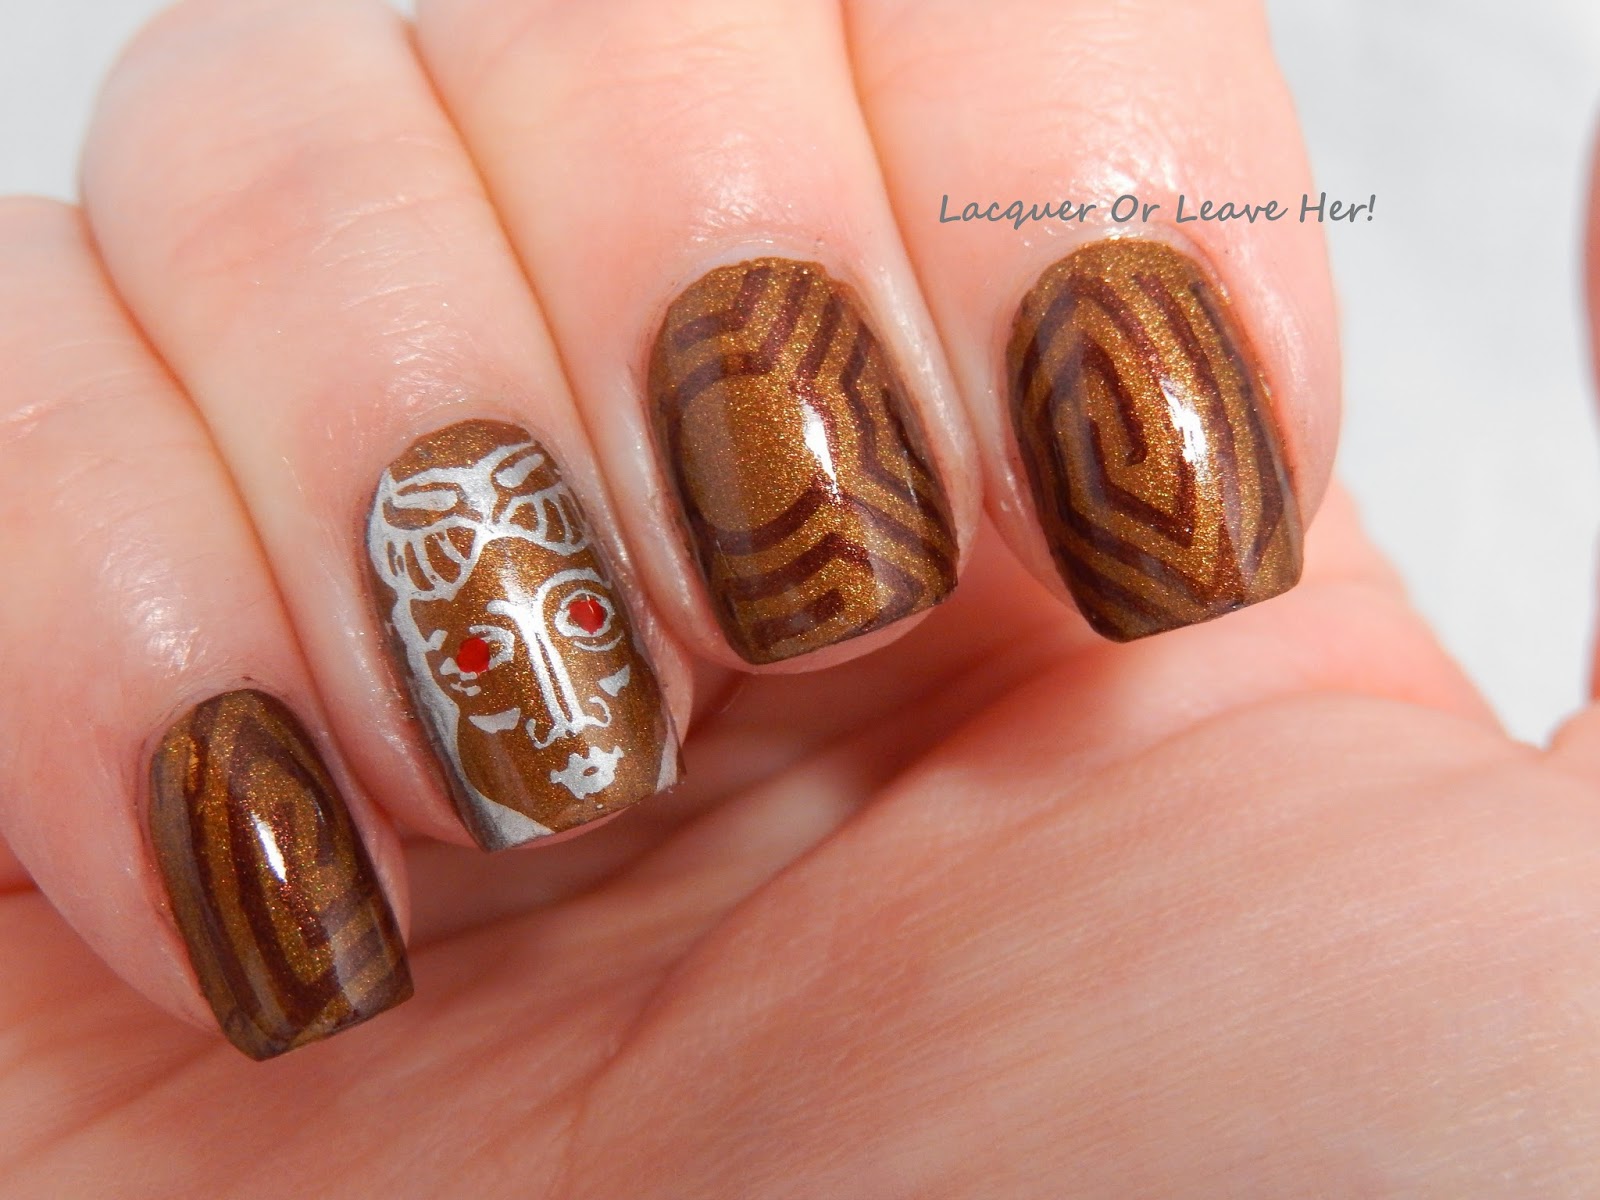
5) Build-a-scene manicures. This plate doesn't have as many options here as some other plates do, but there are still some very fun possibilities, and my demonstration manicure shows one. In my Nail Challenge Collaborative group, this month's theme is manicures based on music/movies/tv. Well, I love the movie Labyrinth,so I decided to do a manicure in honor of it, even if it doesn't so much fit the contents of the movie exactly, lol...
I started with a warm, glowing brown-gold matte, Mentality Hope:
Then I stamped the labyrinth pattern over three nails using Sally Hansen Coco A-Go-Go; next I stamped the minotaur face with Barry M Silver Foil, and finally I dotted his eye with some fierce Konad red:
I love mazes of all sorts, so I really love the being able to have a fun maze manicure when I want it. I wish I'd had this back when I went to the corn maze every fall, but they don't do it in our area anymore (sadface).
I hope this has inspired you to play, play, play! And if you like the Greek Mythology theme, don't forget that they have two plates in theirExplorer collectionthat have single images in the Greek theme.
First, thanks to everyone for your support about my stolen videos. I appreciate it more than I can say!
Second, I wanted to let you know that YouTube is awesome. I was alerted to the stolen videos on Friday night, after business hours. I filled out the copyright infringement forms late into the night/early morning--not because the process is difficult to go through (it isn't), but because I was reporting 40ish videos.
By 9:40 on Monday morning, the videos had been removed and the channel had been shut down.
Assuming normal business hours, that means the turn around time was a little under two hours from the time they received my reports to the time action was completed. I find that to be pretty darned impressive, and it helps me feel so much better about using YouTube to post and store my videos.
THANK YOU YOUTUBE!!!! :)
I'll be back in a bit with my next review (with video.) :)
Oh yes, oh yes, oh yes, I'm back with one of my favorite MoYou London plates yet. Today I will be showing you plate 01, from the new Greek Mythology Collection that recently released. There are 9 plates in the collection, and I think it's only a matter of time before I own them all, because they all get my creative juices flowing! But I'm getting ahead of myself. First, here's the video, where I show the images and discuss some ideas for using the plate:
Next up, here are the still images of the plate:
MoYou London Greek Mythology Collection 01
MoYou London Greek Mythology Collection 01: Right Side
MoYou London Greek Mythology Collection 01: Left side
And, of course, the de rigeur comparison with a standard Konad plate, so you can get a feel for how big the different images are on the plates:
MoYou London Greek Mythology Collection 01 vs. standard Konad plate
MoYou London Greek Mythology Collection 01 vs. standard Konad plate
MoYou London also sent me one of their stamper/scraper sets to try out; they have several to choose from, and the one they sent me is a cute pink one:
I used the stamper to test out the plate and do the manicure you'll see below. You might remember me mentioning before that I normally use the typical Konad stamper/scraper set, with the metal scraper; I've been using it for a long time and am used to it (you know how that is, lol), so I was interested to see how this performed in comparison.
You might also remember me mentioning that plastic scrapers can sometimes be easier to use on these collage-style plates, because the plastic doesn't catch so much on all of the surrounding engraving the way the metal scrapers do. That was definitely true here; I found this plastic scraper very effective for use with the plate; it did the job without catching on the engraving at all.
The stamper is made with a glossier plastic than the one I normally use, and I found that this had two consequences. First, this stamper made isolating part of the plate easier, because the polish doesn't dry so quickly on the surface; this gives you a little extra time to scrape off the parts of the image that you don't want to transfer over to your nail. Since so many of the interesting things you can do with these plates involve that technique, I think this it's worth the investment to grab one of these (it's currently priced at 3.99 GBP on the MoYou London website). The second consequence is that because the polish takes longer to dry on the surface, it's easier to smudge the image when you transfer on your nail--so use a light hand when you first try it out. Otherwise, I didn't find it any more difficult to use than the one I'm used to, and I will be using this one from now on when I want to isolate part of a plate or image. :)
On to the 'How-To' portion of the post! So, what can you do with this plate?
1) Full-nail designs. This plate has several areas that can easily be used for full-nail images, and a few more than can be used if you have smaller nails and/or you're careful. For example, the leafy area might not cover your nails completely if you have wider nails, but you could very easily have the design come over three-quarters of your nail, leaving a little blank space on one edge.
Areas that can be used for full-nail designs
2) Beautiful face manicures. The theme of this plate is the nine muses of Greek mythology, which are traditionally pictured as women. The faces on this plate called to me immediately, and I had to have them. Take a closer look at the faces you have to choose from; I've circled them, but notice you can pull the faces with the elements around them as well:
Lots of lovely faces!
An added benefit for me is that two of these faces remind me of Wonder Woman, and with the stars and columns in the middle, I will definitely be making myself a Wonder Woman manicure with this. :)
4) Instrument/musician manicures. There are enough musical instruments in this plate to make an elegant manicure using parts of them, along with the musical notes on the side. I love that these aren't the typical instruments that you normally get on other plates, and they have a more classical feel to them:
Get your tunes on, baby!
3) Think-outside-of-the-box-icures. Every time I review one of these collage plates, I remind you to think outside of the box. One way I want to encourage you to do this is to look for less-obvious areas that you can use as full nail images, or cool background images that you use under other images. Here are a few areas I think are really visually interesting. Notice how if you just look at the areas in the circles, they look really different out of the larger context; toga robes and hair look like cool deco swirls or marbling:
Nobody keeps baby in a box
If you're having a hard time picturing what an area would look like just by itself, you can cut out a hole in a piece of paper and pass it over the plate to see what shows through (like the Chit Chat Nails technique), or just use your stamper to pick up areas you think look interesting, and see how it comes out on your stamper, or stamped on a piece of paper. :)
4) Isolate those cool images! There are a fun group of images that can be used completely alone or in a melange-collage manicure. What do I mean by that melange-collage thing? Do you remember when you were in school and you'd cut cool things out of magazines and paste them together to make pretty collages? You can do that with your manicures, too. Pick a few images you like, stamp them randomly on your nails in the same or different colors. Do this over a full-nail image, a saran-wrap textured background, a 'splodge' manicure (Crumpet FTW!), or just over your base polish. Take a look at some of the images you have to choose from here:
You could take the globe and just use it by itself as an accent nail. Or, you could take the coins, pick a couple of different sizes, and stamp them randomly over a glitter background. You could also use all the words and Greek letters on the plate randomly over your base polish in a neutral color, and then stamp another image over them on your accent nails. The possibilities are endless.
5) Build a scene. Take a couple of elements that you think complement each other, and use them together to build a scene across your nails. This is the technique that I used for the manicure below. My favorite part of this plate is the writing muse (the one with the scroll, whose face blends into that beautiful flower-medallion design), and I wanted to do something that focused on her face, and built a design around it.
I started with Shirley Ann Nail Lacquers Midnight Masquerade, an ethereal bluish-lavender that has a very subtle blue-purple shift and leans more purple in some lights, and more blue in some lights:
Shirley Ann Nail Lacquers Midnight Masquerade
Shirley Ann Nail Lacquers Midnight Masquerade
Shirley Ann Nail Lacquers Midnight Masquerade
Then I stamped over it using Sally Hansen Co-bolt Blue and Grape Going. I accented with a dotting tool and Sally Hansen Freeze!, Pronto Purple, Coco A-Go-Go, and Milani HD:
I love the way this sort of manicure looks when the nails are not all lined up as much as when they are, so I had to include a picture of that; each nail is different and pretty in its own right:
So there you have it, my ideas for how to use this gorgeous plate. As always, I'm sure you can come up with a million more, but I hope this gives you a little jump-start!
I'm back with two very sweet sets of nail appliques from Incoco's Garden Daydreams Spring 2014 collection. The collection features pastels and watercolors and subtle florals; it's feminine but not sickly sweet the way some floral collections go. I wore each of these for a few days, and then added some nail art when I was ready for a change (so you'll see a little tip-wear on the nail art photos).
Here is the lovely Tea Party, a very soft pink background with a spray of pink and peach roses, amid faint polka dots:
Incoco Tea Party
Incoco Tea Party
Incoco Tea Party
These applied with Incoco's characteristic ease. One of the things I liked about these sets was the flexibility to choose the look I wanted for each nail, and how each nail related to one another; for my index, ring, and middle finger, I have several wraps to choose from, and each one is double-ended; this let me have one nail with no flowers, and to place the flower sprays in what I found to be a pleasing array; if each nail wrap had been the same, I wouldn't have been able to do that. Also, another benefit of this particular set is the multiple colors within the flowers, something that's hard for me to do with stamping, and time-consuming with freehand.
Possibly my favorite set from the collection is Garden Path, an off-white background with a very light green-gray textured effect, topped off with a selection of pink, yellow, and blue flowers:
Incoco Garden Path
Incoco Garden Path
Incoco Garden Path
Incoco Garden Path
These speak directly to my heart because they have a very impressionist feel, like little Monets on my nails. And, if you like the look of those little dried flowers that people do nail art with, but you don't want the hassle of messing with them, these give the same effect. :)
For my nail art, I wanted to add a little bit of extra without detracting from the original design; with Tea Party, I added a little distressed mesh look to the pattern with Sally Hansen Mint Sprint, using Pueen 54 (this is from their new collage-style set, and I'll be reviewing it soon):
For garden path, I was so inspired by Monet that the only logical thing in my mind was to throw up a little Japanese bridge running through the flowers...you'll notice that on three of the four nails I put the sprays near my cuticle, because I knew I wanted to do this when the time came. I freehanded this with acrylic paints:
Because I'm happy
Clap along if you feel like happiness is the truth
Because I'm happy
Clap along if you know what happiness means to you
These appliques are playing a bigger and bigger part in my personal nail-art repertoire, in their own right, and as a spring board for my own nail art. :)
I'm sorry not to have any nail art or swatches for you in this post; I'll be back tomorrow with that.
My post today is to let you all know that my nail videos have been stolen on YouTube; someone has posted them on a different channel as their own. They took all of the videos I'd posted as of a month ago, even one that was a building demolition, with nothing to do with nails or beauty! I have reported the user and filed the copyright infringement claims, all of that, with the help of my blogging friends. I'm not sure how long it will take for YouTube to take action, hopefully very soon.
If you are a beauty blogger who makes videos, plug in a few of your video titles into the search engine on YouTube. The person who stole my videos has a ton of other videos on his/her channel, too, and something makes me doubt they are legitimate... Either way, as I learned the hard way tonight, it's not a bad idea to do a spot-check like that now and then, regardless.
My videos will only ever be posted on the Lacquer Or Leave Her!YouTube channel, and the only other identifier you will see on them is 'Mishka824m'; that was my channel name before I changed it to Lacquer Or Leave Her!, and some of my earliest videos have that on the introduction. If you ever see one of my videos on somebody else's channel, please let me know as soon as possible.
I want to send a HUGE THANK YOU to the viewer who noticed this and alerted me to what was happening. Not only did your help allow me to deal with the situation, but it also keeps up my faith that most people are good!
I have so much going through my head right now, as you can probably imagine. I've had pictures stolen before, and while that wasn't fun, there is just something about having an entire channel of videos stolen, all with my voice and my content, that has been very disturbing; I feel deeply violated by it. I could go on and on about how it's not cool to steal people's stuff, but we all know that, even the person who did it. And I could talk about how much time, energy, and money goes into those videos, but we all know that, too--especially the person who did it, otherwise they would have made their own videos rather than steal someone else's.
So what I will say instead is this. Thank you ALL for supporting my blog, and me, the way you have over these last two years. YOU are why I do this, and why I enjoy doing this. Because, yep, that's right, this month is my two-year blog-a-versary! And I refuse to let something like this detract from what a wonderful experience it has been writing this blog, making my videos, and sharing my nail art with you all. I have made so many friends, and had so much fun, and that's all because of YOU.
I hope you have a wonderful weekend! I'll be back tomorrow with some nail wraps, and I'll have my next MoYou London video for you on Sunday.
.JPG)
.JPG)

.JPG)
.JPG)
.JPG)
.JPG)
.JPG)
.JPG)
.JPG)

.JPG)
.JPG)

.JPG)
.JPG)
.JPG)
.JPG)
.JPG)
.JPG)
+full+nail.jpg)
+labors.jpg)
+patchwork-transition.jpg)
+transitional+manicure.jpg)
.JPG)
.JPG)

.JPG)
.JPG)
.JPG)
.JPG)
.JPG)
.JPG)


+faces.jpg)
+instruments.jpg)
+think+outside+the+pattern.jpg)
+cool+elements.jpg)
.JPG)
.JPG)
.JPG)
.JPG)
.JPG)
.JPG)
.JPG)
.JPG)
.JPG)

.JPG)
.JPG)
.JPG)

.JPG)

.JPG)
.JPG)
.JPG)
.JPG)