Showing posts with label MSMD. Show all posts

Monday, December 17, 2012

MSMD Before & After: Christmas lights

Hello!

A lot of people are doing manicure based on strings of Christmas lights, and I thought I'd do my own...the particular version that inspired me is this one by Demi's nails, as featured on The Crumpet.

I started with a base of Color Club's Kiss Me Mistletoe, which is not only a cool retro shade of green, but is also subtly evergreen scented:


Color Club Kiss Me Mistletoe

Next I stamped a base of Christmas lights to use as a guide, and then free-handed the lights over it:


Why are my pictures loading upside down? Does anyone know?

Christmas lights that aren't sad or tragic at all...>.>

I used Sally Hansen Jumpin' Jade to draw the wire and the base of the lights. I used Pure Ice Siren,  Barry M Gold Foil (you can barely see those) and Sally Hansen Cobalt Blue to draw the lights.

Compared to where I was with my freehand skills when I started blogging, this isn't bad at all. But it's still nothing to write home about...sigh...Ah well, it's festive and that's what matters!

Thanks for looking,

Xoxox,
M.

Monday, September 17, 2012

MSMD Monday: Skittle Nail Art

Hello!

I'm excited about today's MSMD because it's something I've wanted to try for a while, skittle nail art. One of the queens of this technique is Sammy of The Nailasaurus, in my opinion, so I'm using one of hers for my basic inspiration. You can see it by clicking here.

I've been having a yen to pair a moss green with a pretty purple in a manicure, and this seemed to be the perfect opportunity, so here's what I did:

Skittle mani!


Skittle mani in the shade


Skittle mani--direct sun

So here's what I did. All fingers have Revlon Muse as the base color:

Index finger: One thick coat of Different Demension That's so Fetch (Indie Alert!)

Middle finger: gradient done with Zoya Tru, topped with Ulta Purple Xing

Ring Finger: Stamped with Zoya True using LeaLac plate LLC-A (I will review this plate shortly), centers dotted with Ulta Purple Xing

Pinkie finger: purple gleequins, with one coat of gelous on top, and a coat of Seche Vite

I really love the way this came out! This type of manicure is so fun, with something different going on with each nail, but it still looks clean and pulled together. I also really love how That's So Fetch looks over Muse--the color combination is amazing. :)

I hope you saw something here you like! Please check out all of the other MSMD manicures, linked below. :)

M.

Monday, September 10, 2012

MSMD Monday: Saran-wrap interference FAIL

Hello!!

Today's Monkey-See-Monkey-Do manicure is my attempt to recreate this manicure on Imperfectly Painted, which I fell in love with. I just become a part of the great world of toppers, and was excited by this cool way to use them that went beyond just painting one color over black.

I recently got two Glitter Gal transition toppers in my birthday haul, Transitions Soft Red and Transitions Soft Green, so I thought I'd start out with them, over a blackish polish by Ulta.

Bad idea.

Basically, when I was done, they just looked like semi-tinted whiteness on the black nail. So, I tried to fix it by adding some CND on top of it (CND Crimson Sparkle and CND Jade Sparkle), and here's how it came out:


Not bad, but nowhere near as pretty as the original. Still, I can see these being a cool base for galaxy nails, or something like that.

However, I had in my head a vision, and it hadn't come out the way I wanted it to, and I was not happy. I wanted more pretty, more bling, and I was darn well going to get it. I tried putting more of the topper on. That just made it look muddier. I didn't know how to pull out of the tail-spin until--flakies to the rescue!:


 I added on a coat of the flakie half of Revlon's Orbit. It did give a little bit of an extra oomph, but I'm still not sure I can call this a success. Next time I do it, maybe I'll just follow the darned directions and try it directly with the CND first!

Thanks for looking, and please check out the other MSMD Monday manicures by my fellow bloggers, linked below. :)

M.

Monday, August 6, 2012

NOTD Before & After: MSMD Monday featuring Misa Fountain Of Youth and Barielle Positive ZEN-ergy

Hello!!

Today my Monkey-See-Monkey-do Monday is the third in a chain of inspiration. I was inspired by this manicure by Polish Crazed (which you can see by clicking here), which was itself inspired by a manicure by NailXchange (which you can see by clicking here). I have a ton of thin nail tape, so I decided to go that route. I also had two light green untrieds that I've been dying to bust out, so I changed up the color a bit, too. :)

For my base color, I started with Misa's Fountain of Youth. This is a very, very light celery green polish (it almost looks white) with a matte frost finish:

Misa Fountain Of Youth, indirect light

Misa Fountain of Youth direct sun
 Once this was dry (or so I thought), I put strips or nail tape at random angles on my nails. Then, I sponged over the top of these with Barielle's Positive ZEN-ergy, an avocado green polish with a ton of shimmery micro-glitter in it:

Add caption


I like how this came out, although next time I'd stop the sponging up higher to show more of the base color. I also love these two colors together! Fountain Of Youth is not normally a polish I would wear too often, because it's so light and such a pastel shade; I bought it mostly for nail art purposes. Now that I see it on, I like it more than I thought I would; it's an edgy sort of pastel. And paired with another polish like it is here, it's beautiful.

One tip that I learned along the way with this technique. Either make sure your base polish is completely dry before you put the nail tape on, or de-sticky the tape a bit (by, for example, putting it on and off your skin a few times first). Otherwise, the tape will pull up the polish underneath it. This happened to me and I had to fill in the holes with a very tiny nail art brush. :)

Thanks for taking a look! Please check out the other ladies that participate in MSMD Monday, linked below via thumbnails. :)

M.

Monday, July 30, 2012

MSMD NOTD Before & After: Shadow Houndstooth

Hello!!!

A while back, I saw a double-stamped houndstooth manicure that I love, done by A Girl And Her Polish; the houndstooth pattern is stamped twice, so it looks kind of like it has a shadow. I thought it was so pretty, and had to try it out for my Monkey-See-Monkey-Do Monday manicure...you can see the original post by clicking here.

I started with a base of China Glaze's Tree Hugger, which I wore for a day:

China Glaze Tree Hugger in the sun


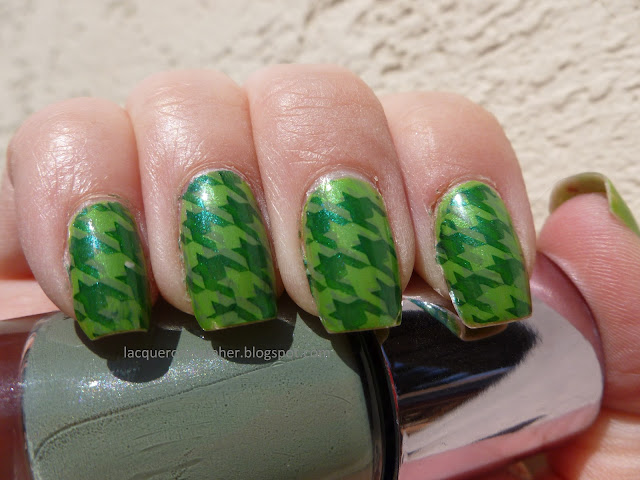
Then, to make the shadowed houndstooth design, I stamped over it first using Ulta Army Of One, and then again using China Glaze Holly Day. I used the pattern on plate Bundle Monster plate BM322. Here is how it came out:


As you can see, some nails came out better than others. I think I got the best effect on the middle finger and the pinkie finger...it's harder than it looks to line these up! If you try to do this look, leave yourself time to makes some mistakes and re-do your nails. I tried the layer-of-topcoat-below-the-stamping trick, and I still had to completely redo a few nails.

All in all, I like this look. Houndstooth is nice on its own, but I really love the depth this double-stamping brings to it. I'll certainly try this again, especially with different color palates--how cool would this look with black, white and red??

Thanks for looking, and please check out the other MSMD manicures, linked below. :)

M.


Debbie at The Crumpet - http://thecrumpet.blogspot.co.uk
Missy @ Gnarly Gnails - http://gnarlygnails.blogspot.com
Nayade at Toxic Vanity - http://www.toxicvanity.com
Alyssa at Fancy Phalanges - http://fancyphalanges.blogspot.com/
Misha @ Enigmatic Rambles: www.enigmatic-rambles.blogspot.com
Carrie @ LeSamowen:Life, Love, and Nail Polish: http://lesamowen.blogspot.com/
Basia (or Bazzia) @ polish my mind: http://polishmymind.blogspot.com/
Isabel - Little Fairy: http://isaspinods.blogspot.com/
Stella - My Wet Nails: http://mywetnails.blogspot.com
Michelle-Lacquer Or Leave Her!: http://lacquerorleaveher.blogspot.com
Angi @ Angelina´s Nails & More www.angelinaswelt.blogspot.de/
Kia @ Lacquered Libra  http://lacqueredlibra.blogspot.com/

Monday, July 16, 2012

NOTD: MSMD Monday (Or, Bet you didn't know you could braid your nails!)

Hello!!!

My Monkey-See-Monkey-Do Monday Manicure this week was inspired by a lovely lady in one of my stamping groups, who did a 'fishtail' or 'braid' manicure on her nails for our Pink + Purple challenge. I saw it and I fell in love with it! Her name is Ashley, and here is her original manicure:


I was really excited by this, and couldn't wait to try my own. As you've heard me say a million times, I'm not a pink sort of girl, so I tried it with shades of brown and green instead. Here is how mine turned out:

Braided Nails

Close up!


And my favorite view :)

To make this manicure, I chose three polishes, China Glaze Con-Fused, You Move Me, and Cling On. I followed this tutorial, that Ashley provided for me from rejoicenailart.blogspot.com (please take a moment to check out that blog if you find this useful):


These directions worked perfectly. There are a couple of things I learned along the way that might help you, that I'll add...first of all, this takes a while, so be prepared for that; don't try to dash it off in 15 minutes while dinner finishes cooking. Second, and this might be obvious...choose colors that cover in one coat if you can. My golden brown above did not cover in one coat, so I had to apply a second before moving on with the next color, which added to the total time. And finally, I would try to choose polishes that are either the same brand, or have the same size brush; this will make it easier to get even strokes on the braid. :)

I love this look, and can't wait to do it again, particularly just as an accent nail, or as French tips.

Oh, one last thing. If you're up on your China Glaze polishes, you might have noticed that the ones I chose are all magnetic polishes. This was not a coincidence; I wanted to try a magnetic design over the braid on my accent nails, and I did just that on my left hand. It was NOT cute. I usually show even my fails on the blog, but it also didn't photograph well. I'm sure one of you talented artists out there could make it work, but for me it was a FAIL. :)

Hope you enjoyed this, and thanks for reading!

M.

Monday, June 18, 2012

NOTD: MSMD Gilded Mermaid nails

Hello!

I've recently seen several versions of 'Mermaid Nails' that I adore, and wanted to try my own version of them. You can see two of my favorites by clicking here and by clicking here.

I wanted a blue-green base that had texture, so I started with two coats of Orly's Halley's Comet:

Orly's Halley's Comet (well, mostly...the ring finger is actually Essence's Choose Me)

On top of that base, I put a generous layer of Spoiled's Pet My Peacock glitter, trying to get both a random spray of glitter, but making sure there weren't any super obvious holes. Then, I covered all of that with a layer of LA Color's Radiation, a sheer greenish blue, with gave an opalescent look to the glitter and tone down its sparkle just a little bit. I decided that I wanted my version to be a 'Gilded Mermaid', so I stamped my 'scales' with China Glaze's Passion (by far the best gold polish I've found for stamping by the way), using Mash Plate 46. To give a final subtle sparkle of a different kind, I went over all of it with China Glaze's Golden Enchantment.

Then...Ah, then.


Then I decided to put on gold French tips...This was not my finest decision-making moment:

Gilded Mermaid nails...that are maybe a little too gilded.

I don't often do this, but the tips bugged me so much, I removed the whole thing and started over. Here is the look without the tips:

Mermaid nails in the light

Mermaid nails in the shade

And I think I do like that much better. The gold tips just make it a little too...I don't know what the right word is, but just a little too.

Strangely enough, when I was trying to decide if I would still like the gold stamping without the gold tips, of if I should go with another color to stamp the scales, I took this picture, which shows the layers, textures, and colors really well, I think:

Some texture for ya!
At the end of it all, I'm pretty darn proud of them, especially because I've never done a glitter sandwich before. Next time, however, I think I might go for the smaller, typical scale lines, rather than these thicker ones. But I loved the deco sort of look to these!

Thanks for taking a look. And don't forget to check out the other ladies that participated in MSMD Monday, shown below.  :)

M.

Monday, June 11, 2012

NOTD: MSMD Duochrome gradient!

Hello!

For my MSMD manicure this week, I was inspired by a nail artist whose work I adore, Laurie of Dressed Up Digits. I have drooled over her manicures for some time now, particularly her gradients...but one of my very most favoritests of them all is this duochrome gradient. Wait, ME interested in something to do with duochromes?! I know it's hard to believe, but it's true. :P It was really only a matter of when I got brave enough to try it myself, not if.

The other day, Nubar's Wildlife came in the mail. I've been wanting it for several months, and I finally got it...and it was worth the wait. I put it on and stared lovingly at it...and then realized it reminded me of something. Not a dupe, but something in the same family. And before long it came to me: OPI's Just Spotted The Lizard.

Here is Just Spotted The Lizard:

OPI Just Spotted The Lizard


And here is Nubar Wildlife:


Nubar Wildlife

As you can see, JSTL is lighter, with less green and less brown. It has much more gold than Wildlife does. They are similar, but different enough that I began to dream of what a gradient with the two of them would look like. So I did it, and here it is, with Wildlife at the tips and JSTL at the base of the nails:


Gradient of Nubar Wildlife and OPI Just Spotted The Lizard in the sunlight

And in the shade...how pretty is that!

Shot 1 of 3 that attempt to show the shift in sequence

2 of 3...

...and 3 of 3.

I think I could have made the line between the two a little more blended, but I do love how this came out, and found myself staring at it throughout the day. My favorite moment was when I was petting one of my kitties, and looked down to see this:


The gradient atop my Sephy's gorgeous fur :)


Of course I had to stop petting her to take a picture of it, which I assure you annoyed her NO END.

And also of course, after wearing it for a day, I had to stamp on it. I wanted to reverse the light/dark effect by stamping a lighter polish at the tips (Sally Hansen Insta-Dry's Silver Sweep), and a darker one at the base (China Glaze Awaken). I used Shany plate 18:


This one's a little bit blurry because when I replicated the backdrop the next day, she wasn't falling for it a second time. Luckily, I have fast fingers. :)

I was really pleased with how this came out and can't wait to try this with some other duochrome gradients. My thanks to Laurie for giving me the confidence that it could be done!

Thanks for looking, and please take a moment to check out the other bloggers who participated in today's Monkey-See-Monkey-Do, shown below. :)

M.


Debbie at The Crumpet - http://thecrumpet.blogspot.co.uk
Missy @ Gnarly Gnails - http://gnarlygnails.blogspot.com
Nayade at Toxic Vanity - http://www.toxicvanity.com
Alyssa at Fancy Phalanges - http://fancyphalanges.blogspot.com/
Misha @ Enigmatic Rambles: www.enigmatic-rambles.blogspot.com
Carrie @ LeSamowen:Life, Love, and Nail Polish: http://lesamowen.blogspot.com/
Basia (or Bazzia) @ polish my mind: http://polishmymind.blogspot.com/
Isabel - Little Fairy: http://isaspinods.blogspot.com/
Stella - My Wet Nails: http://mywetnails.blogspot.com
Michelle-Lacquer Or Leave Her!: http://lacquerorleaveher.blogspot.com
Angi @ Angelina´s Nails & More www.angelinaswelt.blogspot.de/

Monday, June 4, 2012

NOTD: Vertical Gradient MSMD

Hello!

Today I decided to take a shot at a lovely vertical gradient I saw done by Hooked On Polish here. Lots of people are doing this technique right now, but that's one of the specific ones I've seen and liked.

I decided to try it with these two colors, Color Club's Pure Energy (which is a bit brighter and darker than it appears here; the gradient pics are more accurate), and Color Club's Ultra Violet:

Color Club's Pure Energy (pls excuse the ding)

Color Club's Ultra Violet

So I did a sponging gradient using the Nailasaurus gradient technique which you can find here, blending these two colors. While these colors were probably destined to not blend well in terms of an invisible line, I do love how the shimmers blended with one another:


Vertical gradient in the sunlight


Vertical gradient in the shade


Vertical gradient inside light


One thing I learned from doing this is that if you have one color that dominates over the other (in this case, the blue) you have to compensate for that in some way. So, while it looks like I put my gradient line about 3/4 of the way over, I didn't really...it's just that the blue overpowered the purple in the overlap, because the purple polish is a bit more sheer. Next time I'd move the gradient mix line over a little on my nail to get a more balanced look.

One of the cool things about this look with the more dramatic colors is that you can do a faux-duochrome with it. This gives the same sort of look as a duochrome when you hold it still, it just doesn't move the colors when you move your fingers. If that makes any sense, lol.

Thanks for looking, and please check out the other ladies that participated in Monkey-See-Monkey-Do Monday!

M.


Monday, May 28, 2012

MSMD Monday: Memorial Day Manicure

Hello!

Back right on time to do my Memorial Day Manicure!! Today I'm doing my very first Monkey-See-Monkey-Do manicure...I was lucky enough to be included in the group of excellent ladies who do this across the blogosphere. :)

Today I wanted to recreate a manicure I'd seen and admired for some time, which you can find here:

http://www.kewtified.com/2011/07/happy-independence-day/

This was originally a Fourth of July manicure, but I think it works for this, too. I didn't have the white glitter stars, so I had to shift it around a bit:


I used China Glaze Frostbite for the blue base, and Sally Hansen Xtreme White On for the white base. I used Konad white stamping polish and Mash plate 49 for the stars; I used Sally Hansen Cherry Smash crackle for the 'stripes'. For some reason this photographs more orange than it looks in real life. So, this isn't an exact replica, but I think it captures it pretty closely. :)

I feel like Wonder Woman with this on my nails, it's very fun and patriotic!

Thanks for looking,

M.