Showing posts with label Misa. Show all posts

Thursday, October 9, 2014

Before & After: Sparkly Spiders

(Nothing To Disclose)

Hello!

Okay, so, some of you got an accidental sneak peek of this manicure because I hit the wrong button when I scheduled it...it's been a while since I've done that, but I had hoped to never do it again...so I'm gonna spin it like it was a VIP thing if you got to see it. ;-)

My base color today is the third and final polish I have (so far) from the awesome Blink Of An Eye collection, which is a set of saturated matte polishes that have crazy dimension and an awesome waxy finish. If you missed the other two, you can see Misa Eye Candy here, and Misa Lash Out here.

But for now, let's take a look at High Brow, a vampy aubergine with hints of fuschia flecks:

Misa High Brow
Misa High Brow

Misa High Brow
Misa High Brow

Misa High Brow
Misa High Brow

Misa High Brow
Misa High Brow

Misa High Brow
Misa High Brow

I decided this would be the perfect night-time Halloween sky type of base polish; so I used it as a the background for a spooky-licious spider-cure:


To make this, I stamped the web using Bundle Monster H07 (you can find my review of this set here) and Barry M Silver Foil, and the spider with Bunny Nails HD-D (you can find my review of this set here) and Sally Hansen Lickety-Split like and Pronto Purple. I used the stamping+foil technique on all the stamping--silver over the silver, purple over the purple, and green kaleidoscope holo over the green. :) If you missed my tutorial for the stamping+foil technique, you can find it by clicking here.

And, for reasons I'll never understand, while I was making the manicure, my head put together a poem about it, so I thought I'd share it with you:

In darkest night
The spiders crawl
Cross silver'd web
Come one, come all
Along your ear
Across your face
Sleep well, my dear
They'll leave no trace...

Nighty-night,
M. :)

Monday, September 8, 2014

Before & After: Welcome Fall

(Nothing to disclose)

Hello!!

Ah, fall. I love this time of year, even if it doesn't quite feel like fall here yet...temps are still in the 80s and there's no sign of it stopping soon.

But that's okay. It's fall in my heart. So I've decided to welcome it with this mani.

I started with a base of Misa Eye Candy; you might remember I told you a while back about a collection of Misa polishes that have rich, saturated colors with a wax/satin finish? Well this is another of those polishes, with in a fiery reddish-orange shimmer:


Misa Eye Candy
Misa Eye Candy

Misa Eye Candy
Misa Eye Candy

Misa Eye Candy
Misa Eye Candy

Misa Eye Candy
Misa Eye Candy

Then, I did a double-stamp over three of the nails using the leafy tree portion of MoYou London Mother Nature 05 (aka Landscape back in the day); first I stamped with Sally Hansen I-rush Luck, and then with Lickety-Split Lime:


Hey Purple Rain! This thumb's for you!


This is one of my favorite manicures I've done in a long time, I lover how vibrant the base is and how the stamping polishes play off of this. I wish I had a skirt this color with this design going across the bottom! It's such a perfect fall look, and I love the depth created by the two layers of stamping. I don't know how I'm going to bear to take it off, honestly. ::pouts::

So what do you think? Are you ready for fall?

Hugs,
M.

Monday, August 4, 2014

Before & After: Leadlighting isn't just for light bases

Hello!

You've seen the lead-lighting technique here on my blog and elsewhere. Normally, you use a light-colored base (usually white), stamp in black, and then put nearly translucent polishes over the stamping to color it in.

Well, I just can't leave well enough alone, and I decided I wanted to try it with a base other than a light-colored base, because, well, I'm stubborn like that. So I've been playing around a bit, and wanted to show you something I think you'll like.

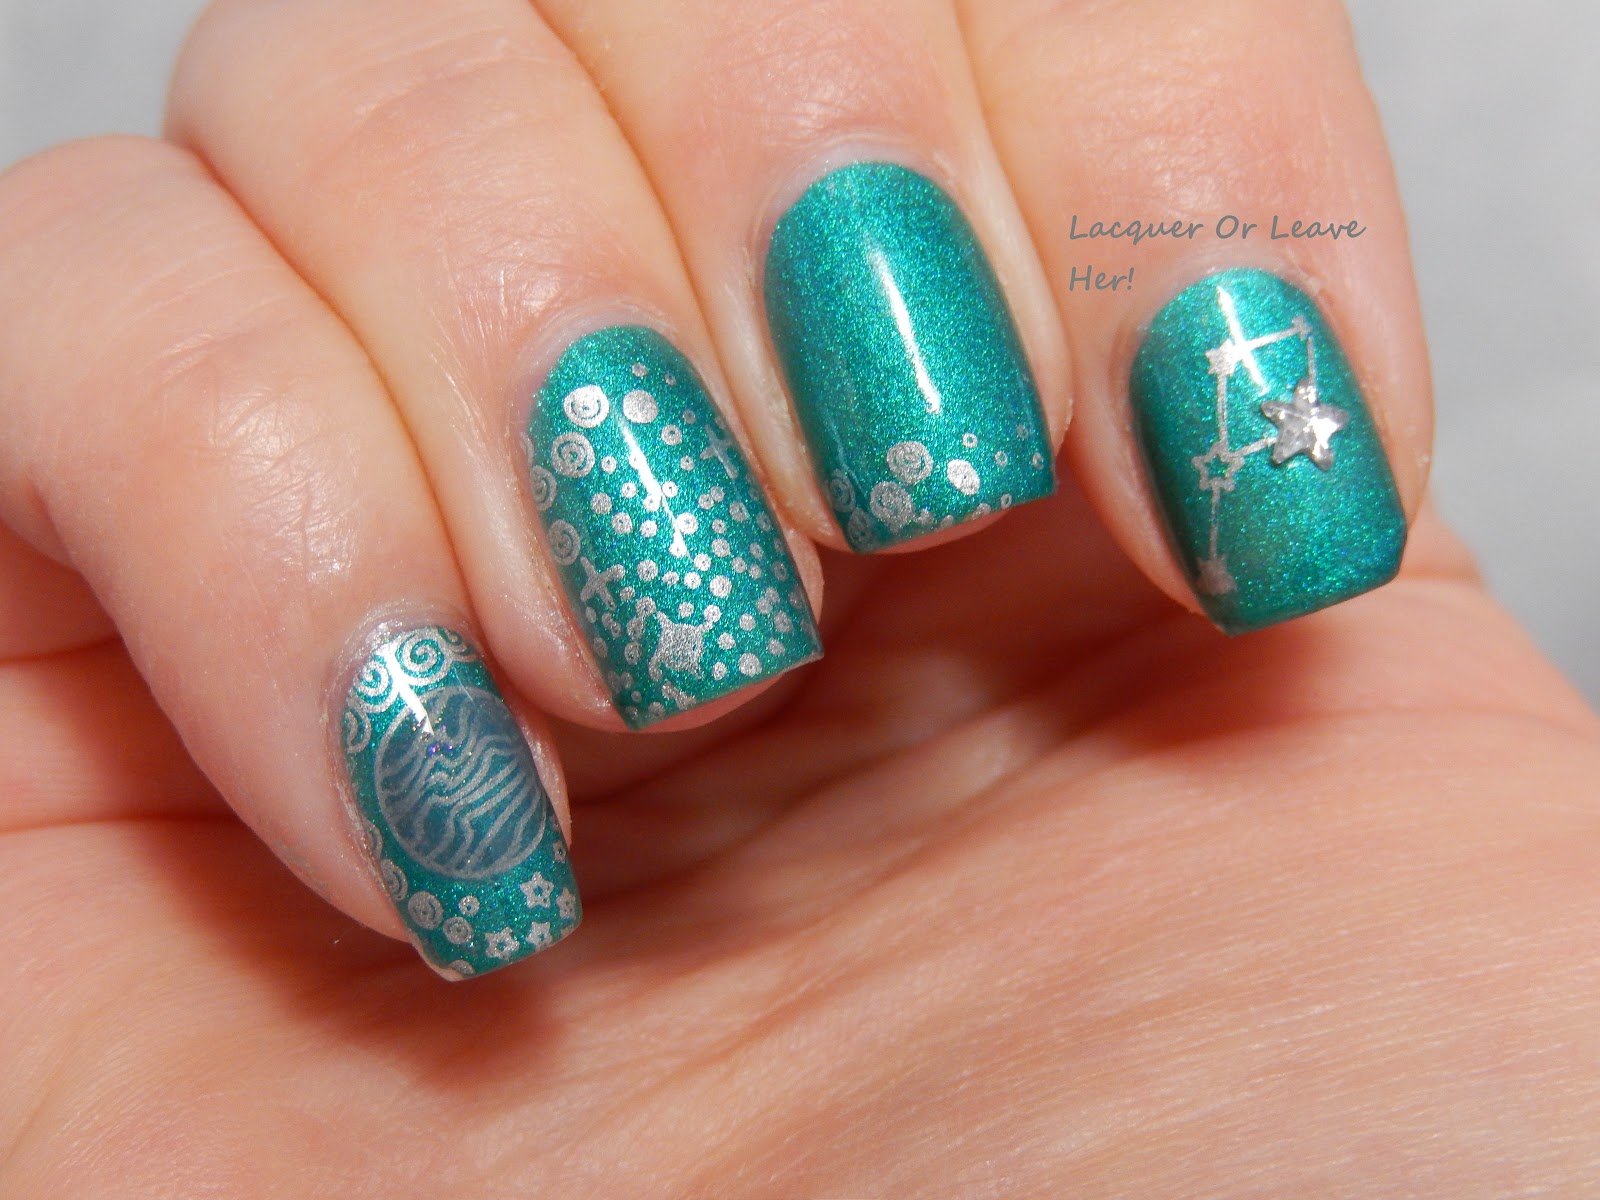
Here's the base I started with, it's Misa Lash Out, from their Blink Of An Eye collection--if you haven't seen this collection, take a look. There are three polishes in it that I've never seen anything like: wax-finish matte polish with a crazy sparkle that's almost like a scattered holo; in the sunlight, it's insane. Lash Out is a blue-leaning teal:


Misa Lash Out
Misa Lash Out
Misa Lash Out
Misa Lash Out

Misa Lash Out
Misa Lash Out

Misa Lash Out

 This also looks beautiful with topcoat, as you'll see below. I'm not sure which way I prefer it.  :)

To decorate it, I first stamped using MoYou London's Sci-fi plate 04, with Sally Hansen Silver Sweep. I added a star rhinestone to the index finger (more about this below), and I used the leadlighting technique on the pinkie finger. I filled in the planet with ALIQUID Lake Michigan Sunset (originally sent for review) with the lead-lighting technique--I applied it over the planet with a dotting tool:


Lead-lit galaxy!


Notice that the effect is subtle here--I wanted to highlight the planet, not necessarily make it jump out. The gentle difference in color makes it appear slightly three-dimensional in person, and as you can see in the close-up, I chose this polish so the little flakes in it would catch the light:


Leadlighting over a colored base
Lead-lighting over a colored base


Two more things I want to say about this. For the constellation on my index finger, I was really surprised that I found it nearly impossible to get a clean image from it. There doesn't seem to be anything wrong with my plate, so maybe I was just having one of those days (although everything else stamped easily). I hadn't originally intended to use the star rhinestone, but because two of the stars just wouldn't come out right, I used it to cover one of them, and it ended up giving a good balance to the manicure. So this is one solution to use if you have a smudge or something in your stamping--throw on a well placed rhinestone, stud, or glitter.

The last point I want to make is that I really want to encourage you to use lead-lighting over other colors. If you do, test out your color combinations to make sure you're going to like what you get, and don't forget those kindergarten paint mixture rules: if you put blue over a yellow base, you're probably gonna get green. Play around, have fun, and bring the leadlighting out into the full range of color!

Hugs, and I hope your week has started well. :)
M.

Monday, October 14, 2013

Comparison post: Black & White glitters, done Halloween style!

Hello!

Ages ago, a reader asked if I could do a comparison post on my black-and-white glitters. I said I would, but then it got pushed back and backer. I have it today, and I hope it's not too late to be useful! And to make it festive, I've given it a Halloween twist by putting them over Misa Um You're Too Delicious.


Let's take a look! Here's what I have:

Thumb: China Glaze Whirled Away
Index: Laquerlicious Zebra Kisses
Middle: Me.Lissa QR Code
Ring: InDecisive Nail Lacquer Newspaper
Pinkie: Dandy Nails Colorblind Squared


China Glaze Whirled Away; Laquerlicious Zebra Kisses; Me.Lissa QR Code; InDecisive Nail Lacquer Newspaper; Dandy Nails Colorblind Squared

China Glaze Whirled Away

Laquerlicious Zebra Kisses; Me.Lissa QR Code; InDecisive Nail Lacquer Newspaper; Dandy Nails Colorblind Squared


Many of you are probably saying that a girl really only needs one black-and-white glitter, and certainly doesn't need 5 of them. To that, I say the following:

....la la la la I'm not listening la la la la la...... Did you say something?

Anyhow, hee hee, here are my thoughts on each of them, because I truly do love each and every one:

China Glaze Whirled Away: I know this got a lot of thumbs-down in the blogosphere, but I truly love it. I love the different sized hexes and yes, I even love the bar glitter. It's really fun and has a circus-like feel to it.

Laquerlicious Zebra Kisses: Shards, shards, shards!! And shards that behave well! They don't stick up or snag, and they add pizzazz to any manicure.

Me.Lissa Lacquer QR Code: I adore square and rectangle glitter to start with. Give it a variety of sizes, and it looks like someone took a chess board and blew it up in space, so the bits are just floating around. And it may be the most perfectly named polish ever.

InDecisive Nail Lacquer Newspaper: What I love best about this is that it's black-white-and-gray; the addition of the gray gives it an extra textural feel. I also love that the glitter in this is smaller, so I can create a more dense visual feel when I want it.

Dandy Nails Colorblind Squared: This was my first black-and-white, and I was so happy to get it. It also has a smaller feel to it, when I want to add something to the manicure, but don't want it to become the sole focus--but in this case I can do it with squares, and I think I've already established where I stand on squares. :)

My apologies again that it took so long to get this up--I try to be fast with reader requests, but this one just kicked my tushie!

Hugs and loves,
M.

Saturday, October 12, 2013

My favorite Halloween polishes: Part 1!

Hello!


Ah, the colors of Halloween. Sure, fall colors are acceptable for Halloween, but the canonical hues that we all love are different, special and fun. Today I'm going to present you with the first half of my favorite Halloween polishes, the ones I've tried that I believe are the best for festively celebrating the season, whether you like to wear a single color or nail art. When I went through and picked out my favorites, I realized there were many more than I'd thought there were, so I'm going to show you 8 today and 8 tomorrow. :)

Let's start with the building blocks!

My vote for awesomest Halloween Orange: Misa Um You're Too Delicious


Misa Um You're Too Delicious, 2 coats, artificial light


Bright. Bold. Saturated orange with a hint of red. Perfect for pumpkins, jack-o-lanterns, and as a base for all of your holiday madness.


Most slime-a-licous green: China Glaze Def Defying

China Glaze Def Defying, indirect sunlight


This is also bright and fun, but it has just that bit of edge to it, the one that makes it suitable for puss or slug slime or zombie drippings. Love it.


Most spooktacular purple: Zoya Keiko

Zoya Keiko, 2 coats, artificial light


The perfect complement to Def Defying and Um You're Too Delicious. Orange and green and purple, oh my!!! Particularly for manicures that are kid-friendly or more on the fun (vs. scary) end of the scale, these three colors are ideal.


Most bruise-tastic polish: Finger Paints Plum Startled


Finger Paints Plum Startled, 2 coats, indirect sunlight


Oh yeah, now we're headed into darker territory. Let's say tonight you're going to an adult Halloween party or haunt, where things are a little spookier and the decorations are a little scarier. For this, you need something with a little more bite. Plum Startled has bite--and looks like the bruise left behind where it bit you. Perfect for graveyards, night skies, and things that go bump in the night.


Bloodiest polish (base polish edition): Orly Grave Mistake

Orly Grave Mistake, 2 coats, indirect sunlight


What is Halloween without blood? And not just any red will do. It can't be too orange-based, or too bright. It has to look thick and fresh to be truly terrifying--and Grave Mistake will do just that for you. :)


Most disgustingly zombielicious polish: China Glaze It's Alive!

China Glaze It's Alive!, 2 coats, artificial light


I return to this polish again and again, both as a base and for nail art purposes. It's delectably chunky, like bits of zombie flesh festering and molding--but it still applies beautifully and layers well. Practically makes you look like body parts are gonna start dropping off at any minute! But If you prefer something that is a little less glittery, try Zombie Zest--it will also fill your undead nail needs.


Most amazing Halloween duochrome: Color Club Portfolio


Color Club Portfolio, 2 coats, indirect sunlight


With a Herculean-strength shift from purple to green, this polish captures two of your requisite Halloween colors and lets them slip and slide through one another. Throw a little nail art on it if you can bear to cover it, and you'll be the envy of all the gals and ghouls at that Halloween party. I personally think this would be an amazing polish to wear with a witch costume. :)


Most Vampire Vamp: InDecisive Sparkly Vampire


InDecisive Nail Lacquer Sparkly Vampire, direct sunlight


Let's admit it. Halloween is also a time to be a bit vampy, a bit sexy-with-a-kick. Whether you're dressing as a vampire, a queen, a witch, a sorceress, or Little Red Riding Hood, this polish will amp up your look in the best possible way. And of course it's the perfect base for any red-based Halloween nail art that strikes your fancy. Go ahead. You know you want to rock that look.

That's it for now, but stayed tuned for part two, which will feature lots and lots of specialty polishes for your Halloween evil, twisted nail wardrobe...muah hah haaaahhhh...

Hugs and love,
M.


Monday, July 15, 2013

Before & After: Atomic Vernita Pines Shade

Hello!

This week's theme in my Hobby Polish Blogger's group is 'Gradient'. I actually did this back before my nubbins, and I wanted to try out something a little different by having the lighter color at the tip. Not too different for other people, I know, but I tend to put my darker colors at the tip for some reason. So this is a little mini-stretch for me. :)

I started with a base of Ruby White Tips Vernita Green, a pretty olive green polish with a scatter of holographic glitter, and a few bar glitters, in it:

Ruby White Tips Vernita Green, indirect sunlight


To make my gradient, I used another Ruby White Tips polish, Lonesome Pine Trails, which is a softer, more avocado color, and Misa Got It Made In The Shade right at the tips for a really light look. Finally, I finished the whole thing off with a coat of Orly Atomic Splash, which for some reason looks more purple than gunmetal against this gradient, and I like it!


 I do like the lighter tips; I was afraid it would look too French-manicure-y, but I think it has a soft, subtle shift that reads like a gradient still. I do also love the way these colors look together, although it's so weird that the glitter looks so different on this! That's okay, I take whatever happy accidents I can get, because honestly this is so much prettier than a regular gunmetal glitter would have been. And you can't see it too well here (you can if you look closely), but the holographic glitter still shines through with a little flash of bling. :)

Hope you all are having a great day, even though it's monday! And you can find more awesome gradient manis linked below. :)

(PS: I hope to be back later today with the results of the make-your-own polish remover later today!)

Hugs and love,
M.