Showing posts with label Bunny Nails. Show all posts

Wednesday, October 24, 2018

(Before & After) Seven Deadly Sins, Day 3: Envy!

(Press samples and affiliate links ahead!)

Hello!


So today's sin du jour is Envy--and first, let's take a look at Spellbound Nails' version of Envy, a gorgeous grass-green scattered holo with gorgeous holo glitters:


Spellbound Nails Envy

So this was one of the hardest ones for me to pair up with a Halloween baddie! Yesterday I went all philosophical on you, so today I'm gonna keep it a bit lighter. As I was thinking about this, I realized that a lot of witch stories involve envy of some sort...The Sanderson Sisters want other people's youth, Elphaba wants what be what the other girls are, etc., so I decided to go with witch:


Spellbound Nails Envy over Bunny Nails HD-C and Sugar Bubbles 037


I threw in some voodoo dolls as type of 'spell' that people use to get at people they're envious of, and, of course, an evil witch who's out to get someone...I stamped with Sally Hansen Sandstorm and Kaleidoscope Black and White, using Bunny Nails HD-C and Sugar Bubbles 037. I also accented my pins with a silver nail art pen.


So what do you think? Who would you have picked for Envy?


Big hugs,
M. xoxo

Follow me! 

Tuesday, October 23, 2018

Seven Deadly Sins Nail Art Series, Day 2: Greed!

(Press samples and affiliate links ahead!)

Hello!


Today's day two of my Seven Deadly Sins Halloween series (if you missed my Gluttony post, you can see it here), and today's sin is Greed...


...Which I decided to pair with zombies. Sure, it's fairly easy to say that zombies always want more brains, no matter how many they get, and that's greed. But, I'm gonna try to convince you this works on a deeper level, hehe. Now, I don't think there's anything wrong with liking nice things, or wanting to own nice things. But I think it can be all too easy to be lured into equating happiness with things, and then mindlessly try to pursue them in order to obtain happiness--mindless pursuit very much metaphorically like zombies. I'm not the first person to make this comparison--in fact, in Dawn of the Dead, one of the most famous zombies movies of all times, Zack Snyder has a deeply ironic scene of zombies taking over a shopping mall, an indictment of his fellow baby-boomers who turned their back on flower-power ideals for the pursuit of material goods that would epitomize the 1980's greedy 'Me' decade.


So, in that spirit, I started with a base of Spellbound Nails Greed, a mustard-wheat yellow scattered hollow with gold holographic glitter:

Spellbound Nails Greed


Then I dug out some really old plates and stamped with Cheeky 55 and Bunny Nails HD-C, using Messy Mansion Carbon for the dollar signs and Messy Mansion Ivy and Spring Green to gradient stamp the zombie hands:


Spellbound Nails Greed stamped with Cheeky 55 and Bunny Nails HD-C
 

So what do you think? Do zombies work for this? What Halloween baddie would you have paired with Greed?


Big hugs,
M. xoxo

Follow me! 

Tuesday, February 20, 2018

The Digit-al Dozen Day 2: Mermaids!

(Press samples and affiliate links ahead!)

Hello!


Today's day two of The Digit-al Dozen's mythical creatures theme, and today I'm going with a creature I think is almost a must-make for nail bloggers: mermaid nails!


I started with a base of Spellbound Nails Dammit Janet, and then stamped a variety of images from Bunny Nails HD-J plate (if you don't know, her store is on an indefinite haitus, but I'm hoping she comes back sooner than later!) :

Bunny Nails HD-J


First I stamped the background patterns with Sally Hansen Thyme Is Money, then I double-stamped my jelly fish, first with Moonflower Polish Moonflower and then with Messy Mansion Chalk to get a shimmery opalescent jellyfish type of effect. Finally I reversed-stamped my mermaids--first I stamped them with Messy Mansion Carbon, then filled in with Sally Hansen Taupe To Go, Champagne Supernova, and Va Va Violet. I first put a layer of Zoya Leia under the mermaid's bikinis and tails, as well as part of the one mermaid's hair to give shimmer. Here's how it turned out:


Bunny Nails HD-J over Spellbound Nails Dammit Janet

Bunny Nails HD-J over Spellbound Nails Dammit Janet


I love how this came out, but most of all I adore how that tail came out! The shimmer from Leia is sooooo pretty!


Okay, so, now I've done unicorns and mermaids, the two must-have mythical creatures for nail artists. Starting tomorrow, things are going to get a little more unusual...


In the meantime, don't forget to check out the lovely Digit-al masterpieces linked below!

M. xoxo


Friday, December 15, 2017

"My Home" mani #5: High Five!

(Press samples and affiliate links ahead!)

Hello!


Today's my final mani in the "My Home" Digit-al Dozen theme for this month! So far I've shown you a little bit about how my house is decorated, and I introduced you to my cabal of wee beasties. Today's manicure features the intersection of the two...


This mani may take a little explaining...so let's take a look at this shot, first:

Bunny Nails HD-F, UberChic Beauty Holiday Jingle, over Spellbound Nails Beauxbatons

This mani features a shot of my Christmas tree on its side, lying on the floor. The lights strings have been yanked off the top, and the ornaments are rolling all over the floor. I wonder how that happened...Maybe the thumb shot will reveal more:


Bunny Nails HD-F, UberChic Beauty Holiday Jingle, and Marianne Nails N. 20 over Spellbound Nails Beauxbatons


Oh no! Two of my little destruct-o-trons are high-fiving amid the chaos!! Darn you, kittieeeees!!


To make the For this mani, I started with Spellbound Nails' Beauxbatons, and then stamped repeatedly with the pine sprig image from Bunny Nails HD-F, with Messy Mansion Forest. Then I stamped the lights and the ornaments with UberChic Beauty's Holiday Jingle plate, with Messy Mansion Red-y Or Not, Misty Jade, and Sterling. Then I colored in the lights with Spellbound Nails Rockets' Red Glare and Twilight's Last Gleaming. I stamped the cats with Marianne nails N. 20, and Messy Mansion Carbon.


What do you think? Do you have pets, and do they like to contribute their own special touch to your holiday decorating?


Happy stamping, and don't forget to check out the other ladies' manis, linked below.


Happy stamping!
M. xoxo


Thursday, December 14, 2017

"My Home" mani #4: Going Garland!

(Press samples and affiliate links ahead!)

Hello!


Today's the fourth mani in the "My Home" Digit-al Dozen theme for this month...Right now a big aspect of my home is Christmas decorations, and for the first time this year, I decided to try out garland over my fireplace. I used to love having Christmas candles on my mantle, but my darling swarm litter of kitties destroys everything they come in contact with, and them + open flames  = burned down house. I've waited several years for them to outgrow the crazy, but I've had to come to terms with the fact that just isn't going to happen.


So, for this manicure, I started with a base of Girly Bits Irreplaceable, and stamped it with UberChic Beauty Texture-licious 2 with Sally Hansen Gone Grey to simulate my fireplace, and stamped the garland with Bunny Nails HD-F. I used a fill-in technique for the garland; I first stamped with Messy Mansion Forest, then filled in the leaves with the same color, then stamped a second time over it with Messy Mansion Carbon. You can do the same thing by creating a decal or with a reversed-stamp technique, but this a little faster than a decal and a little more precise in terms of application than reversed stamping, in my opinion. Then I added dots of Messy Mansion Red-y Or Not layered with dots of Chalk for holly berries, and dots of Sterling for the lights in the garland.


Here's how it came out:


UberChic Beauty Texture-licious 2 and Bunny Nails HD-F over Girly Bits Irreplaceable

UberChic Beauty Texture-licious 2 and Bunny Nails HD-F over Girly Bits Irreplaceable


I love this look, with the holly as a sort of French tip. What do you think?


Stay tuned tomorrow for the last look into my home life...and in the meantime, check out the other ladies' manis, linked below.


Happy stamping!
M.


Friday, December 9, 2016

Review: Spellbound Nails Christmas 2016 Collection!

(Press samples and affiliate links ahead!)

Hello!


One of the ways I know a holiday collection is awesome is if it instantly makes me want to do holiday nail art--and that's just what happened when I laid eyes on Spellbound Nails' Christmas 2016 collection:


Spellbound Nails' Christmas 2016 collection


This collection is fun, it's bright, it's happy. It puts me right into the holiday spirit, and puts a huge smile on my face. :)


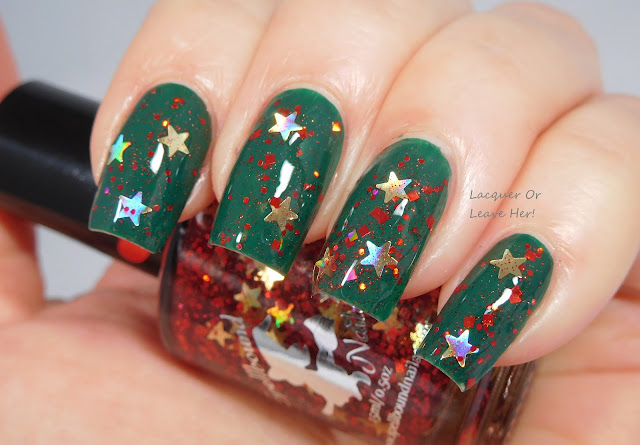
Let's start with Spellbound Nails Christmas Morning, a festive glitter topper featuring red hexes and squares, gold stars, and spray of tiny holographic glitter:


Spellbound Nails Christmas Morning

Spellbound Nails Christmas Morning

Spellbound Nails Christmas Morning


I show Christmas Morning here over Zoya Wyatt. Formula and application were excellent; this is one coat brushed on, with the stars added individually, plus topcoat.


This topper makes me think of the decorations on a tree, so I layered it over green for a Christmas tree effect, and it worked perfectly--so perfectly, in fact, that I couldn't resist adding in some white lights on the accent nail (image from Winstonia's Holly Jolly plate, stamped with Girly Bits Silver Bells and decorated with Girly Bits White Wedding):


Spellbound Nails Christmas Morning + Winstonia Holly Jolly plate + Girly Bits stamping polishes
Spellbound Nails Christmas Morning + Winstonia Holly Jolly plate + Girly Bits stamping polishes


Next up is Spellbound Nails Holly Jolly, a deep matte hunter green with gold sparkle:

Spellbound Nails Holly Jolly

Spellbound Nails Holly Jolly

Spellbound Nails Holly Jolly

This is two coats, no topcoat. The formula and application were excellent. This is the darkest, richest, most beautiful pine tree you can imagine putting up; it's also an amazing green for any sort of country-style look you want to go for. I also see fall sweaters and hunting plaids when I look at this polish.


Of course you can also wear it with topcoat, which brings out the gold beautifully: 

Spellbound Nails Holly Jolly + topcoat
Spellbound Nails Holly Jolly + topcoat

This is one coat of Seche Vite to make it shine, shine, shine. And once that gold popped out at me, I decided I had to stamp some gold stars on it (image from Bunny Nails HD-F, using Messy Mansion Soft Gold):


Spellbound Nails Holly Jolly + Bunny Nails HD-F + Messy Mansion Soft Gold
Spellbound Nails Holly Jolly + Bunny Nails HD-F + Messy Mansion Soft Gold


Next up we have Spellbound Nails Let It Snow, a soft baby blue with white and silver glitters:


Spellbound Nails Let It Snow
 
Spellbound Nails Let It Snow

Spellbound Nails Let It Snow

This is two coats, with topcoat. The formula was a little thick on this one, but evened out nicely with the second coat.


This is crisp winter skies, with snow falling as you hike to pick out your perfect Christmas tree. Or gather for a sleigh ride with your friends. At least, it's what I imagine those things would be like--I've never done either here in non-snowy California. But polishes like this make me feel a little less snow-deprived.


Of course I had to stamp some snow on this one (I used Winstonia's Winter Wonderland Plate and Messy Mansion's Sterling and Chalk):


Spellbound Nails Let It Snow + Winstonia Winter Wonderland plate + Messy Mansion polishes
Spellbound Nails Let It Snow + Winstonia Winter Wonderland plate + Messy Mansion polishes


Next we have my favorite of the collection, Spellbound Nails Merry & Bright, a cranberry red polish with bronze glitters and flakies:


Spellbound Nails Merry & Bright

Spellbound Nails Merry & Bright

Spellbound Nails Merry & Bright

This is two coats with topcoat; formula and application were excellent. This polish has a subtle elegance that I just love. The combination of the bronze with the brick red is just a little bit more sophisticated somehow to me than red and gold (which I love, btw!), and the small glitters and flakies give this a glow-from-within look. So pretty.


The elegance of this inspired me to do an accent nail to match; I stamped with Girly Bits GBC 1-01 using Girly Bits Bronze Goddess:

Spellbound Nails Merry & Bright + Girly Bits GBC 1-01 + Girly Bits Bronze Goddess
Spellbound Nails Merry & Bright + Girly Bits GBC 1-01 + Girly Bits Bronze Goddess


And finally we have Spellbound Nails Silver Bells, a sparkly glitter bomb filled with silver and holographic glitters:


Spellbound Nails Silver Bells

Spellbound Nails Silver Bells

Spellbound Nails Silver Bells

This is three coats of Silver Bells, with topcoat. This does build nicely with gorgeous depth to it, although there is still some visible nail line, so if you have longer nails with some staining like mine, you may want to throw on an extra coat.


This looks like a silvery snowfall on a cold Christmas morning. It throws light and has awesome depth.  The play of the black and gray glitters alongside the silver gives it just enough edge to make it different and interesting. For some reason this also makes me think of New Year's Eve celebrations, so I stamped some fireworks on the accent nail with Bunny Nails HD-E and Messy Mansion Carbon and Soft Gold:


Spellbound Nails Silver Bells + Bunny Nails HD-E + Messy Mansion stamping polishes
Spellbound Nails Silver Bells + Bunny Nails HD-E + Messy Mansion stamping polishes


I think this one also makes a lovely topper; here's one coat it is over Zoya Courtney:

Spellbound Nails Silver Bells over Zoya Courtney


I think this looks like the most amazing candied cranberries; it's glowy and festive and the perfect look for a holiday party. LOVE.


What more can I say about this collection? Ever bottle is a little package of holiday cheer, and you can bet you'll be seeing some holiday nail art featuring these polishes in the next few weeks.


The collection is on sale now in the Spellbound Nails store, and don't forget to follow her on Facebook and Instagram for news and inspiration!


Happy polishing,
M.

Wednesday, December 16, 2015

Review & NOTD: Christmas Tree Skittle Mani with Born Pretty Store nail tape dispenser

(Press sample)

Hello!

Born Pretty Store recently sent me this nail tape dispenser to review; I chose it actually because I tend to struggle a little with nail tape:

Born Pretty Store nail tape dispenser

Born Pretty Store nail tape dispenser


My issue with nail tape is two-fold. The main problem is that I lose the end and struggle to find it again, and in the meantime what I've already applied catches on something and pulls off. Of course, one solution to this is to cut off as many pieces as you need, and pull them off the corner of your table or some such as needed. That sounds good, but what happens is, when I pull one of those pieces off, it instantly flaps over and sticks to my hand or something else, and then I have to try to pull it back off while not destroying the tape on the artwork I'm trying to do. AND, I still can't find the end of the tape the next time I go to do another mani.

So, when I saw this, I figured it would be good for someone as nail-tape challenged as me--it will keep the end ever-ready, and maybe even help me keep the tape under control while I'm working.

I did a video review of the case here, just showing how easy it is to open and put the tape in:


I also did a second video, a tutorial using the dispenser to make the manicure you'll see below:


What I like about it:

  • It keeps the end easily accessible
  • It's easy to pull off what you need as you need it
  • It's easier to grip than the rolls of tape, so I find it easier to use while I'm applying the teap
  • It opens easily so you can change the color of your tape as often as you want
For my test mani, I did a little twist on a simple, traditional nail-tape manicure, the simple Christmas tree. Normally what you do is put on your base polish, and then when it's fully dry, you lay your tape, put the polish for your tree over it, then pull up your tape.

For my tree, I wanted the tree to be on a naked nail, and have two layers--and undercoat of glitter that would show through as the 'garland' on the tree, and the tree itself:


Christmas tree skittle mani nail tape
Christmas tree skittle mani


Christmas tree skittle mani nail tape
Christmas tree skittle mani


Christmas tree skittle mani


As you'll see in the video, I messed up my first attempt. See, what you have to do is:

1) Try not to overlap your glitter coat with your tape.
2) Let this coat dry completely.
3) Put your 'garland' tape on.
4) Put your green polish on, and give it a few seconds to set but not dry
5) Remove your tape in the reverse order you put each piece on.

So this look can be a little tricky, but I think it's worth it, because I love the spray of glitter showing through as the garland on the tree.

Here are the products I used:
Colors By Llarowe Pirates of Penzance (holo red!)
Colores de Carol (silver holo glitter!)
Colors By Llarowe Gemini Rising (Holo green!)
Color Club Marina (textured gold--I think this looks like Christmas garland!)
Bunny Nails HD-F to stamp the star pattern on the thumb and pinkie, and the star at the top of the tree
Barry M Silver and Gold Foil Effects.

I love how it came out, and have already gotten compliments on my sweet little tree.

If you get frustrated with nail tape like I do, a little dispenser like this might be just the trick for you; for $1.59, it's hard to go wrong. You can also use my Born Pretty Code for 10% off  you full-priced order:


Happy taping!
M.

Sunday, November 29, 2015

Before & After: Tee Roses

(Includes press samples; affiliate links)


Hello!

Today I have a quick before-and-after that I actually wore on my birthday back in August; it was inspired by the shirt I wore that day:


I shifted the color scheme a little because I wanted to try something out, so I started with Zoya Charli, an olive-gray creme:


Then I sponged on a some Wet n Wild Tickled Pink and Lavender Creme (a name I find deeply confusing because the shade is hot pink, not lavender), along with a titch of Orly Mirrorball holo magic to capture the shimmer in the shirt. I finished by stamping some roses from Bunny Nails plate BuNa-A:


Here's how it turned out:


Tee roses manicure
Tee roses manicure
Tee roses manicure

Tee roses manicure

Tee roses manicure

I totally get that this combo of colors isn't for everyone, but I ADORE it. The olive gray with the bright pinks--edgy but feminine at the same time. Even if I didn't go exact, I think I captured the feel of the shirt, and to be honest--I wish I could make the background of the shirt the same color as Charli!

What do you think--nailed or no?

Happy stamping,
M.


Friday, October 30, 2015

Before & After: Poisoned Apple

(Affiliate links)


Hello!

Halloween is about spooky scares, and one of the things that used to scare me the most when I was a little girl was...the witch from Snow White. So, for my contribution to the Crumpet's Nail Tarts Halloween collection, I decided to make a tribute to the Disney villain that terrified me the most.

To get an awesome night sky, I used Colors By Llarowe Rest In Pieces, an awesomely holographic blurple:


Colors By Llarowe Rest In Pieces

Colors By Llarowe Rest In Pieces

Colors By Llarowe Rest In Pieces


Colors By Llarowe Rest In Pieces


Love love love this holo, especially for a deep night-sky look...swoon.

Here's how the manicure came out (details afterward):


Come have an apple, little girl...


Poisoned Apple Snow White Manicure

Poisoned Apple Snow White Manicure


This manicure was a conglomeration of a bunch of different plates:
Tree: LeaLac LLC-B, stamped with Barry M Silver Foil
Apples: Bunny Nails old-school HD 06 (the octagonal ones), Winstonia W118, stamped with Barry M Silver Foil, Sally Hansen Rapid Red, and Sally Hansen Red-io Active
Witch: Decal made from My Online Shop JR-22, with Eat Sleep Polish Sheets of Empty Canvas, China Glaze Cha Cha Cha, and Sally Hansen Lively Lilac.

I used a double-stamping technique to make the apples stand out, and then to highlight the poisoned apple, I stamped it in silver with red accents. When I stamped the tree onto my nail, I messed up--the base of the tree should be solid--but I think the mistake makes the tree look creepier, like it has a creepy smile on it, so I decided to keep it (Halloween manicures are so flexible, lol!!). An even though I created it, that witch's face continues to creep me out...::shudders::

What do you think, good Halloween mani? Especially if you're dressing up like Snow White or your daughter is, I think this would be a fun mani.

If this one isn't your cup of tea, or even if it is, check out the other Crumpet Halloween manis below!!

Happy stamping,

M.