Showing posts with label color-changing. Show all posts

Wednesday, July 3, 2013

Before & After (sorta): Wonder Woman Nails!

Hello!

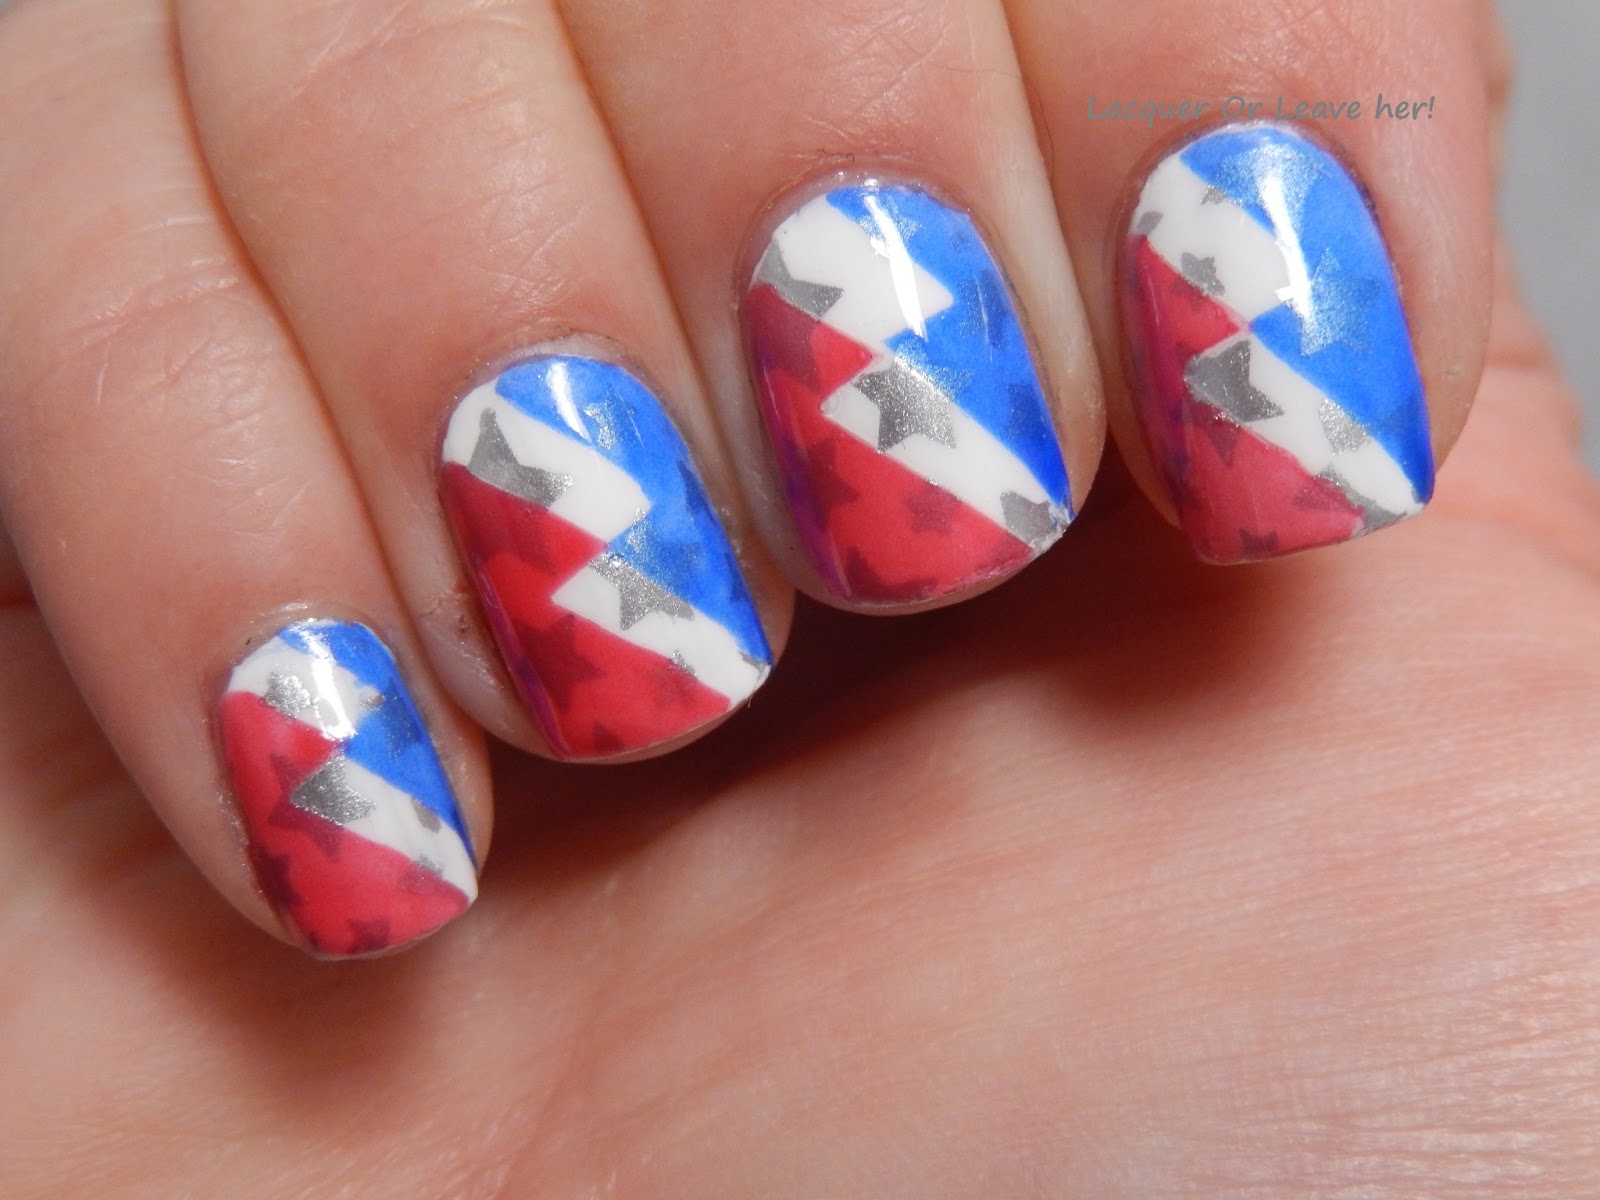
Today I'm going to show you some appropriately festive nails well suited for 4th of July--although whenever I look at them, all I can think is 'Wonder Woman!" and all I can see is Lynda Carter running around in her cute little outfit with her adorable gold bracelets.

The nail art I did here uses InDecisive Nail Lacquer's Red and Blue Ichors, and I've been waiting to do it since I reviewed them...hee heee hee hee heeeeee...If you don't remember, these are temperature-sensitive polishes that shift from clear to colored and it turns out they're pretty darn fun to play with because of that.

I started with a base of Sally Hansen White On, and stamped stars on it using Mash 49 and Barry M Silver Foil. Over this, I painted a design with Red and Blue Ichor; the idea was that when I'm outside in the sun, you'd only see the underwear design, but when I was in cool areas, you'd see the red and blue design over it. Here is what it looks like in the warm (this was taken indoors; outside all color tint disappeared, leaving just a subtle frosted effect):

'Before', when outside in the July heat

And then when I was inside or when the wind picked up, Wonder Woman suddenly appeared!:


Now the world is ready for you


And the wonders you can do

Can't you just see the bracelets flashing?! The magical spin! Of course, that show was WELL before my time...>.>...I mean, clearly I saw it in reruns and all...>.>...but doesn't it just take you back?!!

Thanks for looking, and I hope you have a wonderful 4th of July, for those that celebrate it! :)
M.

Saturday, June 29, 2013

Before & After: You can stamp with InDecisive Nail Lacquer's Ichor line!

Hello!

Omg omg omg, so excited so excited!

Back when I did my review of InDecisive Nail Lacquer's temperature-changing Ichor line, my lovely friend Charis asked me if it was possible to stamp with the polishes, because how cool would it be to have stamping that comes and goes when you're in warm vs. cool temperatures? I said I thought it wouldn't because 2 coats of the polish are recommended...but I was so very wrong!!

To warn you, I was playing around trying this out, so this manicure isn't perfect. First off, my break finally grew out to the point where I could cut it off without taking off part of my fingertip, so I'm in a strange nail place with crazy nubbins (because I can't file the others down any farther than you see because the nail bed on them is too long). And, well...there's cat hair. And some smudging. But I had to share it with you quickly because this is so flippin' fun!!

I was trying out a new polish I just got, Barielle's Green Apple Chew, which is a bright (almost neon but not quite) light-yellowish-green-apple creme:

Barielle Green Apple Chew, direct sunlight


I wanted to do a simple manicure that would be cute on its own when the Ichor didn't show, but I wanted there to be a surprising contrast in the design with the Ichor when it did show. So, I freehanded a white heart (Sally Hansen White On) to be a pretty accent nail against the green, with a nice, sweet happy lovey-dovey sort of feel. Then I stamped Ichor over it using Bundle Monster 316, to give it a different type of feel...

Here is what the mani looks like when the Ichor doesn't show (when your hands are warm; in this case I ran warm water over it, hence the droplets, hee hee):


Ichor is clear when warm


And here is what it looks like when your hands are cold:


Ichor black when cold. :)


How. Cool. Is. That.

If you look back at the first picture, you can see that with the warm water method, the Ichor didn't disappear completely, you can still see it a bit when you look carefully (but you do have to look at it closely--you can't even see it at arm's length). I did this at night, so tomorrow I'll take it out to play in the warm sun, and see if it goes away completely then.

So far I've only tried this with black, but I can't imagine why the other colors wouldn't work as well. The little girl in me that loved to play with invisible ink is so incredibly happy and excited right now, I can't even describe it...:)

Thanks for looking! Hope you are having a wonderful weekend. :)
M.

Thursday, June 27, 2013

Review: Born Pretty Store Striping Tape

Hello!

I've done tons of striping manicures on this blog, and I own a bunch of nail tape. But much to my amazement, I realized a while back that I didn't have a roll of red tape; I bought the tape I have in a set where I didn't get to pick the colors I wanted. So when Born Pretty Store Born Pretty Store asked if there were items I wanted to review, I thought this would be a good opportunity to try out Born Pretty Store's striping tape.

Here is how the tape comes packaged; it comes in its own plastic envelope. As you can see, there is a lot of tape here; you'd have to work hard to run out of it unless you're doing a new striping manicure every day:


Here's a close-up on the color
I use this sort of nail tape primarily for two types of manicures. I use the tape as an accent on the nail itself, and I use it like painter's tape, to delineate patterns or areas of a design that will show after the tape is removed. I'm going to test out the tape in both of these types of manicures.

I did the first manicure for an Adventures In Stamping theme that involved stamping dragonflies or butterflies; I had an idea that I wanted to try out with Barry M Chameleon Blue, which switches from blue to purple when you put a topcoat on it. I thought it would be cool to have half of the nail in one color and half in the other, with different stamping on the halves--and what's a more perfect way to divide those halves than red striping tape, since red and blue makes purple? I stamped with Barry M Silver Foil on the blue half, and with Chameleon Blue itself on the red half (it's a great stamping polish). I stamped overlapping the tape so it would look like the dragonflies were hovering above the design (well, that was the plan, lol):


This is a rigorous test of the striping tape because I wasn't able to cover the tape up with topcoat--if I did, it would have changed the color of the polish underneath. I took this picture the day after I did the manicure, after sleeping with the tape on. As you can see, there is just the teensiest bit of peeling starting at the tip of the nail, and none at all at the cuticle end. I've had other nail tapes that don't stay put that well even when I have them slathered in topcoat. :)

I also decided the next day that I wanted to change up the design a bit, so I redid two of the nails, but left the middle and ring untouched:


This was taken at the end of the second day, and you can see there is a tiny bit more peeling, but still remarkably little considering there was no topcoat over it and it had gone through a fair amount of abuse at that point. If you're looking for a striping tape that will stay where you put it, this one will have some staying power for you.

I also wanted to test the tape out to see how well it performs when used as a tool for masking designs. In this manicure, I started with a base of Zoya Logan and Ivanka (Logan on the pinkie and middle, Ivanka on the ring and index), and used tape to create a design on the nail. I then sponged over the nail and the tape with a gradient of Barry M Silver Foil and Gold Foil (although it didn't turn out to be very noticeable in the pictures, it's there if you look carefully :) ), and removed the tape. I finished the design with some rectangular rhinestones:


The lines are crisp, the tape stuck well and didn't allow leakage underneath, but also came up easily and didn't pull the polish when I took it off. When I was working with it, it stayed put and that made it easy for me to trim the ends and place the next pieces accurately.

Overall, I found this tape as easy to work with as any other I've tried, in fact a bit more. It was also impressively durable, and I like that you can pick individual colors rather than have to be stuck with a bunch of colors you may not like.

If you'd like to order this or any other products from their store, I have a coupon for 10% off that you can use:


This is not an affiliate link and I don't make any money when/if you use it. However, if the code is used 10 times, Born Pretty Store will sponsor a giveaway on my blog, which means free products for you. :)

Thanks for looking! I hope you're having a good week. :)

Hugs and love,
M.

(The nail tape used in this post was provided for my honest review.)

Thursday, May 30, 2013

Review: InDecisive Nail Lacquer (Ichor, Ichor my nails...)

Hello!

I'm back with 4 more polishes from InDecisive Nail Lacquer, and I promised you something interesting today...and so I bring you InDecisive's Ichor line, sent to me for review.

Why are the Ichor polishes 'interesting'? They're temperature-sensitive...in a very cool way (no pun intended). You're possibly saying to yourself, as I did the first time I saw one of these, 'Isn't that just a fancy way of saying 'color-changing polishes?'. Well, technically yes, but in reality, no, they are absolutely not.

Ichor polishes are different for two reasons. First, the polishes change not from one color to another color, which makes a polish only a one-trick pony; rather, they change from clear to their target color, so you can put whatever color you like as your base color--and this means an extremely versatile polish with lots and lots of possibilities. Second, it's temperature that makes the color change, in a very particular kind of way...sure, if you're in a warm room, or outside in warm sun, the polish will be clear, and if you're in a cold room, or outside when it's cold, the polish will turn to its target color. The magic is where the switch happens--at body temperature (86 degrees, to be precise). What this means is that in medium temperatures, the polish will be clear on most of your nail, and colored at the tips. So, your undie color shows in cold temps, Ichor color shows in warm temps, and in moderate temps, you get a French manicure with the combination of the two colors.

That, in my opinion, is brilliant. And incredibly fun.

Aleksandra's original Ichor goes from clear to black. She has added three additional colors to her line: Blue, Red, and Purple, each shifting from clear to the target color. On her website, she shows you each of these polishes over naked nails so you can see the color shift; you can check these pictures out by clicking here. This freed me up to have some fun and play around with color combos, and that's just what I did!

Let's start with the original Ichor, which switches from clear to black; I put it over China Glaze Tart-y For The Party, a springy lavender purple:


Ichor Black over China Glaze Tart-y For The Party


In the second picture, the wind started to come up as I was taking the pictures in my backyard, an you can see how the gradient began to move higher up my nail. That was one of the things I loved best about these polishes--the type of the gradient I'd get changed with things like the wind, and it was so much fun to watch. I wore blue Ichor to an outdoor event, and got about 6 different effects over the course of the afternoon depending on the temperature, wind, etc. :)

Aleksandra suggests that you put two coats of Ichor over your base color, and recommends that you use cremes rather than shimmers, because Ichor dries a bit like a rubber-finish matte polish (my words, not hers), and she suggests you finish it with topcoat for the same reason. I actually love the matte finish it gives, and show it below. Also, I think that as long as you know it's going to have that slightly cloudy effect on the polish below it, you can do some fun things with shimmer and glitters, and I'm looking forward to playing around with that. But you should be aware of that when picking your base color, and factor it in accordingly. In all of my pictures I have two coats of Ichor over my base polish, as suggested.

One last point about original Ichor. As you can see above, in some temperatures, the pigment in the polish gives a flecked effect; this varies a bit from batch to batch. I love the dimension it gives to the gradient when it does show. :)

For the blue version of Ichor, I used Revlon Cloud as my underwear; Cloud is a very light blue with purple tones:

InDecisive Ichor Blu over Revlon Cloud


Seriously, how pretty is that! Of course this would look wonderful over white as well, and I can't wait to try it over a pale green. :)


For Ichor Purple, I decided to try something a bit darker underneath, to see how that would come out. Here I have it layered over Julep Sophie, a medium gray:


InDecisive Ichor Purple, over Julep Sophie; with topcoat

Yep, the color shows up even over a darker basecoat. :)

And here it is again, without the topcoat, so you can see how the finish dries on its own:


Outside semi-direct sun


I love rubber-finish mattes, so of course I love the natural finish of these polishes, and I like that you can leave the topcoat off for a different type of look. :)


For the final color, Ichor Red, I had to try something a little daring and fun. I put it over Zoya Arizona, a bright orange creme:


InDecisive Ichor Red over Zoya Arizona; with topcoat

My grandma and your grandma, sittin' by the fire

My grandma said to your grandma, I'm gonna set your flag on fire

Talkin' 'bout hey now! Hey now!

Ichor Ichor my nails!

Jockomo feena ah na nay, jockomo feena nay!

I love love love how this came out. Tell me that last picture doesn't look like some beautiful tropical drink you'd want to sip by the side of the pool or the ocean! Absolutely gorgeous, summery and fun.

And if you'd like your red to be darker, she can make that up for you, just contact her or let her know in your checkout notes that you'd like a darker shade of red. :)

The formula on all of these polishes is excellent, they apply easily and dry quickly. They can be a bit strange to work with because the polish turns clear almost as soon as you put it on, but it changed slowly enough that I didn't have any troubles applying evenly. However, Aleksandra warns that it can be easily to get some of the polish on your cuticles, have it turn clear, and then forget it's there until it turns colors later, so you may want to clean up your cuticles carefully.

All of these are available now in the InDecisive Nail Lacquer shop, which you can reach by clicking here. As with her other polishes, these are three-free, not tested on animals, and thoroughly human tested for months before she releases them.

I'll be back tomorrow with some nail art, and then I'll bring you the last (awwwww...big sad face) InDecisive Nail Lacquer review on Saturday.

Thanks for reading! Big hugs,
M.

(The polishes in this post were sent for my honest review.)