Showing posts with label shrinking images. Show all posts

Tuesday, April 5, 2016

Review: UberChic Beauty XL clear stamper +DIY holder

(Press sample)

Hello!.

Don't you just love it when a bunch of things you love come together and merge into one great pile of awesome?

You know I love clear stampers. You also know I love XL stampers. I also love shrinking images. So far, I haven't had a stamper that covers all of these needs at the same time, but UberChic Beauty has come out with an awesome solution, an XL clear stamper head:


You may have already seen my video review of this stamper head; if not, you can see it in action here:


As you can see, the head is completely transparent; this means you can see through a huge stamper large enough to cover even long nails:


How long is long? Well, the diameter is about just shy of 1 3/4 inches:


So you might be thinking "Hey Michelle, what about a holder?! If I put it in my normal XL holder that sort of ruins the point, because the holder isn't clear!" That's a very good point! There are two solutions. One is to just use it without a holder--it's big enough that you can just gently roll it over your image even without a holder, and I show you exactly how long it took me to get used to using it that way in my video (spoiler alert--next to no time).

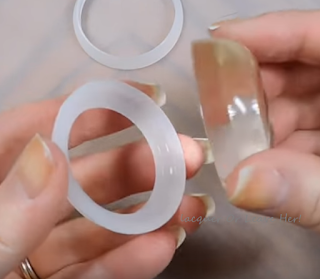
The second solution is to create a DIY holder for it. UberChic Beauty suggests a polywasher; here is the one I found at Lowe's, item # 24622:


There are two different ones in the package; this is the one I prefer--notice that there is a lip that comes in on one side:


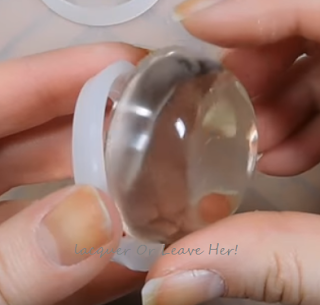
All you do is slip the stamping head into the washer just like you would any other stamper:


Here's what it'll look like from the back; you can see that there's plenty of room to hold it, and you can still see through the head beautifully:


You can see exactly what you're picking up:


And exactly where you're stamping!


I've also heard tell of people using rolls of washi tape and the tops of medium Rx bottles to accomplish the same thing.

One very important quality of this stamp is that it's very squishy! Look how far I can press my nail into it:


But because this is big and squishy, there's something else you can do with this that you can't do with other stampers--you can shrink images! I show the technique in the video, but the crucial part is you need to be able to stretch your stamper out so it shrinks the image when it releases:


I recommend still being careful when you use this technique--I haven't had a chance to see how it holds up over time. During the few times I've used it to shrink so far it works really well; proceed with caution and try to make sure you aren't pulling one area more than others so you can minimize any potential durability problems.

Is this a must have? If you have longer nails, I absolutely think it is. In fact, I plan on stocking up on a few for making reversed-stamping decals and the like.

You can find this hunk of awesomeness in UberChic Beauty's store, and you can follow them on Facebook for new, updates, and to keep an eye out for sales!

Happy stamping,
M.

Friday, October 16, 2015

Review and How-to-use: MoYou London Gothic 07

(Affiliate links)

Hello!

The next theme in the Crumpet Nail Tarts challenge is "Geek". I'm many different flavor of geek; in fact, many of my friends would call me a nail art geek! But I happen to be embracing my steampunk geek this halloween, so I decided I needed to go with that particular flavor for this post.

I have several awesome steampunky plates, including one I haven't showed you before: MoYou London Gothic 07, which is a beautiful blend of Halloween and Steampunk chic.

Of course I made a video:


Here are the stills:


MoYou London Gothic 07

MoYou London Gothic 07

MoYou London Gothic 07

There's so much I love about this plate...the clock swirl is amazeballs and the chandelier is awesome and the winged key with the lock is adorable. But the best, the most awesomest, the coolest of the cool, is the mechanical bat--seriously, how cool is he?? But...he's too big to get him on your nail just as is, so I'm gonna try shrinking him and see how that goes.


How big are the images? They're all different sizes, but this should give you a basic idea: 

MoYou London Gothic 07 vs. Konad


Okay, so for steampunk geek chic mani, I started with a skittle of Zoya Channing (a rust orange shimmer) and Orly Iron Butterfly, a flecked pewter matte.

Next, I shrunk down the mechanical bat and did a little reversed-stamping on it; I filled in the wings with Orly Iron Butterfly.

I also used reversed-stamping on images of the lady's lovely face and hair, and her hat; I wanted to keep her face big but have the hat fit into the image, so I isolated out the hat and decorated it separately, then placed it down lower onto her head. To color the flowers of her hair I used Zoya Dree and Zoya Aggie; I used Zoya Cinnamon for the hat.

Finally, I stamped gears and the clock swirl on with Barry M Silver Foil


Here's how it turned out:

Steampunk geek chic

Steampunk geek chic

Steampunk geek chic

Can I gush a little about how much I love this mani!? The had didn't come out quite right, I should have done two coats of polish to make sure the base polish didn't show through. But other than that, I am sooo proud of it--the bat shank down perfectly to fit on my nail, I love the rakish angle of the hat farther down on her head, and the gears and colors all have a vintage Victorian feel perfect for steampunk. It broke my heart to take this beauty off. *sigh*

What do you think? Steampunky or no?

You can find this plate on MoYou London's website; while you're there, check out the new steampunk collection. Can't wait to get my hands on some of those goodies!

Happy stamping!
M.


Saturday, September 19, 2015

Before & After: Zoya Ember + UberChic Beauty Sugar Skulls 01 (Or, Shrunken heads)

(Press sample; affiliate links)

Hello!


So I said I was gonna test out whether or not you can shrink the sugar skulls on UberChic Beauty's Sugar Skulls 01 plate, and I'm back with a report. Spoiler alert--you can!


For this manicure I started with a base of Zoya Ember, from their 2015 fall Flair collection:


Zoya Ember


 Then I picked two skulls that were about the same in size from the plate:


UberChic Beauty Sugar Skulls 01


I shrunk the top one--it came out well, with the lovely details preserved! As you can see, it's a little smaller, and now fits with no problem on my ring finger:


UberChic Beauty Sugar Skulls 01 shrunken!


I pulled the image of the other skull at full size, to put on my thumb; I decorated them using the reversed-stamping technique (I used Zoya Hannah, Zoya Sia, and Sally Hansen Lightning). The I stamped some of the big roses with Konad Black, and the rose/thorn pattern with Barry M Silver Foil. Here's how it all came out:


So, since I shrunk down this skull image...

does that make me a head shrinker?

Zoya Ember + UberChic Beauty Sugar Skulls 01 mani


Zoya Ember + UberChic Beauty Sugar Skulls 01 mani


You can see in the last picture the relative size and detail of the two skulls, with and without shrinking. So, you should be able to shrink down the medium sized skulls on this plate and use them whole on your nails no problem. If you're not sure how to shrink images, you can see my tutorial by clicking here.

Happy shrinking!
M.

Saturday, November 22, 2014

Tutorial: Shrinking stamping images

(Nothing to disclose)

Hello!

Last time I showed you this manicure, and told you that I shrank the angel's head so that it would fit onto my nail:


I'm back with the tutorial I promised on how to do this; to be clear, this is not my idea, it's been going around the blogosphere and YouTube, and I'm not sure who originated it iIf you know, please say in the comments). So I didn't originate it, I just want to show you how I do it for minimum distortion and give you a tutorial pin for it. :)

The basic idea here is simple: you stretch your stamper head before picking up your image. Then, you release the stamper head back to its original shape before stamping the image; when you release, the image will contract, and be smaller. But it can be tricky to do it without distorting the image. So let me walk you through it, with my little tip.

First, apply your polish and scrape as you normally would.

Next, take your stamper head, and stretch it. You'll need a squishy stamper head for this, and the squishier the better:


Stretch your stamper head with two fingers and your thumb

What I've found is that the people I've seen use two fingers with this technique end up with an image that is fairly distorted--it shrinks more in one direction (how tall it is, say) than the other (how wide it is). That's fine for a lot of images, or if a bit of distortion doesn't bother you. But for things like faces, it can make a big difference. I found that when I use three fingers (well, two fingers and my thumb) to make a sort of triangle shape like above, I can get rid of the distortion to the point that it's barely noticeable.

Once you have picked up your image with the stamp, release it from the stretch, and take a look at it to be sure it looks acceptable:


Release your image and check it.

You can see there is almost no distortion here; there is a little bit though, so you might decide you want to do it again.


Once you get an image you like, stamp it onto your nail as you normally would; don't bother about putting it back into the holder:


Stamp image onto your nail.

And there you have it! As you can see, I have almost no distortion at all, and the image is about 2/3rds the size of the original image.--This will make lots of images on collage-style plates that are just a liiiiittle bit too big useable for you. :)

Here's the technique in one picture for you so you can grab it:


Tutorial on how to shrink stamping images


Play around with it--practice a few times, and you'll get the hang of it in no time. :)

Hugs and happy Sunday!
M.