Showing posts with label Digit-al Dozen. Show all posts

Thursday, August 15, 2019

The Digit-al Dozen Does Patterns, Day 4!

(Press samples and affiliate links ahead!)


Hello!


Today is day 4 of The Digit-al Dozen's pattern week...and yep, you may have noticed I missed day 3, so I'm gonna make up for it with two manis today. :)


This time I wanted to play with a different type of 'pattern.' Fluid nail art is one of my favorite things because of the randomness of the patterns, and now companies are coming out with specialty polishes for your nail art, like this one from Dance Legend:


Dance Legend Bow Holo Blur is a silver holographic spot-it polish--a holographic spotter! I was crazy excited when I heard about this, and couldn't wait to play around with it. Let's take a look at the two manis I did, and then I'll talk a little about my experience with it.


For the first mani I just did plain old nail art, which, when you add holo, isn't plain-old at all:


Dance Legend Bow Holo Blur over Stella Chroma All Charged Up and Grab The Wheel

Base Polish(es): Stella Chroma All Charged Up and Grab The Wheel


For the second, I wanted to try out stamping over the holo:


Base Polish(es): Stella Chroma Classic Red
Stamping Plate(s): Dixie Plates Boho 01
Stamping Polish(es): Kaleidoscope by El Corazon Black


So in terms of my experience with the project, I found this a little more tricky to work with that other spotting polishes--I found the under polish had to be very, very wet or you didn't get much spread. Also, holo polishes tend to have a sort of fractured or pixelated look, so some of the spots don't show up as well as they otherwise would. Add to that my stamping in the second mani, and a lot of the spots blend in with the black stamping. That said: HOLO SPOTTING EFFECT. You know you want it and you know it's awesome--just make sure to keep those points in mind and you're gonna have some awesome manis!


You can find Dance Legend Bow Holo Blur over at Lantern & Wren.


I'll be back for one final day of Digit-al Dozen patterns tomorrow--in the meantime, check out what the other artists did below. :)


Big hugs,
M. xoxo

Follow me all the places! 

You are invited to the Inlinkz link party!

Click here to enter

Thursday, June 14, 2018

The Digit-al Dozen "In My Garden" Day 4: Birds!

(Press samples and affiliate links ahead!)

Hello!


We have two nests of sparrows that come raise a family every spring and summer in our garden, as well as a pair of doves that used to have two babies each year--until we got a big ol' dog that made them feel unsafe. Luckily the sparrows nest up high, so I get to enjoy them as they splash in the birdbath and dig through the bird feed we leave for them.


In their honor, today's mani features birdies! I started with a base of Sally Hansen Get Mod, then I sponged Zoya Delia over it, using this nail art tool from Beauty Big Bang (my code is MISHKA824M if you need one!). Then I stamped some Chevrons with UberChic Beauty's Got Chevron 2 plate and Messy Mansion Spring Green. Finally I added my reversed stamping, which I did with UberChic Beauty's Woodland Chic plate, filled with Messy Mansion Amalfi Coast:


UberChic Beauty Woodland Chic and Got Chevron 2 over Sally Hansen Get Mod

UberChic Beauty Woodland Chic and Got Chevron 2 over Sally Hansen Get Mod


I know what you're saying. Sparrows aren't blue--and you're right. But blue just looked so cute with the green and purple, I had to do it!


You might also be wondering what happened to my thumb. Well, since I only have one more mani in the theme after this, I took this opportunity to use my thumb to tell you a little something extra about my garden--and that's how I feel about garden gnomes:


UberChic Beauty Woodland Chic and Got Chevron 2 over Sally Hansen Get Mod


Yes, I know, many people love them, but they creep me out! That little Travelocity dude did not help the situation.


Here's the manicure matted with Sally Hansen Big Matte topcoat:


UberChic Beauty Woodland Chic and Got Chevron 2 over Sally Hansen Get Mod

UberChic Beauty Woodland Chic and Got Chevron 2 over Sally Hansen Get Mod

UberChic Beauty Woodland Chic and Got Chevron 2 over Sally Hansen Get Mod


I think the matte version is especially cute! What do you think?


I'll be back tomorrow with my final garden mani--in the meantime, check out the other ladies' manicures, linked below.


Big hugs,
M. xoxo

Follow me! 

Friday, May 18, 2018

The Digit-al Does Inspires Each Other, Day 5: Kitties and Puppies with Beauty Big Bang XL-008

(Press samples and affiliate links ahead!)

Hello!


Today's the last day of The Digit-al Dozen's inspire-each-other week, and I'm bummed--this has been so much fun, not only to do my own recreations, but to see how the other ladies have inspired one another. I'm sorry to see it end.


So, I decided to go out with a bang! You'll see what I mean...


First, let's talk about who inspired me for this mani. I absolutely fell in love with this manicure by Nails Like Lace:


I fully intend to buy that plate, but for now I don't have it...luckily, I have another one with very cute cat images on it...Beauty Big Bang XL-008. Here's the video review I did of the plate:


And here's a still shot:


I did three quick sample looks in the video:


(Please excuse the fuzz on the third swatch stick--I hit it with my acetone-covered cotton by accident. It was not my best moment.)


I also did two full manis...first let's take a look at the one inspired by Nails Like Lace. As you know, I have both cats and a dog, so I decided to modify the mani a little bit to include dogs. Since my cats completely own my dog, I thought I'd use a dog pattern in the background, with little kitties popping out on top of it. I started with a base of Spellbound Nails Marauder's Map, and then stamped with Kaleidoscope St-01 Black. I did my kitties with reversed stamping; I used Messy Mansion Summer Heat and Bisque, Moyra Sp-08 Silver, and Kaleidoscope St-02 White. Here's how it turned out:


Beauty Big Bang XL-008 over Spellbound Nails Marauder's Map

Beauty Big Bang XL-008 over Spellbound Nails Marauder's Map


So it's a little bit different, but I think I captured the spirit of the inspiration...what do you think?


For my second manicure, I started with a skittle of Zoya Karen and Sally Hansen Get Mod and Blacky O. Then I stamped my images with Hit The Bottle Polish Moonshine, Taupe-lessly Devoted and Make Mine A Mudslide (also available at Lantern & Wren):


What do you think? Those kitty paws just kill me!


You can find this plate on Beauty Big Bang's site, and don't forget to use my code for 10% off your order: MISHKA824M, and follow them around the interwebs here:


And don't forget to check out the other ladies' final inspiration, linked below. :)

Big hugs,
M. xoxo

Follow me! 

Thursday, May 17, 2018

The Digit-al Dozen Inspires Each Other--Day 4!

(Press samples and affiliate links ahead!)

Hello!


Today's the fourth day of The Digit-al Dozen's inspire-each-other week, and today I'm inspired by this manicure from More Nail Polish:


Isn't that a beauty? I absolutely adore the rhinestones across the nails. That got me to thinking...and my end result requires a little explanation, because it's fairly far afield from this one. Besides the rhinestone wave, I also love the way the nails were divided into two sections, and I wanted to play with that. I'm currently obsessed with the naked-nail-negative-space trend, so I decided to combine the two.


First, I used latex mani defender (normally used to protect your cuticles) to divide my nails--I swept it in a curve across my nail, and waited for it to dry. Then I stamped an image from Dixie Plates Lace 01, with gradient stamping--I went from white through different pinks, and finally to red (Messy Mansion Chalk, Dogwood Pink, Petal, Red-y Or Not, and Kaleidoscope St-04  Pink. I peeled of the latex, which left me with half my nails stamped, then lined with my rhinestone gradient. Here's how it came out:

Dixie Plates Lace 01, stamped with Messy Mansion and Kaleidoscope polishes

Dixie Plates Lace 01, stamped with Messy Mansion and Kaleidoscope polishes


So, as you can see, my mani is pretty different from the original--but you can definitely see where the inspiration comes from. And that's the cool thing about inspiration--one element can really speak to you, and take you off into your own new direction.


If you'd like to see how I made this mani, check out my tutorial:


I'll be back tomorrow with my final inspired mani...in the meantime, please check out what the other ladies did, below. :)


Big hugs,
M. xoxo

Follow me! 

Wednesday, May 16, 2018

The Digit-al Dozen Inspires Each Other: Day 3!

(Press samples and affiliate links ahead!)

Hello!


Today's day three of The Digit-al Dozen's inspire-each-other week, and this week I'm inspired by this mani from The Polished Koi:


What I love best about this mani is the interplay between the delicate blossoms and the opalescent glitter, and the way the texture of the glitter still shows through the leadlighting. So, I set out to recreate that.


I knew I wanted to use Zoya Saldana for my base coat right from the start, but was surprised to discover that I don't have any cherry blossom images like this--all of mine are smaller and solid, so not really leadlight-friendly. So instead, I chose a similar type of image from UberChic Beauty 14-02, and stamped with with Kaleidoscope St-01 Black. I did my leadlighting with LA Colors Nuclear Energy (at least, that's what my bottle says the name is, but I'm doubtful, because I got it at the dollar store, and when I google that name, a green shade comes up...), which I cut with a one-to-one ratio of topcoat:


UberChic Beauty 14-02 over Zoya Saldana

UberChic Beauty 14-02 over Zoya Saldana


The texture doesn't show quite the same way as Oksana's, but I do love the way the purple in the leadlighting plays with the purple shimmer in the polish, so I'm happy with how it turned out. :)


Tune back in tomorrow, same bat-time, same bat-channel, for another inspired mani! And in the meantime, check out the awesome work of the other ladies, linked below. :)


Big hugs,
M. xoxo

Follow me! 

Monday, May 14, 2018

The Digit-al Dozen inspires each other: Day 1

(Press samples and affiliate links ahead!)

Hello!


This month, The Digit-al Dozen decided to choose a mani each day made by another Digit-al Dozen member that inspires us, and recreate it in some way. Today I chose a manicure that inspired me to do as close a complete recreation as possible; as we move through the week, I'll narrow in on certain elements I want to recreate.


The second I saw this mani Courtney from Polished Lifting did, I knew I had to recreate it:


I don't have this exact polish or plate, and I had one with a very similar image on the way, but it didn't come in time...So I used the next best plate I had.


I started with a base of Zoya Darby, and then stamped using MoYou London Mandala 14. I stamped with Kaleidoscope St-01 Black, and colored in with Kaleidoscope St-04 and St-06 Mint. Here's how it came out:


What do you think, did I do hers justice? I think hers is a bit softer, but I do like how the mandala worked in place of the succulent plant. I think both are pretty nice. :)


I'll be back tomorrow with another 'inspired' manicure--in the meantime, check out the other ladies' manis, linked below!


Big hugs,
M. xoxo

Follow me! 

Tuesday, April 10, 2018

The Digit-al Dozen does Indie Love: Day 2!

(Press samples and affiliate links ahead!)


Hello!


For the second day of Indie Love, I'm going to show you another Spellbound Nails/UberChic Beauty combo, because I turn to them both so much. :)


Today I started with Spellbound Nails Transsexual Transylvania, from her Rocky Horror Valentine collection:

Spellbound Nails Transsexual Transylvania

And UberChic Beauty 23-02:


UberChic Beauty 23-02


I shoved them in my magic closet together and said my incantation, and when I opened the door, this is what jumped out:


UberChic Beauty 23-02 over Spellbound Nails Transsexual Transylvania

UberChic Beauty 23-02 over Spellbound Nails Transsexual Transylvania


I love the way the holo plays with the white stamping polish (Messy Mansion Chalk), and comes out looking like you're looking out of some spacecraft window at a lightning storm. Is there lightning in outerspace? Well, we'll just pretend there is. But one thing's for sure--in space, no one can hear your thunder.


I'll be back tomorrow with another indie polish and another indie plate maker--and an tool from an indie retailer! In the meantime, check out the other ladies' manis, linked below. :)


Big hugs,
M. xoxo

Follow me! 

Monday, April 9, 2018

The Digit-al Dozen does Indie Love: Day 1!

(Press samples and affiliate links ahead!)


Hello!


This month The Digit-al Dozen is paying tribute to indies! All week long we'll be featuring nail art with indie products.


Today I'm featuring Spellbound Nails, one of my favorite indies. She makes any type of awesome polish you can imagine, from crellies to holos to duochromes to creme. I thought I'd double-up by also featuring UberChic Beauty, one of my favorite indie stamping plate makers. I chose Spellbound Nails Durmstrang (from her Harry Potter Book 4 collection) and UberChic Beauty 23-03:


Spellbound Nails Durmstrang

UberChic Beauty 23-03


So I put them both in a bag and shook them up and here's what popped out:


UberChic Beauty 23-03 over Spellbound Nails Durmstrang

UberChic Beauty 23-03 over Spellbound Nails Durmstrang


I stamped both of the images with Messy Mansion Sterling. I think this look is bright and fun and summery, which I need right now because we're getting rain! What do you think?


I'll be back tomorrow with another indie or two; in the meantime, check out the other manis linked below!

Big hugs,
M. xoxo


Follow me! 

Friday, March 16, 2018

The Digit-al Dozen Does Stamping Day 5: Foil stamping!

(Press samples and affiliate links ahead!)

Hello!


Throughout the week we've moved through beginning to intermediate to advanced techniques, and today I'm going to finished with an advanced technique that I'm currently obsessed with--foil stamping!


In the immortal words of Kevin from Home Alone: "Don't get scared now..."


...Because this isn't really too much more difficult than regular stamping. Basically these are the steps:

1) Stamp as you normally would, using a foil-stamping polish. I'm using Moyras:


Moyra foil-stamping polish


2) Press your foil onto the image you just stamped. Remove foil gently.

3) Top with a water-based topcoat/basecoat. You can follow up with your normal topcoat if you like, but if you use it directly on the foil, because it will react and go completely bat-crap crazy and it will NOT look good.

That's it! You're done!


So here's the manicure I did, my very first attempt at foil stamping with this polish. I started with a base of Zoya Snow White, and stamped a poppy image from Dixie Plates Botanical 01. Then I stamped the dragonfly image from Dixie Plates Spring 01 with the Moyra foil stamping polish, and pressed my gold foil. I rubbed gently with a cuticle pusher, then pulled the foil off gently. Then I stamped the second layer of the dragonfly with Kaleidoscope st-01 Black. Then I topped off with UNT water-based basecoat. Here's how it turned out:


Foil stamping! Dixie Plates Botanicals 01 and Spring 01 over Zoya Snow White

Foil stamping! Dixie Plates Botanicals 01 and Spring 01 over Zoya Snow White

Foil stamping! Dixie Plates Botanicals 01 and Spring 01 over Zoya Snow White


I. Am. Obsessed. This turned out so amazing, and it was my very first try! I love, love, love this technique, and will use it a thousand more times.


I did learn a few things along the way though:

1) Not all foils are created equal. After I did this mani, I tried another mani with a different foil, one I got from a nail art store, that wasn't from Moyra. It didn't work nearly as well--the Moyra foils are thinner and adhere better. So, for best results, I'd stick with the foils meant to be used with foil stamping polishes.

2) The foils apply very well, but often won't cover perfectly. For best results, use the closest color stamping polish to the foil you're using, or to your base polish--for example, with this manicure, I used the silver polish and gold foil. If I'd used white or black, the areas that didn't cover perfectly would have shown up much more starkly. And, if I'd been using silver foil with the silver polish, the coverage would have looked perfect. If I were stamping red foil over a black base, I'd go with the black foil-stamping polish. Using the same/similar colors will save you tons of agony.


Here's a video tutorial showing how I made the manicure:


You can find the Moyra stamping polish & foil at Lantern & Wren (along with the stamping plates, and the Kaleidoscope polish). And I promise you, although this is a little more involved that regular stamping, the results are totally worth it!


I hope you've enjoyed my mini-journey from beginning to advanced stamping this week...and don't forget to check out the other ladies' manicures, linked below!


Big hugs,
M. xoxo

Follow me! 

Wednesday, March 14, 2018

The Digit-al Dozen Does Stamping: Day Three!

(Press samples and affiliate links ahead!)

Hello!


Yesterday I talked a bit about using a clear stamper to strategically place images in your stamping, and to use images meant to be layered. Today we're going to look at another intermediate mani that focuses on both placing images carefully with a clear stamper, and combining different images in your mani.


For this look, I started with a base of Zoya Sawyer, and Girly Bits Brick House (not the bottle I'm holding--I did that for contrast), then stamped images from UberChic Beauty 18-03 with Messy Mansion Soft Gold:


UberChic Beauty 18-03 over Zoya Sawyer and Girly Bits Brick House

UberChic Beauty 18-03 over Zoya Sawyer and Girly Bits Brick House

Notice that I centered the point where all the rays come together on the index and middle finger nails, and striped the other image down the side. Back in the day before clear stampers, this would have been an advanced mani, because stamping was so much harder to place precisely. Now I'd call this an intermediate mani, because you will still need to practice a little with the clear stamper to get the placement right--but not very much.


Okay, so we've gone through beginning stamping and looked at some intermediate stamping...stay tuned as I delve into a couple of advanced techniques on Thursday and Friday, and in the meantime, check out the lovely stamped manis the other ladies did, below!


Big hugs,
M. xoxo

Follow me! 

Tuesday, March 13, 2018

The Digit-al Dozen Does Stamping Day 2: UberChic Beauty Welcome Spring!

(Press samples and affiliate links ahead!)

Hello!


I started off The Digit-al Dozen's stamping week yesterday with a super-simple-but-super-chic manicure to show you how easy it can be to get great results with stamping. Today I'm gonna show you some simple, more intermediate ways to add color to your stamping.


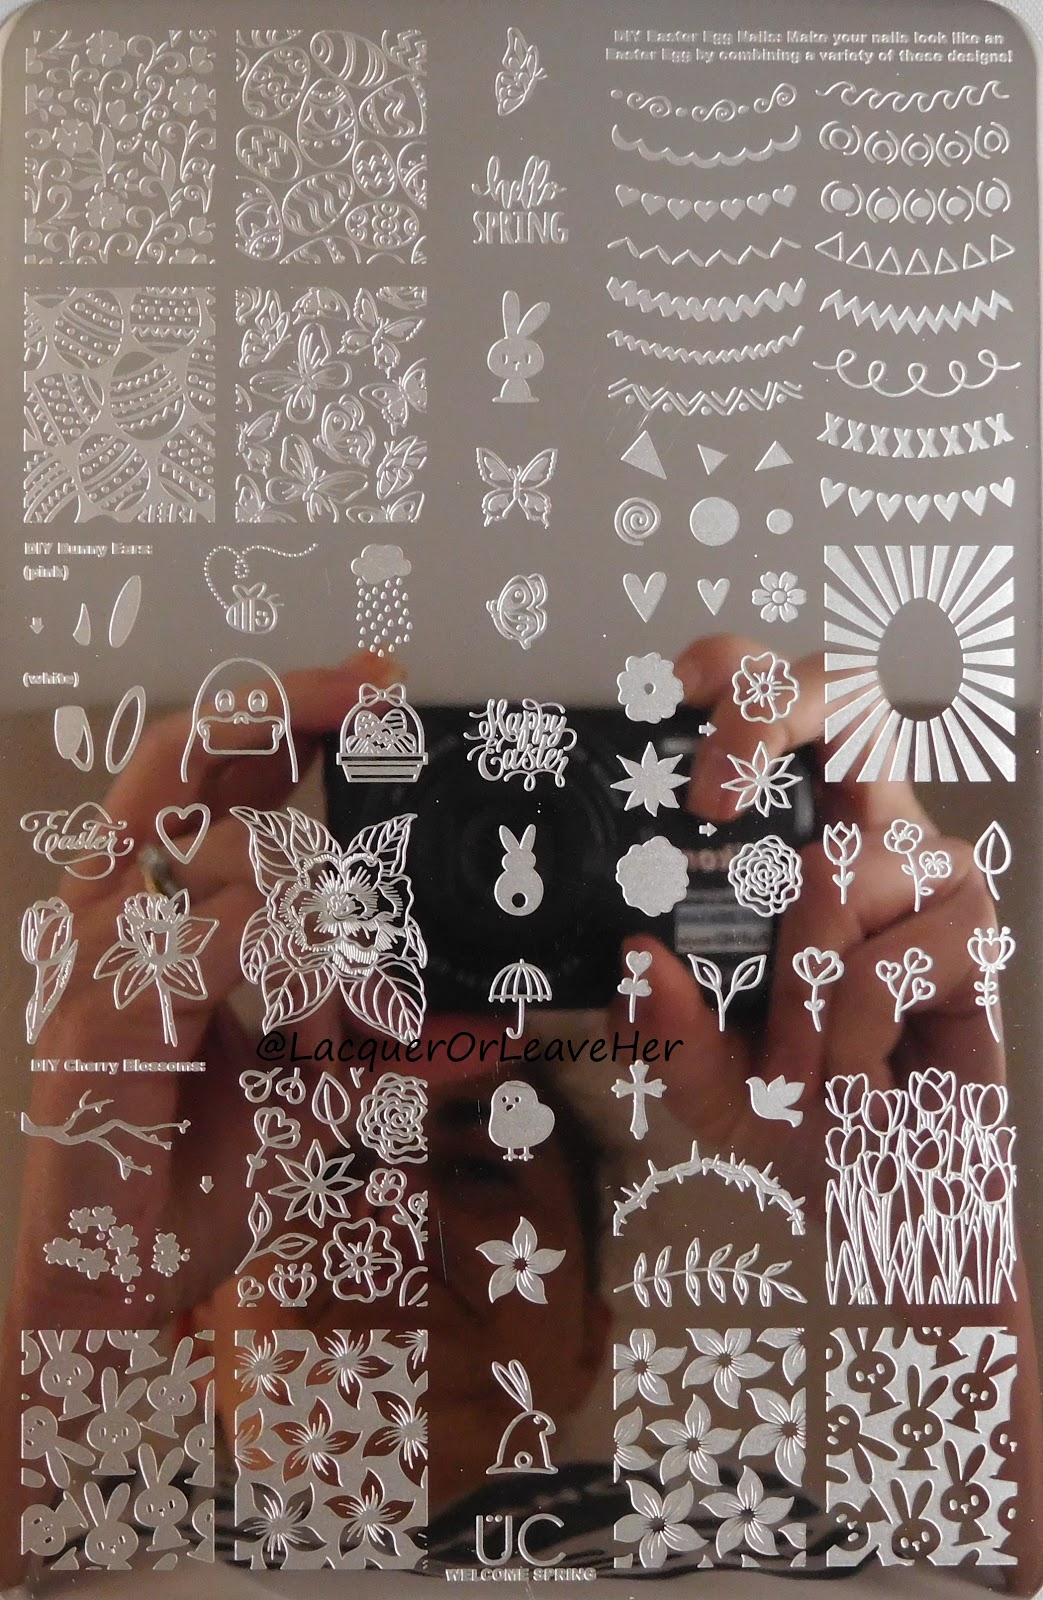
Along the way, I'll be featuring UberChic Beauty's Welcome Spring plate, hot off the stamping presses! Here's the video I did reviewing this plate:


And here's a look at the plate:


UberChic Beauty Welcome Spring
UberChic's full nail images are 1.7 x 2.1 cm, and here's a shot with a ruler so you can see how big the other images are:


As always, UberChic's stamping quality is top-notch:


Now on to the manicures! One of the easiest ways to get color into your stamping is to create a gradient, and the stamp over it. For this manicure, I used a gradient of Zoya Darby, Haruko, and Ireland, and then stamped with Messy Mansion Carbon:


UberChic Beauty Welcome Spring over Zoya Darby, Haruko, and Ireland

UberChic Beauty Welcome Spring over Zoya Darby, Haruko, and Ireland


A second way to incorporate color into your stamping is to stamp it directly using layering images. To do this, you'll need a clear stamper so you can see where you're laying down your different layers of color. If you're a beginner, start with an image like this one below, where it doesn't matter so much if you get the layers precisely placed--practice with those and when you get the hang of it, move on to more difficult images.

For this mani, I started with a base of Zoya Lacey, and stamped my branches with Messy Mansion Pudding, my blossoms with Messy Mansion Chalk and Hydrangea Pink, and dotted the flowers with Hydrangea Pink and Petal:


UberChic Beauty Welcome Spring over Zoya Lacey

UberChic Beauty Welcome Spring over Zoya Lacey

When you're feeling a little more comfortable with placing those images, you can play around with combining all sort of images and colors. For the mani below, I wanted to get the placement of the negative space oval as similar as possible over all of the nails (you'll notice it was nearly impossible on the pinkie because of the length of my nail!), and make sure the chick was placed in the same position on each nail. I started with a base of Zoya Snow White, and then stamped with Messy Mansion polishes in Amalfi Coast, Spring Green, Happy Now, Banana Bender, and Petal


I love how each of these manis came out, for such different reasons! I love how well the gradient came out on the first, pastel and spring but still vibrant; I love the lacy feel of the cherry blossoms, and the pop-art chick-lets just make me smile. :)


You can find this plate on sale now in UberChic Beauty's store, and you can follow them around the interwebs here:


I'll be back tomorrow with more stamping, and in the meantime, check out what the other Digit-al Dozen ladies did, linked below. :)


Big hugs,
M. xoxo

Follow me!