Okay, I said yesterday's mani was my last Halloween mani of the year.
And it is.
But, November 1st is a day that a lot of cultures celebrate as a day to remember the loved ones they've lost, and in that spirit, I have a mani about trying to talk to those we have on the other side...
MoYou London Circus Collection 07 over Blue-Eyed Girl Lacquer A Soul For Sale Or Rent and The Lady Varnishes Evil Like Me
MoYou London Circus Collection 07 over Blue-Eyed Girl Lacquer A Soul For Sale Or Rent and The Lady Varnishes Evil Like Me
What do you think? I love stuff like this--I read tarot cards, and one of my book series is about a woman who solves mysteries with the help of an enchanted tarot deck--so this is right up my alley.
Today we're gonna take a look at this year's Halloween plate from Dixie Plates, Halloween 2017--here's my video review of it, along with DP 05, the Halloween plate from last year:
Le'ts take a closer look at the plate:
Dixie Plates Halloween 2017
What I love best about this plate: OMG, where do I start?! The negative space eyeballs, dancing skeletons, the skeleton hands, I have nothing like those and I am sooo excited to use them. But I think the every best part is the bottom of the plate, which is like a build-your-own scary costume accessory for any look that involves slashes gashes or drips of blood, pus, and gore. So whether you're going as a zombie or a vampire or a crazy asylum inmate, your nails can have the appropriate damage and gore. LOVE.
The full nail images are 2.1 x 2.5cm, and here's a shot with a ruler along the bottom so you can judge the size of those images:
How about quality? These swatches are done with Sally Hansen Insta-Dri Grease Lightening and a clear stamper:
Great detail in the fine lines and great large, solid areas. Top-notch, my friends.
For my first mani, I had to test out the build-your-own-gore look, because I'll be doing a zombie scare for my trick-or-treaters this year, and plan on being a zombie ring-master. So, I started with a base of Zoya Darcy on my accent nai, and Scout on the rest. I saran-wrapped Zoya Dree over Scout, and then stamped my images with Messy Mansion, Carbon, Ivy, and Spring Green. Finally, I sponged a mixture of Sally Hansen Insta-Dri Grease Lightening and Messy Mansion carbon around the edges of the nails to make them look like they'd been clawing dirt:
Dixie Plates Halloween 2017 over Zoya Darcy, Scout, and Dree
Dixie Plates Halloween 2017 over Zoya Darcy, Scout, and Dree
I love how this look came out, and I absolutely am going to redo it for Halloween night!
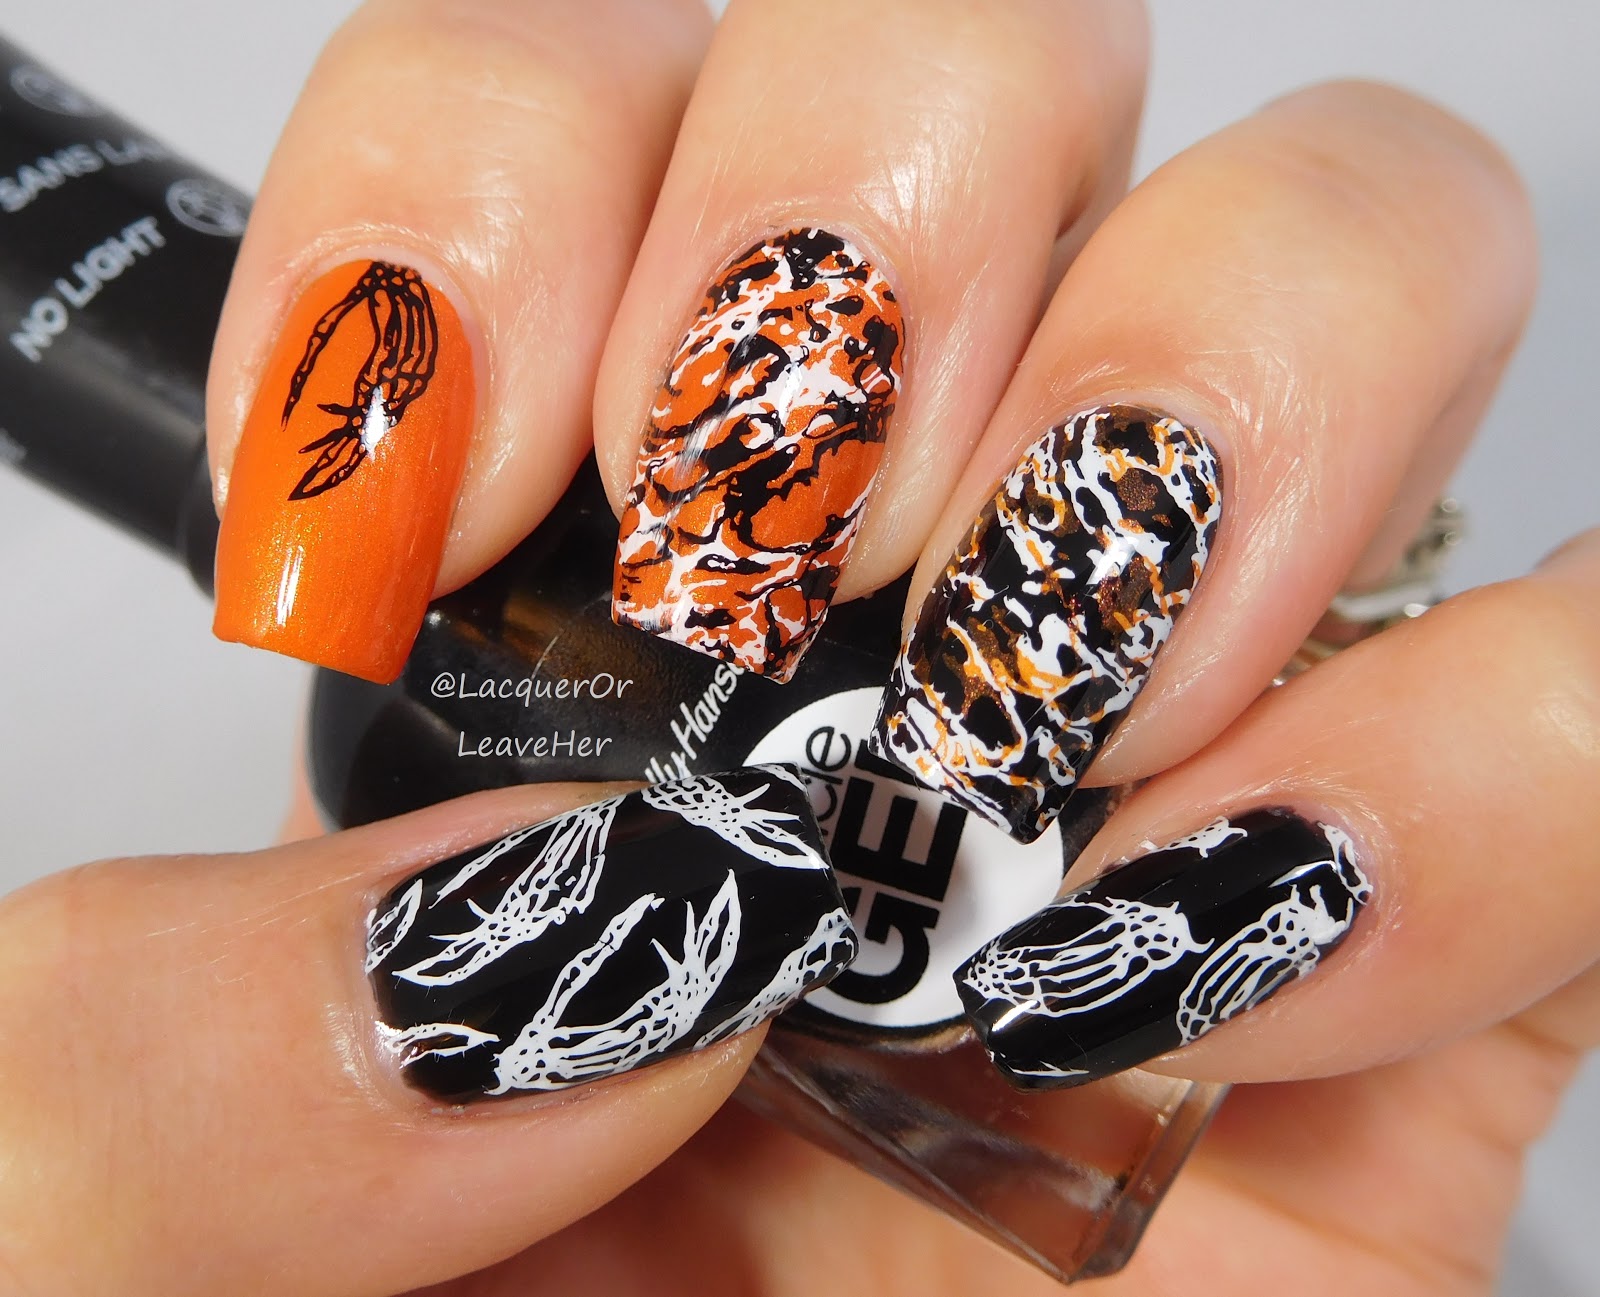
For my second mani, I couldn't resist playing with the skeleton hand image, and I'm currently obsessed with Dixie Plates Marbled 01, so I thought I'd add that in for a cool skittle mani. I started with a base of Sally Hansen Blacky O and Moonflower Polish Atardecer en el Morro (a stamping polish formulated for use as a regular polish, as well). Then I stamped using Messy Mansion Carbon, Chalk, and Moonflower Polish Atardecer en el Morrow. Then, for the first version, I added a skeleton hand charm from Charlie's Nail Art that I've been dying to use:
Dixie Plates Halloween 2017 over Sally Hansen Blacky O and Moonflower Polish Atardecer en el Morro
Dixie Plates Halloween 2017 over Sally Hansen Blacky O and Moonflower Polish Atardecer en el Morro
For my second version, I stamped one of the claws on the index finger in place of the charm:
Dixie Plates Halloween 2017 over Sally Hansen Blacky O and Moonflower Polish Atardecer en el Morro
Dixie Plates Halloween 2017 over Sally Hansen Blacky O and Moonflower Polish Atardecer en el Morro
Which do you like better, with the charm or without? I can't decide...Either way, I put together a video tutorial so you can get the look yourself:
If you're in the US or Canada, you can find this plate at Lantern & Wren, and if you're in the UK, you can find it at Nail Stamping Queen UK. For other locations, check the Dixie Plates site for suppliers who ship to you. You can also stalk Dixie Plates around the interwebs here:
Remember the olden days when there was no such thing as clear stampers and layering plates? Good times...NOT. Thank goodness we're living in more enlightened times, and thank goodness for these layering plates from Messy Mansion:
If you're on your way to a party or just want to look like you've got a party on you hands, this is the plate for you! Presents and banners and balloons, and even ice cream, all done in layers so you can get all the color your heart desires.
The images are all different sizes, so here's a shot next to a ruler to give you a sense of how big they are:
And how do they stamp? Really well:
I did this on camera, so my layering isn't perfect, but you get the idea!
For my sample mani, I wanted to play around with the bows, and was inspired to pair them with these cute bow charms sent to me for review by Charlie's Nail Art:
Messy Mansion Crystal 01 & Charlie's Nail Art bow charms over Blue-Eyed Girl Lacquer Best-Selling Show, A Love Such As This, and Spellbound Nails Milky Way
Messy Mansion Crystal 01 & Charlie's Nail Art bow charms over Blue-Eyed Girl Lacquer Best-Selling Show, A Love Such As This, and Spellbound Nails Milky Way
Messy Mansion Crystal 01 & Charlie's Nail Art bow charms over Blue-Eyed Girl Lacquer Best-Selling Show, A Love Such As This, and Spellbound Nails Milky Way
What do you think?! I love this soooo much, it's so pin-up and retro and cute. And I love how all of these colors play together! And I was impressed--these bows stayed on much better than I expected them too, I think because the edges are rounded, so they didn't catch as much as I expected them to. I wouldn't expect them to stay on for days at a time, but for an event I think you'd be okay. :)
You can find the bows in Charlie's Nail Art store, and you can use my code, LOLAM10, for 10% off your order. You can follow them here:
Today we're gonna take a look at some star charms that were sent to me for review by Charlie's Nail Art:
Charlie's Nail Art Star Charms
The moment I saw these, I thought they'd make the most adorable mani with the stars and constellation mani from Born Pretty Store BP-L056 (you can see my video review of this plate here):
Born Pretty Store BP-L056
I started with a base of Sassy Pants Polish To All A Good Night, and stamped first the stars-in-circles image on the upper left with Hit The Bottle Polishes Amethyst Sizzle, then the constellations image with Messy Mansion Chalk, then I put on the star charms:
Charlie's Nail Art star charms over Sassy Pants Polish To All A Good Night + Born Pretty Store BP-L056
Charlie's Nail Art star charms over Sassy Pants Polish To All A Good Night + Born Pretty Store BP-L056
So first, let me say that I love so much about this mani--I love the way the base polish and the Amethyst Sizzle work together to creat a great night sky--even though the white stamping over the top obscures the pattern, the colors are lovely together, and I'm in love with that constellations image.
That said, the stars are just not right for my nails. I actually think they look cute, but they're just too big for someone like me that has curvy nails, they just stick out way too far:
Even with industrial strength nail glue, these are gonna pop right off, or destroy some article of clothing I love. If you have large, flat nail beds they may work for you, but even on my thumb, which is broader and flatter, they were problematic:
Definitely less so, but still too much pointy stick-outage to make this a viable look for me. Like I say, though, if you have broad flat nails, these might work for you--I'll be wearing the rest of mine on my big toes come summer sandal time.
You can find these in Charlie's Nail Art's store, and you can use my code, LOLAM10, for 10% off your order. You can also follow them on Facebook and Instagram for tons of inspiration and news updates!
Okay, so. See, what had happened was? Well...let's just say this one might have gotten away from me.
When I received a set of little fimo presents to review from Charlie's Nail Art, I figured Christmas was the perfect time to do it, and I figured that the colors would be a refreshing change from typical Christmas colors. So I lined up my plates and my polishes and everything, sang a happy tune, and put it all together.
Fimo presents from Charlie's Nail Art, UberChic Beauty Christmas 02 and Lina Nail Art Supplies Can't Wait For Xmas! over Sassy Pants Polish Luster Of Midday
Fimo presents from Charlie's Nail Art, UberChic Beauty Christmas 02 and Lina Nail Art Supplies Can't Wait For Xmas! over Sassy Pants Polish Luster Of Midday
What do you think? I can't decide how I feel about it. Every component is super cute, but together I'm not convinced it fully works. Maybe I was just more optimistic about the combination of yellow and purple than I should have been, or maybe I should have put the dots under the top coat of Luster Of Midday. I'm not saying I don't like it--when I make a mani I don't like it doesn't make the blog. I'm just not completely sure about it. I will say I love the sparkle it gives, and the present theme, and the fimo slices are super cute! Just maybe I'd put it all together differently next time.
You can find the fimo slices in Charlie's Nail Art's shop (I think the blue and pink ones in the set would be super cute for a baby shower mani--and for $0.64, how can you go wrong?). Use my code LOLAM10 for 10% off your order. And don't forget to follow them on Facebook and Instagram for updates and tons of inspiration!
(1) It's Halloween time.
(2) The Walking Dead is about to start up again.
Therefore: Let there be zombies. Soon they'll be everywhere, watching you from around corners, stalking you so they can nosh on your brain...Or maybe just ringing your bell on Halloween to get some candy. You know, whichever.
I stamped with Messy Mansion Red-y Or Not, and for my finishing touch, added some spooky eyes that I bought over at Charlie's Nail Art:
Eyeballs from Charlie's Nail Art
Here's how it turned out:
Messy Mansion MM81XL over Sally Hansen Chartreuse Chase
Messy Mansion MM81XL over Sally Hansen Chartreuse Chase
Messy Mansion MM81XL over Sally Hansen Chartreuse Chase
AAAHHHRRGGGHHH!!! Okay, I don't know if that freaks you out, but it definitely freaks me out.
You can find the plate and polish in Messy Mansion's store, and you can find the eyes over at Charlie's Nail Art. If you head over there, don't forget to use my code for 10% off: LOLAM10.
Charlie's Nail Art recently sent me these adorable little butterfly charms to review:
Charlie's Nail Art Butterfly Charms
I like a good nail charm now and then, and I quickly fell in love with these. Unlike many charms, they're extremely flexible, which means I can bend them to fit my nails no problem, or leave them at angles for artistic purposes. I was also surprised to discover they're reversible--they're black on one side and gold on the other, so you can choose which color you want without worrying about running out. I also love how intricate these butterflies are!
For my test mani, I wanted to create the look of a butterfly flitting aroud a flower. To create the effect, I did a stamping sandwich with Spellbound Nails The Knight Bus; in between layers I stamped a butterfly from UberChic Beauty 9-02:
Flutterby with Charlie's Nail Art charms and Spellbound Nails The Knight Bus
Flutterby with Charlie's Nail Art charms and Spellbound Nails The Knight Bus
What do you think? I'm not sure I quite captured the look I was going for, but I like the end result. One tip for you--I am generous with topcoat when I attach charms like these, but I wasn't careful when I applied it, so I smudged the stamping on the flower a bit. So be careful! Ultimately, this ended up a little busier than I intended, but I still like it--it's light and flirty and perfect for the last days of summer. And believe it or not, the butterflies stayed put until I removed them!
You can find the charms at Charlie's Nail Art, and you can get 10% off your entire order using my code: LOLAM10. You can also follow them on Instagram for inspiration!
So I was playing around with some nail foil that Charlie's Nail Art sent me for review, and when I saw what I came up with, I knew I just had to turn it into some steampunk nail art...but wait, I'm getting ahead of myself!
So, okay. I started with a base of Zoya Yuna, a dark gray with green-gold flecks:
Zoya Yuna
Now, you know you can cover your entire nail with nail foil, but I like to play around with it and use it in different ways. You can use it with stamping (see my post here), and I love to use it for background texture. Since I am currently obsessed with the dry-brush technique, I decided to see how it would look in combination with that.
I love that just the way it is--it's abstact and arty, makes me think of something you'd see in a museum. But my second thought was that it would be a perfect background for a steampunk mani! So I pulled out MoYou London Steampunk Collection 03 to stamp with.
I did a video of this plate you can see here:
And here's a closer look at the plate:
MoYou London Steampunk Collection 03
Clockfaces and geegaws and gears, oh my!
I stamped with Messy Mansion Soft Gold, and here's how it came out:
Dry-brush + nail foil technique + MoYou London Steampunk 03
Dry-brush + nail foil technique + MoYou London Steampunk 03
I love, love love love, love it. It's like some abstract bio-mech steampunk concoction filled with gears and awesome! I love how the depth and the holographic flash the nail oils add, like pieces of some precious metal suspended on my nails. :)
You can find the nail foil at Charlie's Nail Art, and you can use my code LOLAM10 for 10% off whatever you order. You can also follow them on Instagram for tons of inspiration.