(Press samples ahead!)
Hello!
Incoco has released an awesome set of appliques for the winter and holiday season, their Winter Magic Collection!
 |
| Incoco Winter Magic Collection |
 |
| Incoco Winter Magic Collection |
I haven't featured any nail appliques for a while, so here's a run-down of why I like nail wraps, particularly Incoco's, and why particularly during the holiday season:
- Time savings. Yes, I love spending hours doing my own manicures, stamping, free-hand, whatever. But during the holidays, time gets a little more scarce, especially when I have to cook and clean and then go to or host a gathering with nails destroyed by said cooking and cleaning. In 5-10 minutes I have a great manicure with these.
- Good, easy fit. Incoco wraps stretch gently, so you can finesse the fit if the wrap is a little too small, or your nails are a slightly different shape. They trim down easily if you don't have enough of the right size. They're removable until you press them down so you can adjust. And then once you do press them down, they fit smooth with the nail, like real polish. Because they are.
- Easy glitter removal. Incoco's glitter appliques remove almost as easily as their regular appliques, without a glue base, foil wrappers, etc. LOVE.
- Easy accents. I can make things even faster by just throwing on an accent nail, and that also stretches how much value I get out of a set.
- Easy mix-n-match. I love how Incoco always has some solid colors/glitters that match well with their patterns, so even when I'm in a hurry I can still create my own look with skittles.
- Made with real nail polish. This makes them easy to decorate if I want to add to them, so I can throw on a glitter, for example, and then do a quick stamp over them.
First up is Berry Glitz, a gorgeous cherry red with fine glitter:
 |
| Incoco Berry Glitz |
 |
| Incoco Berry Glitz |
This is a perfect Christmas red, right, cheery, and fun. :) Beautiful to wear on their own, this also match several sets in the collection, and are an excellent, easy-to-remove glitter base for your own art. My recommendation: mix these with Christmas Magic or Merry Mint.
Next we have Bundled Up, Incoco's take on sweater nails:
 |
| Incoco Bundled Up |
 |
| Incoco Bundled Up |
I love the combination of colors on this--I don't care who you are, these sweater are cute, not ugly. :)
My recommendation: Wear this one by itself, or do a skittle mani with Party Time.
Next is Christmas Magic, a combination of red and green decorations on a sparkly gold background:
 |
| Incoco Christmas Magic |
 |
| Incoco Christmas Magic |
These make a gorgeous mani on their own, but also mix beautifully with Berry Glitz or Spruced up. My recommendation: mix the red trees with Spruced up, the green trees with Berry Glitz, and use your leftovers in a combo skittle mani. Work it, baby.
Next is Cold Spell, my favorite of the collection--a blue-and-white glitter gradient to make your nails look softly icy:
 |
| Incoco Cold Spell |
 |
| Incoco Cold Spell |
This has the advantage of a smooth, easy gradient and a glitter all in one. Insta-gorgeous, and with easy removal to boot. My recommendation: Pair these with First Snow.
Next we have First Snow, a white applique with a spray of snowflakes across that fade into the white:
 |
| Incoco First Snow |
 |
| Incoco First Snow |
I love the decision to have the pattern on this fade on and off rather than have it completely cover the wrap. Keep in mind you'll only be using up to about the half-way point of the wrap--so the two on the left of the bottom picture are going to have the snowflakes across your half-moon area, and the two on the right are going to leave the bottom of the nail near the cuticle white. So you can mix and match these to get different effects based on placement. My recommendation: Cover your pinky, ring, and thumbs with the snowflakes on the top, and have them at the cuticle on your middle and index fingers. Trim the bigger wraps if necessary.
Next up is Holiday Treasures, a mixture of presents, candy canes, and gingerbread dudes:
 |
| Incoco Holiday Treasures |
 |
| Incoco Holiday Treasures |
These work together for a fun skittle mani, but my recommendation is to split these up and use them as accent nails with Berry Glitz and/or Spruced Up. Trim the wraps down as needed for the accents/skittle manis (I'll do a video showing this, if it will help--let me know).
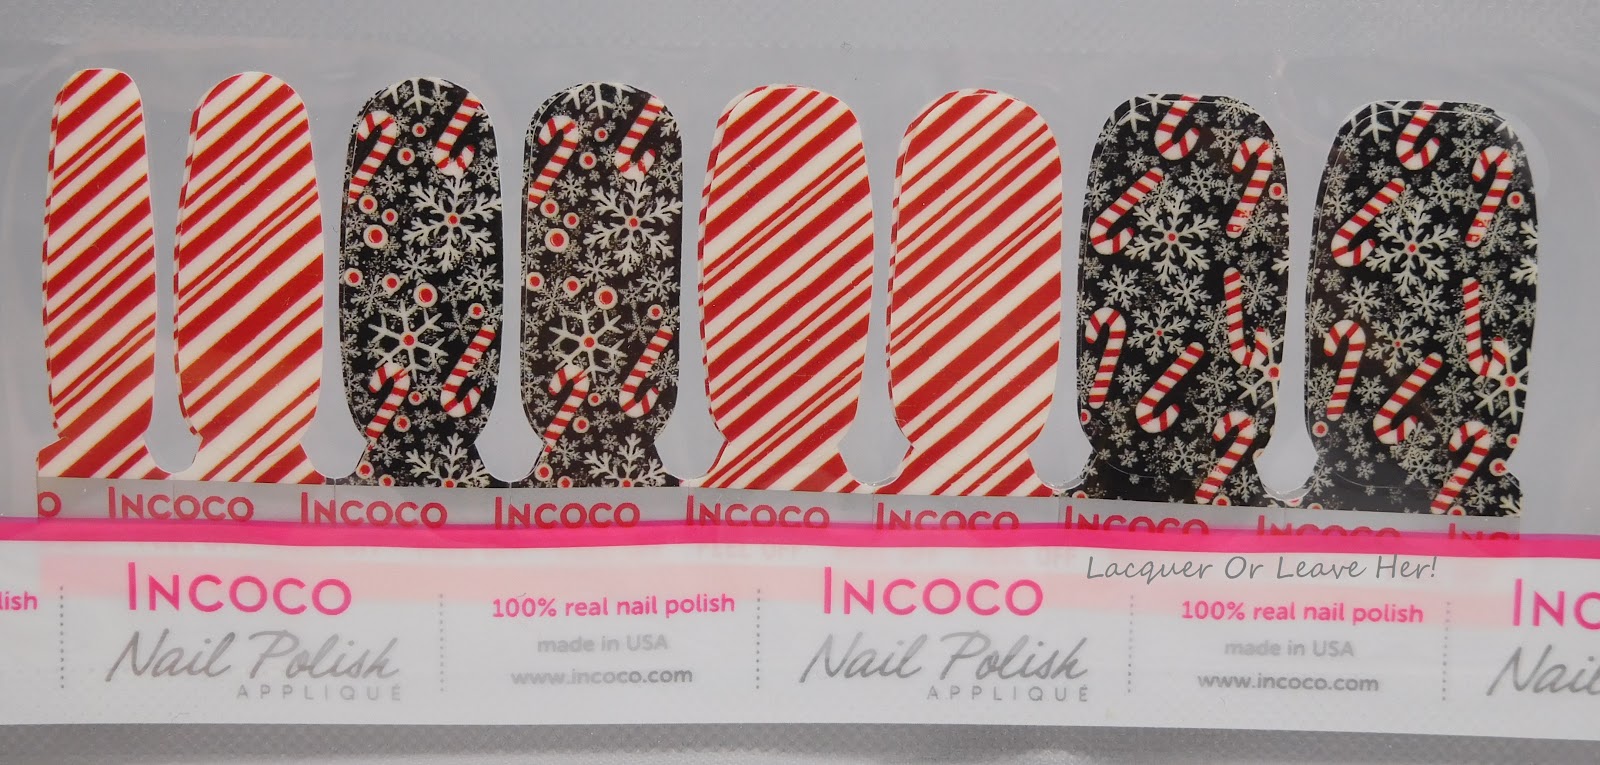
Next is Merry Mint, a combination of red and white stripes and a candy cane snowflake collage:
 |
| Incoco Merry Mint |
 |
| Incoco Merry Mint |
I adore this combination of black with the red and white! It's sweet, but with a little edge. This would also pair with either Party Time or Berry Glitz, but my recommendation is to just skittle the heck out of this one as is. LOVE.
Next we have New Year Cheer, a mixture of gold and black fireworks on sparkly backgrounds along with 'Happy New Year' nails:
 |
| Incoco New Year Cheer |
 |
| Incoco New Year Cheer |
This is a great set for New Year's Eve (obviously!) and you can do a full mani without the nails that say 'Happy New Year' if you want. Unless you have really big nails, if you want to put those words on your thumbs, you're going to need to trim them down. I do this by taking one of the ones that fits the nail I want, centering it over the bigger nail, and trimming around it. This also pairs well with Party Time, but since New Year's Eve only comes once a year, my recommendation is to just skittle these bad boys on their own. You can get use of a set for a week or so if you keep it sealed up once opened, but definitely not for a full year, so just go for it. :)
Next we have Party Time, a glowing black glitter:
 |
| Incoco Party Time |
 |
| Incoco Party Time |
I love the night-sky sparkle look to these, and they pair well with Merry Mint, Bundled Up, or New Years Cheer. They'd also lend a sparkly touch anytime you feel girly goth. My recommendation: stamp with silver snowflakes for a stunning night-snowfall mani.
Finally we have Spruced Up, a bright, happy Christmas green glitter:
 |
| Incoco Spruced Up |
 |
| Incoco Spruced Up |
Spruced up pairs perfectly with Christmas Magic and Holiday Treasures. You can also pick up an extra set for St. Patrick's day. My recommendation: wear these with the gingerbread men from Holiday Treasures as accent nails. Super cute. :)
You can find these and tons more applique sets on Incoco's website; If you need something in a hurry, you can also find selections at Target or at Nail Bars kiosks if you have one near you. They're also stocked at Ulta.com, Walmart.com, and Target.com.
And you can also follow Incoco for inspiration and updates:
I'll be back with some manicure creations from these beauties, so stay tuned!
Happy wrapping!
M.


