Monday, October 31, 2016

Review and Tutorial: UberChic Beauty Texture-licious plate and a masking technique! (featuring Spooky puniken spellbook nail art)

(Press samples ahead!)

Hello!


UberChic Beauty just put out a new mini, and this one is all about that texture! Here's the video I did to discuss ideas for using the images:


And let's take a look at the plate in a still shot:


One of the tips I give you all the time in my videos is to get double-duty from your images by using them as background for other images, to get texture and depth in your manis. This plate is made specifically to give you a ton of cool options for turning your mani from basic to beautiful. You can use these images by themselves, and any of them would give you a cool look. But take a look at them together with other plates you have and the combinations will start jumping out at you--I show you some possibilities with the newly released UberChic Beauty Mermaid Life plate.


These images are the same size as other UberChic Beauty full-nail images, that is, 5/8ths of an inch wide, and 7/8ths of an inch tall:


And how do they stamp? Pretty darn well:


Okay, so on to the sample manicure! Of course since it's the Halloween season, I had to do a Halloween mani with this. The image that looked the most spooky to me was the raggedy script image, which sort of reminds me of a creepy spellbook. I decided to pair it with a spooky jack-o-lantern image from UberChic Beauty's Halloween 02:


UberChic Beauty Halloween 02


And, while I wanted the script to run across the background, I also didn't want it to show behind the jack-o-lantern's eyes and smile...so I decided to try out something I've been wanting to do for a long time.


Before I was a nail stamper, I was a rubber stamper--I used to make cards, use rubber stamps in scrapbooks, all that kind of stuff. In fact, I still do, just not as much. In rubber stamping, there's a technique called 'masking' where you mask off an area and then stamp over it, so your image will show up everywhere except the area you masked off. I decided there was no reason why this wouldn't work for nail stamping, too.


To test it, I first stamped my image on the top sticky part of a post-it note. I recommend using the thinnest post-it note possible, since some are paper thin and many (like the one I used) are thicker and a bit trickier to work with. Then, you cut out your image:


Now you should have an image with a slightly sticky back. For step two, you stamp that same image where you want it on your nail. Of course I forgot to take a picture of this step, so you're going to have to trust me that it's there! For step three, you lightly place your post-it image over the image on your nail, like this:


For step four, stamp on the nail the way you normally would, right over the post-it image. I used a squishy stamper and pressed directly down onto the nail to help keep the image from moving:


Now my jack-o-lantern has the script perfectly around it, but not behind the eyes and smile, so it looks hollow inside!


So here are the product details. That lovely blue-green duochrome base polish is Zoya Remy (it's a total stunner). I stamped the jack-o-lantern first with Girly Bits Silver Bells, and then again with Girly Bits Flame, for a slightly layered effect; I stamped the script with Silver Bells. Finally, I added a witch charm from Charlie's Nail Art:


Spooky spellbook with Zoya Remy, UberChic Beauty Texture-licious and Halloween 02, and Girly Bits stamping polishes

Spooky spellbook with Zoya Remy, UberChic Beauty Texture-licious and Halloween 02, and Girly Bits stamping polishes


I love how this came out--the witch activated some of her spells and left her jack-o-lantern to stand guard while she flies off to Costco to get supplies for her Halloween party! It's a little spooky and a little fun, and I love how the colors work so well together. And the witch charm bends easily so you can tuck her around your nail, cover with topcoat, and minimize those poky edges.


You can find the Texture-licious plate and Halloween 02 in UberChic Beauty's shop, here.
You can find the Girly Bits polishes in the Girly Bits store, here.
You can find the witch charm in the Charlie's Nail Art shop, here; if you do, use my code for 10% off your entire order: LOLAM10.


Happy stamping!!
M.

Sunday, October 30, 2016

Review: Zoya Enchanted 2016 Holiday collection!

(Press samples and affiliate links ahead!)

Hello!

In a few short days we'll be moving from the Halloween season into the full-on holiday season, filled with gatherings of friends and family, holiday parties and hectic holiday shopping.


And you know you want your nails to look good through all of it.


And in my opinion, there no easier way than with Zoya's Enchanted Holiday 2016 collection, filled with PixieDust polishes and multichromes:


Zoya Enchanted Holiday 2016 Collection

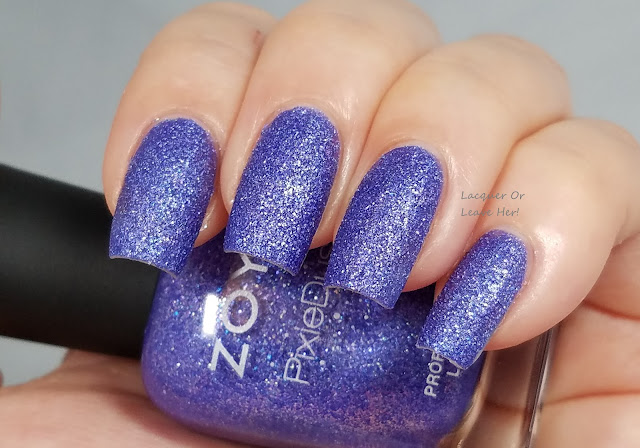
Let's jump in with Zoya Alice, a periwinkle blue filled with the glittery texture you've come to love from a PixieDust:

Zoya Alice
Zoya Alice

Zoya Alice
Zoya Alice

Zoya Alice
Zoya Alice


This is two coats, with no base coat or topcoat. Formula was excellent, and as with most Pixies, the application is about as easy and fool-proof as you can get. This reminds me of hydrangeas, or a winter sky when the sun is just starting to go down and there's a storm coming in. The color of the sparkles are hard to see in this, but they're little points of pink and blue.


Next is Zoya Elphie, the perfect deep emerald green Pixie:


Zoya Elphie
Zoya Elphie

Zoya Elphie
Zoya Elphie

This is two coats, no base or topcoat. Formula and application were both excellent. This polish is the Emerald City, it's a deep winter forest, it's Christmas trees sparkling with dew. Gorgeous.


Next up is Zoya Lorna, a rich sugared-plum Pixie:


Zoya Lorna
Zoya Lorna

Zoya Lorna
Zoya Lorna

Zoya Lorna
Zoya Lorna

This is two coats with no base coat or topcoat, again with excellent formula and application. If the Sugar Plum Fairy wears nail polish, this is it. It's blackberry pie or plum pudding on a candle-lit holiday table. Okay, now I'm hungry.


Next we have the first of two multichromes in the collection: Zoya Olivera. This beauty is an inky-blue base that shifts purple and green:


Zoya Olivera
Zoya Olivera

Zoya Olivera
Zoya Olivera

Zoya Olivera
Zoya Olivera

This is two coats with topcoat. Formula and application were both excellent. This polish is a magical winter night sky that shifts through an almost foil-like emerald green shimmer and goes to royal purple around the edges. It's vampy, but with color that maintains a jewel-like quality. Just beautiful.


Zoya Saint is the other multichrome in the collection, and is almost the opposite of Olivera, with a soft periwinkle-leanin blue base and a light magenta flash:


Zoya Saint
Zoya Saint

Zoya Saint
Zoya Saint

Zoya Saint
Zoya Saint

Zoya Saint
Zoya Saint


This is two coats with topcoat, excellent formula and application. This has an icy quality that makes me want to build a snowman or go ice skating, and a magical aspect that makes me think of fairies and dragonflies. Soft and sweet.


And finally, we have Zoya Waverly, a midnight sapphire blue Pixie:


Zoya Waverly
Zoya Waverly

Zoya Waverly
Zoya Waverly


This is two coats with no basecoat or topcoat, however, I recommend you wear a base coat with this one, although you normally can get away without one when you wear textured polishes--this one will stain if you don't put a base coat under it. Ah, dark blue, why are you so inky?


Something about this polish makes me think of velvet. It also makes me think of a star-filled night sky during a cold winter night, the kind where the chill takes your breath away. Stunning.


So what do I think of the collection overall? I love jewel-toned colors, and this hits those notes hard. I also think the holidays are a time for glitz and glamour, and there's enough magic sprinkled into this collection to keep every nail fanatic happy. And I love the ease of the PixieDust polishes--they apply easy, dry quickly, and since you don't need a base or topcoat with most of them, they're just about the fastest way to get a gorgeous manicure, something we can all get behind during our hectic holiday schedules. Without a doubt, this is an A+ collection.


You can find the Enchanted collection now on Zoya's website; you can also find it on Amazon if that's easier for you. And don't forget to follow Zoya on Facebook and Instagram for inspiration and news!


Happy polishing,
M.

Saturday, October 29, 2016

Review: Creative Shop 23 (or, Autumn Splendor)

(Press samples and affiliate links ahead!)

Hello!


Today I have a Creative Shop plate to review for you--Creative Shop 23. When Creative Shop's XL squishy stamper came on the market, I fell in love, and my XL squishies are still a go-to for me--but believe it or not, I never tried any of Creative Shop's plates. So I was eager to get my hand on Creative Shop 23, and of course I did a video review of it discussing ideas for how to use it:


(I also have a quickie review that just shows the images and the swatches if you prefer that).


Let's take a look at the plate:


Creative Shop 23
Creative Shop 23

The feel that predominates this plate to me is 'garden'. Birds and flowers and leaves, and yes, even little hedgehogs (why, why must they hog the hedge??). There are owls and beautiful little girls to put in your garden, and even a lamb or a horse to give it a country garden feel.


The full-nail images are about 5/8ths of an inch wide and an inch long:


And the plate stamps like a dream:


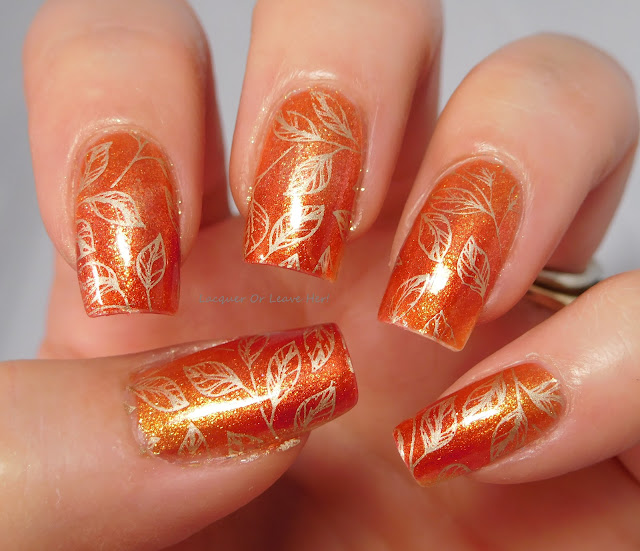
For my sample mani, I started with a base of Zoya Tanzy and Zoya Channing, then I stamped the leaf images over with Messy Mansion Soft Gold:


Creative Shop 23 over Zoya Tanzy and Channing

Creative Shop 23 over Zoya Tanzy and Channing

Creative Shop 23 over Zoya Tanzy and Channing

What do you think? I love the subtle gradient and how the gold has pop, but also complements the colors in the gradient. I love how soft the leaf pattern is, too.


You can buy Creative Shop plates, depending on your location, from these stores:

USA(ship international)- http://www.beautometry.com
Macau - http://nilnails.taobao.com
UK(ship international) - http://rainbow-connection.co.uk
UK(ship international) - http://www.nail-artisan.co.uk/
EU
(ship international) - http://www.hypnoticpolish.com


Happy stamping!
M.

Friday, October 28, 2016

NOTD: Black & Silver Halloween ball (featuring Messy Mansion MM83XL)

(Press samples and affiliate links ahead!)

Hello!

Well, Halloween is almost here, and I have a ton of new images I want to use! So I decided it was time to do a skittle mani to grab a bunch of those cool images and work them all together.

Several of the images I've been dying to play with are negative images that would show off some of the awesome holos I've reviewed lately, so I started with a skittle of The Lady Varnishes Fairy Queen, Spellbound Nails Dementor, and Sassy Pants Polish Celebrate. Then I stamped images from Messy Mansion MM83XL and UberChic Beauty Halloween 02:


UberChic Beauty Halloween 02


I used two stamping polishes, Messy Mansion Carbon and Sterling. Here's how it came out:


Messy Mansion MM83XL and UberChic Beauty Halloween 02 over The Lady Varnishes Fairy Queen, Spellbound Nails Dementor, and Sassy Pants Polish Celebrate

Messy Mansion MM83XL and UberChic Beauty Halloween 02 over The Lady Varnishes Fairy Queen, Spellbound Nails Dementor, and Sassy Pants Polish Celebrate

I just love, love love how those negative-space images let the holo goodness shine through. Have you ever seen such sparkly ghosts and spiders? And look at the holo-licious backgrounds behind those trees!!


Happy stamping!
M.

Wednesday, October 26, 2016

Review: Messy Mansion Symetrika 07 & 08 (plus Halloween nail art featuring MM22XL + Zoya Hudson)

(Press samples and affiliate links ahead)

Hello!

Messy Mansion recently released a few more of the geometric plates in their Symetrika line! Of course I made a video review:


(I also did a shorter quickie review if you just want a quick look at the plates).


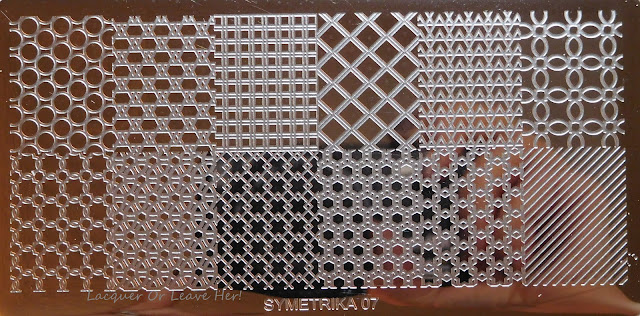
Let's take a look at the still shots:


Messy Mansion Symetrika 07
 
Messy Mansion Symetrika 08


The images on both plates are the same size, 3/4 of an inch wide by 1 inch long:


So how do they stamp?


Great images! Crisp lines and great transfer.


On to my sample mani! This year my Halloween nail art has leaned more toward the creepy side, you may have noticed. Okay, a lot more toward the creepy side. So today, I'm gonna do a one-eighty and go for something on the light, whimsical side.


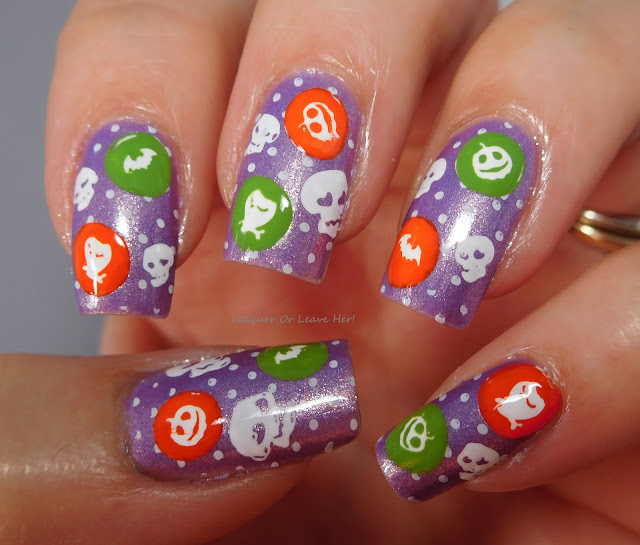
I started with a base of Zoya Hudson, and then stamped the polka dots from Symetrika 08 with Messy Mansion Chalk. Then made decals using the little circle images on Messy Mansion MM22XL:


I used Sally Hansen Lickety-Split Lime, Orange Impulse, and Messy Mansion Chalk. I finished up by stamping the little skulls from MM22XL:


Messy Mansion Symetrika 08 + MM22XL over Zoya Hudson
Messy Mansion Symetrika 08 + MM22XL over Zoya Hudson

Messy Mansion Symetrika 08 + MM22XL over Zoya Hudson
Messy Mansion Symetrika 08 + MM22XL over Zoya Hudson

What do you think? Do you prefer fun Halloween manis, or spooky Halloween manis? I think each have their place, and I love the little scowl on that owl. :)


Happy stamping!
M.