Friday, May 12, 2017

Review: UberChic Beauty Collection 16

(Press samples ahead!)

Hello!


UberChic Beauty has been putting out a ton of awesome new stuff lately, I can barely keep up! In case you didn't know, my reviews always go up in video form on my YouTube Channel before anywhere else (collection 17 is already up there, too), so if you want to see them as soon as they post, subscribe and you'll get a notification...and there might be a collection 18 review coming soon...just sayin'!


Here's the video review of collection 16:


And let's take a closer look here at the plates:


UberChic Beauty 16-01

What I'm most obsessed with on this plate: The bottom set of images with the hibiscus flowers--some with leaves, an entire sprig, a full nail image and an isolated image--so many possibilities! Also the twig image at the very top, which can be layered under just about any sort of flower image. But maybe most of all, the round image at bottom right--how cool would it be to use that to make a gorgeous sun filled with rays coming off of your half moon??


UberChic Beauty 16-02

What I'm most obsessed with on this plate: The five-pointed negative-space flower images in all the different sizes--mix-n-match possibilities aplenty. I also adore that mum-type flower that looks like a medallion--such pretty detail. And the combo check-plaid pattern is very fun.

UberChic Beauty 16-03

What I'm most obsessed with on this plate: Those deco circles that look like their made of strings of pearls!! I also adore the delicate negative-space circle flower pattern second from bottom left, and all of the patterns that play with diamonds. Love, love, and love.


UberChic Beauty full nail images are 17 mm X 21 mm. Here're shots with a ruler so you can see how big the other images are:


How do they stamp? Beautifully:


These were all done with a clear stamper, and I'm very, very impressed. Great quality!


For my manicure, I started with a base of Penny Bloom Go Sharks! (one of my custom creations!) over Girly Bits Yes, We Can, and then stamped one image from 16-02 and one from 16-03 with Messy Mansion Chalk:


UberChic Beauty 16-02 & 16-03 over Penny Bloom Go Sharks! and Girly Bits Yes, We Can


UberChic Beauty 16-02 & 16-03 over Penny Bloom Go Sharks! and Girly Bits Yes, We Can


Did I mention how excited I was about those diamond images, and the plaid/check image?? So much I couldn't decide which to use first, and I just love how well they go together. Something about this feels very spring-y to me, like the blanket you lay down for an awesome picnic on the beach. So happy with how all of these colors play with each other.


You can find this collection and tons of other goodies in UberChic Beauty's shop; you can also find them hanging out around the interwebs:


Happy stamping!

Thursday, May 11, 2017

Review: Messy Mansion MM88XL (Or, the Mystical Gem plate!)

(Press samples and affiliate links ahead!)

Hello!


Today we're going to take a look at a funky new plate from Messy Mansion, MM88XL, or as I like to call it, the Mystical Gem plate, hehe. Here's the video review I did for the plate:


Let's take a closer look:


Messy Mansion MM88XL


Raw gemstones and cut gemstones, and gemstones in pretty settings. Lots of mystical-type geometric symbols, including some that remind me of cool sci-fi insignia, and others that look like dream catchers. Lots of fun to be had here.


The sizes are all different, so here's a look with a ruler so you can get a feel for how the images will fit on your nails:


How do they stamp? Let's take a look:


These were all done with a clear stamper, and I got great lines. Love, love love!


For my manicure, I started with a base of Girly Bits Ambition, from their Warrior Goddess collection. Then I sponged on some Messy Mansion Soft Gold to get a marbled gem sort of effect, then stamped my images in Messy Mansion Pudding:


Messy Mansion MM88XL over Girly Bits Ambition and Messy Mansion Soft Gold
 
Messy Mansion MM88XL over Girly Bits Ambition and Messy Mansion Soft Gold


I'm so happy with how this turned out--the sponged background gives texture and almost a southwestern feel to it. It has a sci-fi feel with an elegant edge that I really like. What do you think?


You can find this plate, and many other awesome ones, in Messy Mansion's store, and you can also find many of their products through Amazon if that's easier for you. You can follow Messy Mansion around the interwebs here:


Happy stamping!
M.

Monday, May 8, 2017

Review: Penny Bloom build-your-own polishes!!

(Press samples ahead!)

Hello!


Have you ever wanted to make you own polish? Have you ever looked into making your own polishes, and discovered how expensive buying all the stuff is, buy it anyway, get it home and realize you don't know nearly enough about what makes a decent suspension base or how to make a crelly and then somehow managed to end up with glitter all over your table and carpet and cats?


I haven't, that's for sure. *Ahem*


Okay, I might maybe have done that a little. And while glittery cats are pretty to look at, I admit I learned the hard way that there's a lot more to making a decent glitter polish than I thought. But I still get that creative urge, and that's why I love Penny Bloom--formerly known as Nayll--because I can go there, play around creating polishes from a wide variety of glitter and colors, and none of it leaves a titch of mess on my carpet (or my kitties).


My Penny Bloom creations!!


You all know I have strange feelings about Valentine's Day--I'm much more likely to do an anti-Valentine's mani than one with hearts and flowers. So I jumped on this opportunity to create my very own semi-anti-Valentine's polish, called Don't Break My Heart:


My creation: Penny Bloom Don't Break My Heart over Girly Bits Irreplaceable

My creation: Penny Bloom Don't Break My Heart
My creation: Penny Bloom Don't Break My Heart over Girly Bits Irreplaceable

These pictures show two coats over Girly Bits Irreplaceable.  Application was very good; I did have to fish for the dots and the skulls, but I expect that with large glitters.

Recipe for Don't Break My Heart:
Base: Red
Glitter 1: Large black dots
Glitter 2: Medium red holo Squares
Glitter 3: Medium gray hex
Glitter 4: Extra-small red holo hex
Glitter 5: White skulls

What I think about how it came out: I love it, however, if I had it to do over again, I'd include a note asking for a a higher percentage of black dots. Which is an important point--you absolutely have the ability to include notes about your polish, so take advantage of that if you just want a sprinkling of something or want to be sure you get a lot of something else. I made no special requests for these polishes so you can get a sense of how much you're getting of each size glitter.


Next up is Go Sharks!, a polish I created in Penny Bloom's new 'Design your sports team' section. She has a selection of ingredients available for a huge selection of sports teams--even hockey, something that often gets short shrift here in the USA. So of course that's what I selected--I'm a hockey fanatic, and I love my San Jose sharks. Their colors are primarily teal, white, and black:


My creation: Penny Bloom Go Sharks over Girly Bits Yes, We Can!

My creation: Penny Bloom Go Sharks over Girly Bits Yes, We Can!


This is two coats over Girly Bits Yes, We Can!. Application was excellent; you will have to fish for large dots.

Recipe for Go Sharks!:
Base: Clear
Glitter 1: Large black dots
Glitter 2: Silver flakes
Glitter 3: Medium turquoise holo squares
Glitter 4: Extra-small turquoise holo hex
Glitter 5: Extra-small grey hex


What I think about how it came out: I adore this!! I love how the black dots look like little hockey pucks, and I'm so glad I chose silver instead of white shards, because it still feels like my team, but it has a celebratory, flashy feel to it.


For my next creation, I wanted to do something that captured the bright, happy, warm feel of summer, so I made Summer Sunshine:
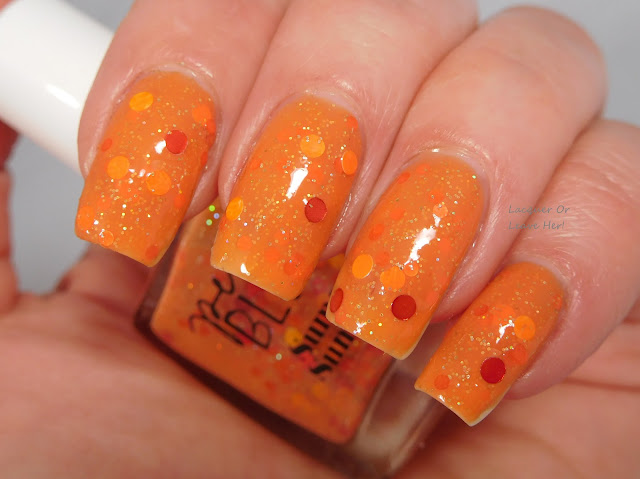

My creation: Penny Bloom Summer Sunshine

My creation: Penny Bloom Summer Sunshine


This is two coats, that built to a jelly-leaning crelly base. Application was excellent--because I had so many dots in this, I didn't have to fish, but if you want to be sure to get a certain color balance, you may want to.

Recipe for Summer Sunshine:
Base: Orange
Glitter 1: Large red holo dots
Glitter 2: Large peach dots
Glitter 3: Large orange dots
Glitter 4: Large banana yellow dots
Glitter 5: Extra-small gold holo hex


What do I think? This is tied for my favorite of the bunch--I love how the teeny gold hex glint like sun off the side of a building, and perfectly set off the larger size of the dots. I can practically feel the glow of the sun on my skin.


Following the summer vibe, I wanted to make a polish that looked like a slice of the sea, so I chose a blue jelly base and went to town for Under The Sea:


My creation: Penny Bloom Under The Sea

My creation: Penny Bloom Under The Sea

My creation: Penny Bloom Under The Sea

This is two coats of squishy goodness. Application was perfect, and no need to fish for anything.

Recipe for Under The Sea:
Base: Dark Blue
Glitter 1: Green flakes
Glitter 2: Aqua flakes
Glitter 3: Turquoise holo flakes
Glitter 4: Small silver holo hex
Glitter 5: Medium violet holo squares


What do I think? I'm so pleased with the balance here. I wanted different shades of blue to give lots of depth, but also threw in some green to look like seaweed, and some purple to give a hint of pretty fish or anemones. I love this all on its own, but can't wait to do some stamping with this--a few fish maybe?


For my final polish, I stayed near the ocean, and came up with Waves On The Beach:


My creation: Penny Bloom Waves On The Beach

My creation: Penny Bloom Waves On The Beach

This is two coats, and it applied like a dream--a wonderful surprise for a light crelly.

Recipe for Waves On The Beach!:
Base: Beige
Glitter 1: Medium sea blue holo squares
Glitter 2: Medium turqoise holo squares
Glitter 3: Medium caramel squares
Glitter 4: Large powder blue dots
Glitter 5: Aqua flakes


What do I think? This one is a close second to Summer Sunshine for my favorite. I wanted to create a polish that looked like water and sand and sea glass washing off the sand back into the ocean, and I love how this captures those colors. This polish makes me want to stroll along the beach.


Tip: Some of the bases will give you a jelly while some will give you a crelly, and some are in between. To figure out which is which, check out the brush inside the pictured bottle on the website--if you can see it clearly, you'll get a jelly finish, if you can't really see much, you're on the crelly side.


So what do I think overall? I loved creating polishes with this brand before, and I love it still. The only issue I had was two of the brushes I got were wonky--if you have an issue with that, let her know, otherwise everything was excellent. Sara has a very nice selection of base colors and glitters to choose from, and the $15 price tag is a huge savings over what I shelled out trying to make my own glitters. She makes it easy to create something you'll be proud of, and the process is just plain FUN.


You can make your own polishes at Penny Bloom here; while you're there, also check out her pre-made line of polishes, and the pages where you can design polishes specifically for bridal or baby events (love this idea for favors!). You can also check out her Facebook page and her Instagram page for inspiration. If you liked any of my designs (you can also see my previous creations here and here), please feel free to steal my recipe or improve on it and show me the results! If you don't, that's the beauty of it--you can design something completely different. Tag me on those, too! :)


Happy creating!
M.

Wednesday, May 3, 2017

Review: UberChic Beauty's Unicorn Love plate!

(Press samples ahead!)

Hello!


You know I don't do cutesy. But every rule is made to be broken, and I have two exceptions: Pusheen, and unicorns. Both can turn my frown upside down an any dreary day, so my soul rejoiced when I laid eyes on the new Unicorn Love plate from UberChic Beauty.

Here is my video review of the plate:


And let's take a closer look:

UberChic Beauty Unicorn Love

So many adorable unicorns on this plate! Long-maned unicorns and elegant unicorns and frolicking unicorns, and even chubby unicorns for those among us who believe that the more unicorn you have to love, the better. I adore the layering images--I'll use those hearts and stars and especially those gemstones over and over and over again. And, just to show you how weird my brain is (I think I'm already thinking about memorial day) how cute would the stars and hearts in the upper left corner be for making an American flag in red, white and blue?


UberChic Beauty's full-nail images are 17 x 21 mm, and here are a couple of shots with a ruler to help you judge how big the other images are:


 How do they stamp? I've some to expect excellence from UberChic Beauty plates. Here are swatches I did with a clear stamper:


Very nice--from the fine lines on the unicorns to the definition of the negative space image, these stamp well.


For my manicure, I started with a diagonal gradient of Zoya Abby, Tina, Jordan and Millie, then used a coat of Zoya Chloe, one of their flakie polishes from back in the day to add a sprinkle of extra magic. Then I stamped my rainbows with Messy Mansion Chalk. In the meantime, I made two unicorn decals with Messy Mansion Royal Purple for the outline, filled in with Zoya Amira and Hit The Bottle holographic stamping polishes in Lucky Spark for the hair and Holo There Beautiful for the horn (also available at Beautometry):


UberChic Beauty Unicorn Love over a gradient of Zoya Abby, Tina, Jordan, and Millie


UberChic Beauty Unicorn Love over a gradient of Zoya Abby, Tina, Jordan, and Millie


What do you think? I think this is just full of fun and happy. If you want to see how awesomely it went with my Starbucks Unicorn Frappuchino, check that out here. :)


You can find this plate in UberChic Beauty's store, and you can find them hanging out around the internet in these places:


Happy stamping!
M.

Tuesday, May 2, 2017

Review: 2X Super Chip Resistance polish life extender

(Press sample ahead!)


Hello!


I have something a little different to show you today, a chip resist product called 2X Super Chip Resistance. You all know I change my polish a lot so don't usually worry too much about chips, but for those occasions when I do need longer wear, I'm always on the lookout for products that can make this happen, so I was very interested to see how this product worked, particularly because it's made by the same man who invented Piggy Polish.


2X Super Chip Resistance


I followed the directions carefully by applying one coat of 2X to my clean nails on my middle finger and my pinkie finger, then put on my polish, then finished with one coat of 2X. On my index and ring finger, I didn't use the 2X, just used my regular base coat and finished with my normal Seche Vite.


I normally get 2-3 days with a polish before I see chips, so I wore the polish for a full six days to try out the full 2X effect.


I got my first chip on day 3, on my pinkie finger--which was one of the fingers that had the 2X. All the rest of the fingers were fine, though, so I waited until day 4 to take my first picture.


Here's how the nails looked on day 4 (I'll post the original mani shortly):

2X Super Chip Resistance on middle finger and pinkie, after 4 days


2X Super Chip Resistance on middle finger and pinkie, after 4 days


As you can see, the worst chipping is on the pinkie and the second worst chipping is on the middle finger, both of which were fingers I used the 2X on. The index finger also has some wear and chipping starting, although a little less than the middle finger.


Here's what it looked like on day 6:


2X Super Chip Resistance on middle finger and pinkie, after 4 days


The chipping on the middle and pinkie fingers--the two that I used 2X on--have major chipping and even some splitting. There is a little more tipwear on the other two nails, but not much.


So, sadly, the 2X didn't work well for me. However, everyone has different body chemistry, and I know lots of people who swear certain brands of polish dry quickly for them while others say the same brand takes forever, so you never know. The card and the website do mention the product is guaranteed, although I couldn't find any information on the website that gives any information about the guarantee (do they refund your full amount, under what circumstances, what about shipping, etc.).


You can find 2X Super Chip Resistance in their online store, here.


Happy polishing!
M.