Hello!
I'm back with that nail art I promised you, using Barielles Gentle Breeze collection (click here to see my review if you missed it). I'm thought I'd do something a little different today; I'm going to show you the manicure first, and then explain it in the form of a tutorial this time, since it's a combination of techniques I love and use on the blog together often.
Here's the mani, which I'm calling Starflash:
.JPG "Starflash") |
| Starflash! (Does anyone else hear the theme song from Flash Gordon?) |
Now let's talk about how I did it...
1) Choose two complementary colors to make a gradient. For mine, I chose Heaven Sent, the light blue creme from the collection, and Under The Sea, the teal shimmer:
.JPG) |
| Barielle Heaven Sent |
.JPG) |
| Barielle Under The Sea |
2) Paint your base polish as the lighter color, in this case, Heaven Sent. Some people start off with bare nails for their gradients, but I find when I do that, I get too much random pulling, which results in bald spots.
3) Put each shade together on a non-porous surface next to each other, and swirl the edges together with a dotting tool or orange stick like this:
 |
| Layout for your polishes |
I learned this technique from The Nailasaurus back in the day. This is certainly not a trick I originated! :)
4) Using a bit of make-up sponge, apply the polish to your nails. Move the sponge up and down in the direction of the gradient; lift your sponge of the nail when you move it, don't try to slide it up and down the nail. In other words, you're going to do this: dab-move up-dab-move down-dab-move up, etc.
.JPG) |
| Dab on your polish, moving the sponge up and down in between dabs. |
(Hey Michelle! What is that purple stuff you have on your cuticles there? Is it Liquid Palisade? No, but it's something very similar. You put it on to mask off your skin when you're doing messy nail art, then just peel it (and the excess polish) off when you're done. I will review it for you next time. In the meantime you can always just clean up with a brush and acetone, or try putting scotch tape around your nails before you do your gradient. :) )
5) Clean up your cuticles, and you'll have a gradient that looks something like this:
.JPG)
6) Stamp your image on top of your gradient. For my mani, I used the lower-right portion of Pueen 61, and stamped with Barielle Gray Sky:

So here's where things get tricky. the design I've chosen is the kind that, if not stamped perfectly straight, is going to look all crooked and weird. How do you stamp stripes, or stripe-like things like this, so that the lines don't warp? Excellent question! The trick is, rather than stamp across you nail from side-to-side like you normally would, stamp down your nail, from cuticle to tip, like this:
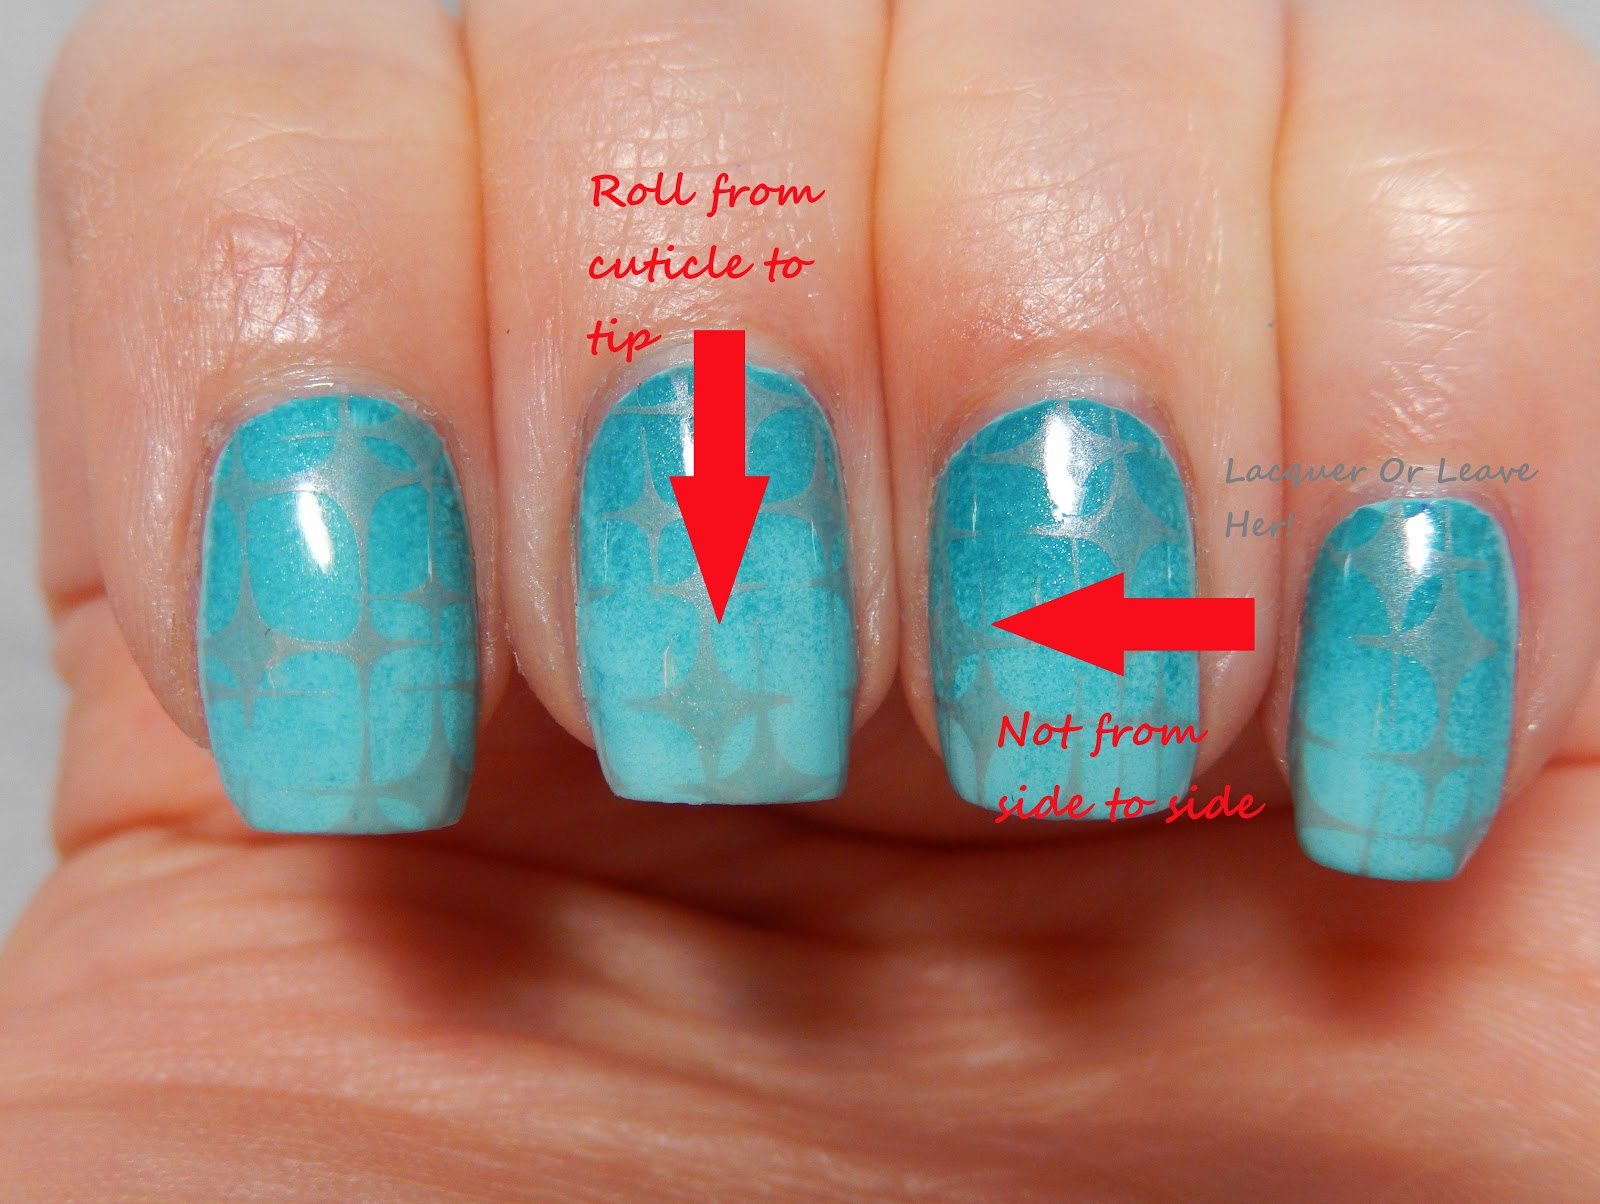 |
| Stamping vertical lines/stripes |
I place the stamper at the base of my cuticles, and look to make sure the lines are running the direction I want them to run. Then, I roll the stamp down my nail to the tip. Now, you may have to practice it a time or two, but it will come to you quickly.
Here again is the finished mani, for your viewing pleasure:
.JPG) |
| Starflash, the sequel |
.JPG) |
| Starflash claw |
And here is a pin-able tutorial graphic, should you want one. :)

Hope you're having a great week!
M.
Gorgeous! I love the blues!
ReplyDeleteAren't they awesome? The minute I took the collection out of the box, I was all 'Gradient!!!'
DeleteThis looks very pretty!
ReplyDeleteThank you so much!
DeleteGreat tip on rolling from cuticles to free end! I've always stamped this way but never actually thought about it. I saw the picture and had an aah-haa moment lol!
ReplyDeleteLOL!! So do you have problems with horizontal lines then?? ;-)
DeleteLove the step by step tutorials for these nails! I struggle with lining up my stamping so thank you for the tip on stamping from the cuticle and not from the side for those.
ReplyDeleteGlad to help! Vertical lines are impossible for me if I do it the side-to-side way.If I stamp directly down into a super squishy stamper that can work too, but sometimes I still get wobble that way. :(
DeleteLovely gradient! I've never done a gradient like this, I've just applied the polishes directly to my sponge. Definitely trying it next time!
ReplyDeleteHer tutorial came out right when I was learning the technique, so I've always done it that way. I think in theory it allows a little bit of a smoother blend between the polishes normally. The shimmer in Under The Sea gave a slightly different sort of look, which I love, but with two cremes I can get a pretty darn smooth look. :)
DeleteWow, what a WONDERFUL tip. I seriously am having this problem with quite a few of my images and I never thought to stamp vertically to lessen the warping, thanks so much!
ReplyDeleteGlad to help! Trying to get vertical stamping right any other way has driven me to the edge of sanity, lol!
DeleteThis gradient is really beautiful! And your stamping techniques have really helped too!
ReplyDeleteOh, I'm so glad to hear that! Thanks so much. :)
DeleteThere are several great tips in this post! I can't wait to try them out!
ReplyDeleteI hope they're helpful!! :)
DeleteBeautiful and subtle! I just got some of that type stuff to protect my cuticles and it's so awesome for stamping. Fantastic!
ReplyDeleteGood to hear--I haven't tried it with stamping yet, just with the messier stuff. But I should give that a try too!
DeleteI love that gradient! And I'll definitely have to use you technique for stamping lines!
ReplyDeleteThank you so much! I hope it helps. :)
DeleteLove the gradient and the stamp adds a little something special!
ReplyDeleteI gotta have my little somethin'!!
DeletePerfect stamping, erfect gradient, perfect tutorial!
ReplyDeleteAw, thank you so much! :) <3
DeleteWhat a beautiful mani! Your gradient is so pretty, and that stamping is spot on! Love it!
ReplyDeleteThank you soooo much! :)
DeleteThank you for the tutorial. I always have 2 issues - preparing smooth gradient base and right placement with stamper. Your tutorial has given me some tips to improve my issue. Now i can work on solving my problem areas with these tips :)
ReplyDeleteGlad to help! Let me know how it goes. :)
DeleteThat's a perfect tutorial!! thank you :)
ReplyDeleteI'm so glad it was helpful! :)
DeleteThis is lovely! And that's a great stamping tip, so thank you!
ReplyDeleteMy pleasure!! :)
DeleteThis is one gorgeous mani!
ReplyDeleteThank you so much. :)
DeleteGreat gradient and perfect stamping! Sooo love the whole thing!
ReplyDeleteThank you so much! Gradients make everything look good, don't they?
DeleteSuch a lovely use of the colors!!!
ReplyDeleteThank you so much!
DeleteGreat post. Thanks for putting all details. Loved your mani
ReplyDeleteThank you! I always try to remember to do more tutorials and then forget to take the right pictures for them...>.<
DeleteYay I love tutorials! I've never done my gradients like this, looks easier than what I do
ReplyDeleteWhich method do you do, paint directly on the sponge?
DeleteAwesome post, great tips, and beautiful mani :-)
ReplyDeleteThank you so much!! Glad it was useful. :)
DeleteI'm gonna have to try rolling vertically... I never thought that that's what's causing the warping.
ReplyDeleteI bet it would help. You'll still need to do it once or twice to get the hang of it, but it's soooo much easier!
DeleteIt's so intricate now that I've seen all the steps, I appreciate it more!
ReplyDeleteSuch a sweet thing to say, thank you!!
DeleteThis is such a beautiful mani. And what a different way to do gradients!
ReplyDeleteHats off to The Nailasaurus for that--she's awesome. :)
DeleteTHANK YOU for this!!!! That is such an easier way to do a gradient!!!
ReplyDeleteMy pleasure, I'm glad it was helpful!! I learned from her the first time I tried a gradient, and never looked back. :)
DeleteGorgeous mani! Thanks for the tip on stamping straight lines, that's going to help out a lot.
ReplyDeleteIt's such a life-saver...:)
DeleteIt's really lovely. great tut up der. I m gonna try this.
ReplyDeleteLet me know how it goes! :)
DeleteWhen doing "messy" manis, I just use that fancy peel off base coat (glue, basically) to protect my fingers; but I like your purple stuff better, because purple. :D
ReplyDeleteAnyway, what a lovely gradient! And that star-like stamping design looks great with it; feels like it should be used for some sci-fi book cover! :)
Is the one you use more like the liquid latex? I find the glue just a bit more of a pita to peel off, but it definitely works. :) And thank you! That's how I feel about it--like a retro 60's sci-fi thing. :)
Delete